Setting Up a Microsoft Active Directory (AD) Bridge

The Microsoft Active Directory (AD) Bridge provides a link between your AD enterprise directory structure and IAM.

Understand the Microsoft Active Directory (AD) Bridge

IAM can synchronize with this directory structure so that any new, updated, or deleted user or group records are transferred into IAM. Each minute, the AD Bridge polls AD for any changes to these records and brings these changes into IAM. So, if a user is deleted in AD, then this change will be propagated into IAM. Because of this synchronization, the state of each record is synchronized between AD and Identity Domains.

After users are synchronized from AD to IAM, if you activate or deactivate a user, modify the user's attribute values, or change the group memberships for the user in IAM, then these changes are propagated to AD through the AD Bridge.

Note

The AD organizational units (OUs) contain the users and groups that are imported into IAM.

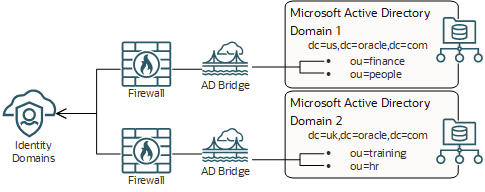
You can configure IAM to synchronize with one or multiple AD domains by installing an AD Bridge for each domain.

Note

You must install the AD Bridge on the machine that’s attached to the Microsoft Active Directory domain for auto discovery. You don’t have to install the bridge on the domain controller.
Figure 1. Inbound Directory Synchronization
Inbound directory synchronization from AD to IAM by installing and configuring an AD Bridge for each AD domain.
Figure 2. Outbound Directory Synchronization
Outbound directory synchronization from IAM to AD for updates to a user's activation status, attribute values, or group memberships.

In the diagram above, Clarence Saladna (CSALADNA) is a user who's been synchronized from AD to IAM through the AD Bridge. In IAM, an administrator deactivates Clarence's account because he's on vacation. Also, because Clarence received a promotion, he has a new job title of Director and belongs to different groups that are associated with his new role, including the Executive and Management groups. The AD Bridge can be used to propagate these changes to AD.

Both the AD Bridges and your AD enterprise directory structure are in your Microsoft Windows environment (for example, Microsoft Windows 2003). Because IAM is an Oracle Cloud service, it's in an Oracle environment.

Figure 3. Bridge Security
The Internet connection that links each AD Bridge to IAM contains a firewall.
Note

If an AD user attribute is multi-valued, then the AD Bridge will transfer only the first value of the attribute into IAM.

Certified Components

The following table lists the certified versions for IAM, AD, your operating system, and the Microsoft .NET software framework (which is required for the AD Bridge to run).

IAM AD 64–Bit Operating System .NET Framework
20.1.3

Microsoft Windows Server 2008

Microsoft Windows Server 2008 R2

Microsoft Windows Server 2012

Microsoft Windows Server 2012 R2

Microsoft Windows Server 2016

Microsoft Windows Server 2019

Yes

Windows 10 v1607 or later

Windows Server 2016 or later

Version 4.6+

Statuses

There are two statuses for the AD domain with which the AD Bridge is communicating:
  • Partially Configured: The AD Bridge is installed, but it's not configured to communicate with either the AD domain or IAM.

  • Configured: The AD Bridge is installed and configured, and available to synchronize with the AD domain.

There are three statuses for the AD Bridge:
  • Active: The AD Bridge is installed and configured, and available to synchronize with AD to retrieve user accounts and groups.

  • Inactive: The AD Bridge is installed and configured, but it's not available to synchronize with AD. For performance reasons, this is done.

  • Unreachable: The AD Bridge is installed and configured. However, one of the following conditions has occurred:
    • The back-end service used to establish communication between IAM and AD is stopped.

    • The IAM administrator uninstalled the client associated with the AD Bridge, but the bridge couldn't be removed from the Directory Integrations page of the IAM Console because the client can't connect to the Identity Domains server. IAM can't use the bridge to communicate with AD. See Remove a Microsoft Active Directory (AD) Bridge.

    • The administrator regenerated the Client Secret for the AD Bridge, and then uninstalled the client for the bridge.

Hardware Requirements

The minimum hardware requirements are:

  • 1 GB of RAM
  • 1 GB of disk space
  • A quad-core CPU

Why Use the Microsoft Active Directory (AD) Bridge?

Most customers have AD as their central directory service. These customers also use AD as their network directory. This directory is where all of their workstations are connected to and from where they manage their users.

In addition to AD, customers use an enterprise LDAP to centralize all of their user identities. So, a customer uses AD to manage their employees, but in the centralized LDAP, the customer manages their partners, consumers, and any other users with which the customer has relationships.

For these reasons, it's imperative that IAM can integrate with both AD and an enterprise LDAP (for example, Oracle Internet Directory).

By using IAM, customers can control when they will migrate their directory-based applications to the cloud. In the interim, they can use one of the following:
  • AD Bridge: This bridge provides a link between your AD enterprise directory structure and IAM. IAM can synchronize with this directory structure so that any new, updated, or deleted user or group records are transferred into IAM. Each minute, the bridge polls AD for any changes to these records and brings these changes into IAM. So, if a user is deleted in AD, then this change will be propagated into IAM. As a result, the state of each record is synchronized between AD and IAM. After the user is synchronized from AD to IAM, if you activate or deactivate a user, modify the user's attribute values, or change the group memberships for the user in Identity Domains, then these changes are propagated to AD through the AD Bridge.
  • Provisioning Bridge: This bridge provides a link between your enterprise LDAP (such as Oracle Internet Directory) and IAM. Through synchronization, account data that’s created and updated directly on the LDAP is pulled into IAM and stored for the corresponding IAM users and groups. As a result, any changes to these records will be transferred into IAM. Because of this, the state of each record is synchronized between the LDAP and IAM. See Managing Provisioning Bridges.

About Multiple AD Bridges for High Availability and Load Balancing

If you only have one Microsoft Active Directory (AD) Bridge component in one Windows Service connecting to your Active Directory domain, it can be a single point of failure in the architecture.

To avoid this, IAM supports the installation of multiple AD Bridge instances mapping to the same Active Directory domain.

The maximum number of AD Bridges that an administrator can install per domain must not exceed five (5). In addition, the maximum number of domains that an administrator can configure per tenant must not exceed 10. To configure these limits, raise an SR with Oracle Support.

With a AD Bridge High Availability (HA) deployment of at least two AD Bridges per domain, delegated authentication and data synchronization loads can be shared among all the AD Bridges. The allocation of requests to a AD Bridge is completely random, depending on the availability of that particular AD Bridge. One delegated authentication request will be picked up by one AD Bridge. An AD Bridge can pick delegated authentication and full or incremental synchronization as well. Both AD Bridges have the capability to perform data synchronization and delegated authentication simultaneously. However, only one AD Bridge can perform data synchronization of a domain at a time.

This diagram shows a high availability deployment of at least two AD Bridges per domain, you can distribute delegated authentication and data synchronization requests among all the AD Bridges.

Enable HA for an Existing Deployment

Prerequisites

  • Ensure that you have upgraded the existing AD Bridge to version 20.1.3 and greater for every domain that you have configured.
  • AD Bridge HA must be enabled for you. Once all AD Bridges in all domains have been upgraded to version 20.1.3 or greater, enter an SR with Oracle Support to enable HA. Once HA is enabled, it is enabled for all configured domains.

Limitations

Note the following limitiations for AD Bridge HA.
  • Only one AD Bridge can be configured in one Windows machine. To configure multiple AD Bridges you have to use multiple Windows machines in the same domain. Note that without AD Bridge HA enabled by Oracle Support, installation of second AD Bridge for the domain will fail.
  • Maximum of 5 AD Bridges per domain can be configured by an Administrator for HA and load sharing.
  • AD Bridge HA won’t work if any one of the AD Bridges installed for a domain is version 19.3.3 and below. To check the version of an AD bridge, open the AD Bridge user interface and note the version in the bottom right corner of the window.
Note

If additional bridges won’t install for a domain, make sure that all prerequisites are met and that none of the constraints apply to your environment.

Enable HA for a New Deployment

Enable HA

AD Bridge High Availability must be enabled for you. Enter an SR with Oracle Support to enable the feature.

Limitations

Note the following limitations for AD Bridge High Availability.
  • AD Bridge HA will not work if any one of the AD Bridges installed for a domain is version 19.3.3 and below.
  • Only one AD Bridge can be configured in one Windows machine. To configure multiple AD Bridges you have to use multiple Windows machines in the same domain. Note that without AD Bridge HA enabled by Oracle Support, installation of second AD Bridge for the domain will fail.
  • Maximum of 5 AD Bridges per domain can be configured by an Administrator for HA and load sharing.
Note

If additional bridges won’t install for a domain, make sure that all prerequisites are met and that none of the constraints apply to your environment.

Checking a Bridge Data Synchronization Status

  1. In the IAM Console, expand the Navigation Drawer, click Settings, and then click Directory Integrations.
  2. Check the status. You should see examples like the below.
    Figure 4. No AD Bridges are running Active Sync.
    Figure 5. One AD Bridges is running Active Sync.

Test Active Directory Connectivity

There are 2 types of connectivity in AD Bridge:
  • Connectivity between AD Bridge and LDAP server of Active Directory
  • Connectivity between AD Bridge and IAM
To test the connectivity of AD Bridge follow below steps:
  1. Open ADBridgeUI.exe. It’s in the ADBridge installation folder. The default path is C:\Program Files\Oracle\IDBridge.
  2. Click the Test Connectivity button.

AD Bridge Connectivity Notifications

Learn about notifications that IAM sends to the tenant admin when connectivity between AD Bridge and the IAM server is broken and also when it is restored.

Notifications sent when connectivity of AD Bridge with IAM server is broken

Oracle sends notifications to the tenant admin when connectivity between AD Bridge and the IAM server is broken. Connectivity could be broken because of multiple reasons, for example if the AD Bridge is stopped or if the IAM is stopped on the Windows machine.

The notifications will have the email subject: Connectivity to AD bridge <windows machine name> is unreachable.

Notifications sent when connectivity of AD Bridge with IAM server is restored

Similarly, when connectivity is restored, an email will be sent from Oracle to the tenant administrator.

The notifications will have the email subject: Connectivity to AD bridge <windows machine name> is restored.

Use REST API to Configure Email Notifications

Using the REST API, Administrators can configure who should receive email notifications when connectivity is broken and restored.

The Administrator can provide comma separated list of emails IDs to which to send the notifications using PATCH /admin/v1/Settings/Settings.

Example payload:
{
    "schemas":[       
      "urn:ietf:params:scim:api:messages:2.0:PatchOp"
    ],
    "Operations":[
       {
           "op": "replace",
           "path":         "contactEmails",
           "value": [             
        "admin@oracle.com",             
        "<emailid>@gmail.com"             
      ]
       }
          
             ]
}

Set Permissions for Your Microsoft Active Directory (AD) Account

Use your Microsoft Active Directory (AD) domain administrator account to create an AD Bridge. Before creating this bridge, you must set permissions for your account. You must set these permissions so that you can install the bridge and configure delegated authentication for it.

With delegated authentication, identity domain administrators and security administrators don’t have to synchronize user passwords between AD and IAM. Users can use their AD passwords to sign in to IAM to access resources and applications protected by IAM.

Setting Permissions to Synchronize Users, Groups, and Group Membership

Set permissions for your Active Directory Bridge service account so that you can synchronize users, groups, or OUs between Microsoft Active Directory (AD) and Identity Domains.
  1. Use your domain administrator credentials to sign in to the machine that contains your AD server.
  2. Open a command window.
  3. Set the Generic Read permissions for the users, groups, and organizational units (OU) in the AD domain that you want to import into Identity Domains:
    dsacls <AD_Domain_Name> /I:T /g "<AD_Domain_Name>\<User/Group_Name>:GR"
    Note

    <AD_Domain_Name> is the name of the domain that you're associating with IAM and <User/Group_Name> is the username of your domain administrator account.

    /I:T: This parameter specifies the objects to which you are applying the permissions. T is the default, which means you can propagate inheritable permissions to this object and child objects down to one level only.

    /g: This parameter grants the permissions that you specify to the user or group. For example, /g {<user> | <group>}:<permissions>.

    <permissions>: This parameter specifies the type of permissions that you are applying.
    • GR: Generic Read
    • GW: Generic Write
    • LC: List the child objects of the object
    • RP: Read Property
  4. Set the List Children and Read properties for the cn=Deleted Objects container with inheritance. This container is also in the AD domain that you're associating with IAM.
    dsacls "cn=deleted objects,<AD_Domain_Name>" /takeOwnership
    dsacls "cn=deleted objects,<AD_Domain_Name>" /I:T /g "<AD_Domain_Name>\<User/Group_Name>:LCRP"
    Note

    If you don't have the above permissions, then the AD Bridge won’t be able to synchronize deleted users, groups, or OUs between AD and IAM. This will cause inconsistencies between AD and IAM.

Setting Permissions to Propagate Changes to Microsoft Active Directory

Set permissions for your Active Directory Bridge service account so that you can propagate changes you have done in IAM to Microsoft Active Directory (AD) through the AD Bridge.
  1. Use your domain administrator credentials to sign in to the machine that contains your AD server.
  2. Open a command window.
  3. Set the Generic Write permission for the users, groups, and organizational units (OU) in the AD domain, if you want to propagate the changes you have done in IAM to Active Directory.
    dsacls <AD_Domain_Name> /I:T /g "<AD_Domain_Name>\<User/Group_Name>:GW"

Setting Permissions for Delegated Authentication

Set permissions for your Microsoft Active Directory (AD) domain administrator account so that you can configure delegated authentication for the AD Bridge.
  1. Open Active Directory Users and Computers.
  2. Right-click the user, group, or organizational unit (OU) that you want to delegate, and then click Delegate Control.
  3. On the Delegation of Control wizard, click Next, and then click Add.
  4. On the Select Users, Computers, or Groups dialog box, in the text area, enter the user name or group name that needs to be granted permissions to configure delegated authentication.
  5. Click Check Names to verify that the user or group has been created in AD. If it hasn't been created, then create it.
  6. Click OK, and then click Next.
  7. Select the Delegate the following common tasks option, and then select Reset user passwords and force password change at next logon.
  8. Click Next, and then click Finish.
    The next steps explain how to set specific permissions to lock and unlock user accounts.
  9. Right-click on the newly modified user or group, and select Properties.
  10. Select the Security tab, click Advanced.
  11. On the Advanced Security Settings, click Add.
  12. On the Permission Entry wizard, click Select a principal, and enter the same user name or group name that has been granted reset permission.
  13. Click OK.
  14. In the Applies to field, select Descendant User objects.
    The list of permissions allowed for the user account (Principal) displays.
  15. Scroll down and enable Read lockoutTime, and Write lockoutTime.
  16. Click OK and continue to click OK until the end of the setup.
    The user account now has permissions to change passwords for all the user objects present in the high-level context.

Creating a Microsoft Active Directory (AD) Bridge

To create a Microsoft Active Directory (AD) Bridge that provides a link between your AD enterprise directory structure and IAM, you must be assigned to either the identity domain administrator role or the security administrator role. You must also have administrative rights to access the AD domain that you want to monitor by using the bridge.

Part of creating the AD Bridge is providing administrative credentials for both AD and IAM. The bridge requires these credentials to communicate with AD and IAM as an administrator.

Important

The AD account used to install the AD Bridge should have the following permissions:
  • Generic Read for the users and groups in the AD domain that you want to import into IAM

  • Generic Read for all organizational units (OUs) in the domain

  • Generic Read for the cn=Configuration container in the domain

  • The List Children and Read properties for the cn=Deleted Objects container with inheritance

If this account is also used to configure delegated authentication for the AD Bridge, then the account should have the following permissions:

  • Change Password

  • Reset Password

  • Read pwdLastSet

  • Write pwdLastSet

  • Read lockoutTime

  • Write lockoutTime

You can access the Managing security settings infographic to see how to create an AD Bridge.

  1. Open the navigation menu and click Identity & Security. Under Identity, click Domains.
  2. Select the identity domain you want to work in and click Settings and then Directory integration.
  3. Click Add.
  4. In the Install a bridge for Microsoft Active Directory page, make a note of the Identity Domains URL, Client ID, and Client Secret.
    The IAM URL contains the name and port number for your Identity Domains identity domain. The Client ID and Client Secret are used by the AD Bridge to access IAM as an administrator.
    Note

    The Client Secret is encrypted (for security purposes). To see the Secret in clear text, click Show Secret. To regenerate the Secret for the AD Bridge, click Regenerate.
  5. Click Download.
    IAM downloads the client for the AD Bridge.
    Note

    Don’t close the Install a bridge for Microsoft Active Directory page. You'll need to reference the IAM URL, Client ID, and Client Secret when creating the AD Bridge.
  6. To install the client for the AD Bridge, double-click the ad-id-bridge....exe file.
    The Welcome to AD Bridge Installer window appears.
  7. In the Language Selection area, select the language that you want to use to install the client for the AD Bridge, and then click OK.
    The IAM Microsoft Active Directory Bridge Installer appears.
    Tip

    While you’re installing the client for the AD Bridge, IAM generates log files for the bridge automatically, and stores them in the %Temp% directory.
  8. If the Open File — Security Warning dialog box appears, then click Run. Otherwise, go to step 8.
  9. In the Welcome dialog box, click Next.
  10. In the Destination Folder dialog box, choose one of the following install choices:
    • To install the client in the default directory, click Next.
    • To select another directory to install the client:
      1. Click Browse.

      2. In the Browse For Folder dialog box, select the directory where Identity Domains will install the client.

      3. Click OK.

      4. Click Next.

  11. In the Specify Proxy Server dialog box:
    1. If your organization has a firewall in place and requires communication to be handled using an HTTP Proxy Server, then select Use Proxy Server. If you select this check box, then provide the full path (or address) of the proxy server and the administrator credentials for connecting to the proxy server.
    2. If your organization doesn’t require communication to be handled using an HTTP Proxy Server, then don't select Use Proxy Server.
    3. Click Next.
  12. In the Specify Credentials dialog box:
    1. Provide the Cloud Service URL, Client ID, and Client Secret.
      Tip

      These credentials appear on the Install Bridge page of the IAM Console.
    2. Click Test.

      The AD Bridge attempts to connect to the IAM server.

      If a connection can be established, then a Connection Successful! confirmation message appears.

      Otherwise, you’ll receive an error message, indicating that you entered an incorrect Cloud Service URL, Client ID, or Client Secret. Modify the incorrect values, and click Test again.

    3. Click Next.
  13. In the Specify Microsoft Active Directory Credentials dialog box, provide the following connection details to the AD server:
    1. Username: The AD account that the AD Bridge uses to access the AD server.
    2. Password: The password for the AD account.
    3. Use SSL: If you're connecting to the server via an SSL connection, then leave this check box selected. Otherwise, deselect it.
      Note

      Oracle recommends that you keep the Use SSL check box selected because this results in a faster and more-secure connection. After you select or deselect this check box, and install the client for the AD Bridge, you can't modify this setting.
    4. Click Test.

      The AD Bridge attempts to connect to the AD server.

      If a connection can be established, then a Connection Successful! confirmation message appears.

      Otherwise, you’ll receive an error message, indicating that:
      • You entered an incorrect username or password. Modify the incorrect values, and click Test again.

      • You're attempting to connect to the AD server via an SSL connection, but the certificate for the server isn't trusted. Make sure that this certificate is valid, and is present in the trust store of your machine. Then, click Test again.

    5. Click Next.
  14. In the Summary dialog box, click Close.
  15. In the IAM Console, access the Directory integrations page.
    The AD Bridge that you created for the AD domain appears with a status of Partially configured. The bridge is created, but not configured. See Configure a Microsoft Active Directory (AD) Bridge for more information about configuring this bridge.
    Note

    If you don't see the AD Bridge in the Directory integrations page, then refresh your web browser. Also, you can create only one bridge per AD domain.

Configuring a Microsoft Active Directory (AD) Bridge

After creating a Microsoft Active Directory (AD) Bridge, you configure it by:

  • Selecting the AD organizational units (OUs) and groups with which you want IAM to synchronize using the AD Bridge. The OUs contain the users that you want to import into IAM. By synchronizing with AD, the bridge can transfer new, updated, or deleted user or group records into IAM.

  • Specifying whether, after a user or group is synchronized from AD to Identity Domains, if you activate or deactivate a user, modify the user's attribute values, or change the group memberships for the user in IAM, these changes will be propagated to AD.
  • Scheduling how often you want IAM to use the AD Bridge to import users and groups from AD.

  • Defining custom attribute mappings between AD and IAM.

  • Specifying whether users can use their IAM or AD passwords, or their federated accounts, to authenticate into IAM to access resources that are protected by IAM, such as the My Profile Console, the IAM Console, or any apps assigned to the users.

You can access the Managing Security Settings infographic to see how to configure an AD Bridge.

  1. Open the navigation menu and click Identity & Security. Under Identity, click Domains.
  2. Select the identity domain you want to work in and click Settings and then Directory integration.
  3. Click the AD Bridge that you want to configure.
    Note

    The bridge has a status of Partially Configured.
  4. In the Configure the Microsoft Active Directory Domain page, configure the AD domain to poll for changes to users or groups in AD and import those changes into IAM.
    1. In the Select organizational units (OUs) for users and Select organizational units (OUs) for groups panes:
      1. Select the Include Hierarchy check box. If you select a parent OU, then all children OUs will be selected. The OUs contain the users and groups that you want to import into IAM.

        OR

        Deselect the check box. If you select a parent OU, then children OUs won’t be selected.

      2. Select the check box for each OU that contains users or groups with which you want IAM to synchronize using the AD Bridge.

        Note

        If you don’t see any OUs for users or groups in the Select organizational units (OUs) for users and Select organizational units (OUs) for groups panes, then refresh your web browser.

        To force a full synchronization between AD and IAM, deselect all check boxes for selected user or group OUs, click Save, and then in the Save Configuration Changes? dialog box, click OK. Then, click Import to import the users and groups from AD.

      3. Optional. In the Filter text box, enter a custom filter to search for user or group OUs. For example, entering (sn=Smith) will return all users with the last name of Smith. Or, enter (department=IT) to return the IT group.

      Tip

      • To select all users or groups, select the Include Hierarchy check box, and then select the top-most check box in each pane.

      • In the Filter text box, you can’t enter more than 4,000 characters.

      • The wildcard character * is allowed, except when the AD Attribute is a DN attribute. For more information about AD filters, click here.

      • You can use the Filter text box to synchronize users from AD to IAM based on their group memberships rather than their OUs. To do this, don't deselect the check boxes for the OUs. Instead, in the Filter text box, provide the custom group membership filters.
      • If there's a mismatch between the number of users or groups you're expecting to be transferred into IAM and how many users or groups are actually imported, then use Active Directory Users and Computers to test the custom filter in AD to verify that the users and groups brought into IAM are correct.

      • The names of the users that you want to import into IAM must contain at least three characters. The names of the groups that you want to import into IAM must contain at least five characters.

      • The telephone numbers of the users that you want to import must meet the requirements of the RFC 3966 specification.

    2. In the Supported Operations area, choose which operations for IAM users or groups will be propagated to AD:
      • If you activate or deactivate IAM users, and you want these user activation status changes to be reflected in AD, then select the Activate/Deactivate Users check box. Otherwise, leave this check box deselected.
      • If you edit attribute values for IAM users, and you want these modifications to be passed to AD, then select the Update Users Attributes check box. Otherwise, leave this check box deselected.
      • If you change the groups to which IAM users belong, and you want these group membership changes to be propagated to AD, then select the Update Groups check box. Otherwise, leave this check box deselected.
    3. In the Set import frequency area, schedule how often, in hours and minutes, you want IAM to use the AD Bridge to import users and groups from AD.
      Important

      During an incremental synchronization cycle, if there are more than 100,000 group membership changes in Microsoft Active Directory, then the synchronization cycle might take more than one hour. Microsoft Active Directory needs this time to process the change logs.
    4. In the Configure Attribute Mappings area, click Edit Attribute Mappings to define custom attribute mappings between AD and IAM. See Define Attribute Mappings for a Microsoft Active Directory (AD) Bridge. Otherwise, go to step e.
    5. In the Authentication Settings area, select Enable local authentication if you want users to use their IAM or their AD passwords to authenticate into IAM to access IAM-protected resources.

      If you select this option, then configure delegated authentication for this AD Bridge. By activating delegated authentication, users transferred into IAM through the bridge will use their AD passwords to sign in to IAM. By deactivating delegated authentication, users must use their IAM passwords to authenticate into IAM.

      Also, if you select Enable local authentication, then keep Don't send Welcome Notifications deselected to have IAM notify users by email that they must activate the IAM accounts that are created for them.

      Otherwise, if you don't want users to be notified that IAM created accounts for them, then select the Don't send Welcome Notifications check box.

      If you want users to use their federated accounts to authenticate into IAM, then select Enable federated authentication.

      Note

      If you select this option, then configure SSO through the Identity Providers page.
      Important

      By selecting Enable federated authentication, any user accounts that are transferred into IAM through the AD Bridge are classified as federated accounts. For referential integrity purposes, you can't deactivate, remove, or change the status of these user accounts to nonfederated.
    6. Click Save.
  5. In the Confirmation window, click OK.
    The status of the AD Bridge changes from Partially Configured to Configured. The bridge is created and configured.
    Important

    Before you use the AD Bridge to import any AD user accounts into IAM, enable the Password Never Expires option for the accounts in AD. Otherwise, the passwords for the accounts will expire. If this occurs, then you can change the passwords.
    Note

    If you use the AD Bridge to import a group into IAM, and then delete the group in IAM, you can re-establish a link between the group in AD and the group in IAM. To do so:
    1. In the Select organizational units (OUs) for groups pane, clear the check box for the designated group, and click Save.

    2. Select the check box for the group, and click Save again.

    3. Run the AD Bridge to synchronize the group between Identity Domains and AD immediately.

Defining Attribute Mappings for a Microsoft Active Directory (AD) Bridge

By default, when you create a Microsoft Active Directory (AD) Bridge, attribute mappings are defined between AD and IAM. Attribute mappings enable the AD Bridge to pass values associated with user accounts between AD and IAM.

You can map attributes in two different ways: inbound and outbound. Inbound mappings allow you to map attributes from AD to IAM. Outbound mappings allow you to map any changes in IAM attributes to AD attributes.

For example, when you run the AD Bridge, the bridge can use the givenName - First Name mapping to transfer the first name of the user account from the First name field on the General tab of the Properties window of AD to the First Name field on the Details tab of the Users page of IAM. Similarly, you can perform an outbound mapping so that when you make any change to the first name of the user account in IAM, this change is reflected in AD.

In addition to the predefined attribute mappings, you can define custom attribute mappings between AD and IAM.

  1. Open the navigation menu and click Identity & Security. Under Identity, click Domains.
  2. Select the identity domain you want to work in and click Settings and then Directory integration.
  3. Click the AD Bridge for which you want to define custom attribute mappings.
  4. Click Configuration.
  5. In the Configure Attribute Mappings area, click Edit Attribute Mappings. In the Edit Attribute Mappings window, two tabs appear:
    • Microsoft Active Directory to Identity cloud: This tab contains inbound attribute mappings from AD to IAM.
    • Identity cloud to Microsoft Active Directory: This tab contains outbound attribute mappings from IAM to AD.
  6. If you want to define inbound attribute mappings, then click the Microsoft Active Directory to Identity cloud tab. Otherwise, go to step 9.
    You'll see predefined inbound mappings from AD to IAM. These mappings include:
    List of predefined attributes Required Description
    sAMAccountName Yes The user's user name.
    givenName No The user's first name.
    sn Yes The user's last name.
    middleName No The user's middle name.
    displayName No The user's display name.
    title No The user's job title.
    preferredlanguage No The user's preferred language (for example, English).
    localeID No The user's language and region (locale).
    mail Yes The user's email address.
    telephonenumber No The user's telephone number.
    homePhone No The user's home telephone number.
    mobile No The user's mobile telephone number.
    postalAddress No The user's postal address.
    streetAddress No The user's street address.
    l No The user's work location.
    st No The state of the user's work address.
    postalCode No The zip code of the user's work address.
    c No The country of the user's work address.
    usercertificate No This multi-valued attribute contains the DER-encoded X509v3 certificates issued to the user.
    userAccountControl Yes Specifies flags that control behavior for the user, such as whether the user has an Active or Inactive status, or whether the user's account is locked.
  7. Click Add Row because you want to define an inbound attribute mapping from AD to IAM.
  8. In the Directory User Attributes column, select the name of the AD attribute that contains a value which you want to transfer into IAM. If the attribute id is not available in the drop-down list, you can enter the new attribute name. After you save the changes, this new attribute will appear in the drop-down list.
  9. In the IAM User Attributes column, enter or select the name of the IAM attribute that will contain the value transferred from AD.
  10. If you want to define outbound attribute mappings, then click the Identity cloud to Microsoft Active Directory tab. Otherwise, go to step 13.
    You'll see predefined outbound mappings from IAM to AD. These mappings include:
    List of predefined attributes Required Description
    User Name No The user's user name.
    Display Name No The user's display name.
    Work Email No The user's work-related email address.
    First name No The user's first name.
    Last name No The user's last name.
    Middle name No The user's middle name.
    Title No The user's job title.
    Locale No The user's language and region (locale
    Preferred Language No The user's preferred language (for example, English).
    Work Phone number No The user's work-related telephone number.
    Mobile Phone number No The user's mobile telephone number.
    Work Address Formatted No The user's work-related postal address.
    Work Street Address No The user's street address.
    Work Locality No The user's work location.
    Work Address Region No The state or region of the user's work address.
    Work Address Zip Code No The zip code of the user's work address.
    Work Address Country No The country of the user's work address.
    Home Phone number No The user's home telephone number.
  11. Click Add Row because you want to define an outbound attribute mapping from IAM to AD.
  12. In the IAM User Attributes column, enter or select the name of the IAM attribute that contains a value which you want to transfer into AD.
  13. In the Directory User Attributes column, enter or select the name of the AD attribute that will contain the value transferred from IAM.
  14. Click Save.

Understanding Full and Incremental Sync

You can synchronize users and groups from selected organizational units (OUs) in Microsoft Active Directory (AD) into IAM. You can perform either an incremental sync or a full sync. Learn about syncing new OUs and read some example use cases.

Syncing New Organizational Units

Before 20.1.3, OU sync was triggered by the Bridge every minute so that newly added OUs in Active Directory were automatically available in IAM. Starting with the 20.1.3 release, when you add a new organizational unit (OU) in Active Directory, you must perform an incremental or full sync to see the newly created OU in IAM. Oracle recommends that you to run an incremental sync when adding new OUs.

Use Case: Delete Users and Groups from Microsoft Active Directory (AD)

Microsoft Active Directory (AD) is an authoritative source. Users that are deleted from AD are unlinked and deactivated in IAM. You can then remove these users from IAM.

When groups are deleted from AD, upon a full or incremental sync, these groups are also removed from IAM.

Use Case: Reattach an Unlinked User in IAM

Consider you want to create previously unlinked users in Microsoft Active Directory (AD) with the same usernames. When you next perform a full or an incremental sync, these users in AD are reattached to the associated users in IAM.

The reattached user’s authentication will be delegated to AD if delegated authentication is activated in IAM. For example, a user is synced from multiple AD domains into IAM. All of these domains are authoritative because AD is an authoritative source. If you delete a user from one of the domains, then the user is unlinked in IAM. If you resync the user to a different AD domain, then this domain now becomes authoritative for the user.

Activate and Deactivate Microsoft Active Directory (AD) Bridges

Use IAM to activate and deactivate Microsoft Active Directory (AD) Bridges:

  • Deactivate: Disable the link between your AD enterprise directory structure and IAM.

  • Activate: Enable the link between IAM and AD.

Modify a Microsoft Active Directory (AD) Bridge

You can change the following items for a Microsoft Active Directory (AD) Bridge:

  • The AD users and groups that you want IAM to import using the AD Bridge.
  • Whether, after a user or group is synchronized from AD to IAM, if you activate or deactivate a user, modify the user's attribute values, or change the group memberships for the user in IAM, these changes will be propagated to AD.
  • How often you want IAM to use the AD Bridge to import users and groups from AD.
  • The predefined and custom attribute mappings defined between AD and IAM.
  • Whether users can use their AD or their IAM passwords, or their federated accounts, to sign in to IAM to access resources protected by IAM, such as the My Profile Console, IAM Console, and apps assigned to the users.
Note

You can upgrade the client for the AD Bridge. By doing this, you can install the latest client without removing the existing client that's installed.

To upgrade the client, download it and follow the instructions in Create a Microsoft Active Directory (AD) Bridge. When you see the Specify Oracle Identity Cloud Service Credentials or the Specify Microsoft Active Directory Credentials dialog boxes, the client will use the credentials you provided in the previous installation. For this reason, the values are greyed out so they can't be edited.

Using the Console

Activating a Microsoft Active Directory (AD) Bridge
Activate a single Microsoft Active Directory (AD) Bridge.
  1. Open the navigation menu and click Identity & Security. Under Identity, click Domains.
  2. Select the identity domain you want to work in and click Settings and then Directory integration.
  3. Click the Action menu The Action menu to the right of the domain that contains the AD Bridge that you want to activate.
  4. Select Activate.
  5. In the Confirmation window, click OK.
    By activating the domain, you're activating the AD Bridge associated with the domain. The status of the bridge changes from Inactive to Active.
Deactivating a Microsoft Active Directory (AD) Bridge
Deactivate a single Microsoft Active Directory (AD) Bridge.
  1. Open the navigation menu and click Identity & Security. Under Identity, click Domains.
  2. Select the identity domain you want to work in and click Settings and then Directory integration.
  3. Click the Action menu The Action menu to the right of the domain that contains the AD Bridge that you want to deactivate.
  4. Select Deactivate.
  5. In the Confirmation window, click OK.
    By deactivating the domain, you're deactivating the AD Bridge associated with the domain. The status of the bridge changes from Active to Inactive.
Activating All Microsoft Active Directory (AD) Bridges
Activate all Microsoft Active Directory (AD) Bridges simultaneously.
  1. Open the navigation menu and click Identity & Security. Under Identity, click Domains.
  2. Select the identity domain you want to work in and click Settings and then Directory integration.
  3. Click Activate All.
  4. In the Confirmation window, click OK.
    By activating all domains, you're activating the AD Bridge associated with each domain. The status of each bridge changes from Inactive to Active.
Deactivating All Microsoft Active Directory (AD) Bridges
For security purposes, deactivate all Microsoft Active Directory (AD) Bridges simultaneously.
  1. Open the navigation menu and click Identity & Security. Under Identity, click Domains.
  2. Select the identity domain you want to work in and click Settings and then Directory integration.
  3. Click Deactivate All.
  4. In the Confirmation window, click OK.
    By deactivating all domains, you're deactivating the AD Bridge associated with each domain. The status of each bridge changes from Active to Inactive.
Viewing Details About a Microsoft Active Directory (AD) Bridge
By default, you can see the domain name and status for each Microsoft Active Directory (AD) Bridge. You might want to see other information about the AD Bridge, such as its configuration information, attribute mappings, and a synchronization log of the communication between IAM and AD.
  1. Open the navigation menu and click Identity & Security. Under Identity, click Domains.
  2. Select the identity domain you want to work in and click Settings and then Directory integration.
  3. Click the AD Bridge about which you want to see more information.
Modifying a Microsoft Active Directory (AD) Bridge
From Directory Integrations, modify a Microsoft Active Directory (AD) Bridge.
  1. Open the navigation menu and click Identity & Security. Under Identity, click Domains.
  2. Select the identity domain you want to work in and click Settings and then Directory integration.
  3. Click the AD Bridge that you want to modify.
  4. To edit configuration information about the AD Bridge, go to step 4. Otherwise, go to step 5.
  5. Click Configuration.
    1. In the Select organizational units (OUs) for users and Select organizational units (OUs) for groups panes, select or deselect check boxes to enable or prevent IAM from importing users and groups using the AD Bridge.
      See Configure a Microsoft Active Directory (AD) Bridge for more information about the Select organizational units (OUs) for users and Select organizational units (OUs) for groups panes.
    2. In the Supported operations area, select or deselect check boxes to enable or prevent IAM from propagating changes for a user's activation status, attribute values, or group memberships to AD.
      See Configure a Microsoft Active Directory (AD) Bridge for more information about the Supportedoperations area.
    3. In the Set import frequency area, change how often you want IAM to use the AD Bridge to import users and groups from AD.
    4. In the Configure attribute mappings area, click Edit attribute mappings. The Edit attribute mappings window opens and two tabs appear:
      • Microsoft Active Directory to Identity cloud: In this tab, you can modify inbound attribute mappings from AD to IAM.
      • Identity cloud to Microsoft Active Directory: Use this tab to modify outbound attribute mappings from IAM to AD.
      1. Click the Microsoft Active Directory to Identity cloud or Identity cloud to Microsoft Active Directory tab.

      2. In the Directory User Attributes and IAM User Attributes columns, change the AD or IAM attribute used for the predefined or custom attribute mapping.

      3. To remove an attribute mapping, click the X button to the right of the mapping.

        Note

        Inbound attribute mappings with asterisks in the Microsoft Active Directory to Identity cloud tab are required by the AD Bridge to pass values associated with AD user accounts into IAM so that the accounts can be created in IAM. You can't delete these mappings.
      4. Click Save to close the Edit Attribute Mappings window.

      See Define Attribute Mappings for a Microsoft Active Directory (AD) Bridge for more information about the Directory User Attributes and IAM User Attributes columns of the Microsoft Active Directory to Identity cloud and Identity cloud to Microsoft Active Directory tabs of the Edit Attribute Mappings window.
    5. In the Authentication Settings area, select the Enable local authentication option if you want users to use their IAM or their AD passwords to sign in to IAM to access IAM-protected resources.

      If you select this option, then configure delegated authentication for the AD Bridge. See Configure a Microsoft Active Directory (AD) Bridge.

      If you select Enable local authentication, then select or deselect Don't send Welcome Notifications to enable or prevent IAM from notifying users by email that they must activate the IAM accounts that are created for them.

      Otherwise, select Enable federated authentication to have users use their federated accounts to sign in to IAM.

    6. Click Save.
    7. In the Confirmation window, click OK.
    See Configure a Microsoft Active Directory (AD) Bridge for more information about the areas of the Configuration tab.
Synchronizing IAM with Microsoft Active Directory (AD) Bridge

You can run a Microsoft Active Directory (AD) Bridge to synchronize IAM with AD immediately.

As part of configuring an AD Bridge, you specified how often, in hours and minutes, you want IAM to use the bridge to import users and groups from AD. You're synchronizing IAM with your AD enterprise directory structure.

When the interval you specified elapses, IAM synchronizes with the directory structure so that any new, updated, or deleted user or group records are transferred into IAM. Because of this, the state of each record is synchronized between AD and IAM.

For security purposes, you may want to import users and groups from AD immediately. There are two types of imports that you can run:
  • Full import: The AD Bridge polls AD and retrieves data associated with all user and groups that you selected in the Select organizational units (OUs) for users and Select organizational units (OUs) for groups panes of the Configuration tab for the bridge. This data represents users and groups that were created, modified, or removed in AD. As a best practice, Oracle recommends that you perform a full import the first time you run the AD Bridge.
  • Incremental import: Similar to a full import, but for this type of import, the AD Bridge polls AD and retrieves only user and group data that changed since you last used the AD Bridge to import users and groups into IAM.

By running the AD Bridge, you can propagate changes for IAM users in AD. After users are imported into IAM through the bridge, if you activate or deactivate a user, modify the user's attribute values, or change the group memberships for the user in IAM, then these changes will be reflected in AD.

You can also use the AD Bridge to view a synchronization log of the communication between IAM and AD.

  1. Open the navigation menu and click Identity & Security. Under Identity, click Domains.
  2. Select the identity domain you want to work in and click Settings and then Directory integration.
  3. Click the AD Bridge that you want to use to import users and groups from AD.
  4. Click Configuration.
  5. In the Configuration tab:
    1. In the Select organizational units (OUs) for users and Select organizational units (OUs) for groups panes, select the check box for each OU that contains users or groups that you want to import.
    2. In the Supported Operations area, select check boxes to enable IAM to propagate a user's activation status, attribute values, or group memberships to AD. See Configuring a Microsoft Active Directory (AD) Bridge for more information about the Supported Operations area.
    3. Click Save.
      The AD Bridge propagates any changes to an IAM user's activation status, attribute values, or group memberships to AD.
  6. In the Confirmation window, click OK.
  7. Click Import.
  8. In the Import Type window, choose whether you want to run an incremental import or a full import, and then click OK.
    IAM imports the users and groups from AD.
    Note

    Based on how many users and groups you're importing, the job may take several minutes or even hours.
  9. Click the Import tab. The status of the job IAM uses to import users and groups from AD is Running. After all users and groups are imported, the status changes to Success.

    Also, on this tab, you'll see a synchronization log of all traffic that occurs between IAM and AD for the current import job that ran. This includes the start date and time, and completion date and time, for the import job, how many users and groups were imported from AD successfully, and how many users and groups couldn't be imported.

    Note

    If you don't see the status change after a few minutes, then click Refresh. Also, if the status of the job is Failed, then an error occurred while the AD Bridge was transferring users and groups from AD to IAM.
Removing a Microsoft Active Directory (AD) Bridge
Remove a Microsoft Active Directory (AD) Bridge.
  1. Open the navigation menu and click Identity & Security. Under Identity, click Domains.
  2. Select the identity domain you want to work in and click Settings and then Directory integration.
  3. Click the Action menu The Action menu to the right of the domain that contains the AD Bridge that you want to remove.
  4. Select Remove.
  5. In the Confirmation window, click OK.
    By removing the domain, you’re removing the AD Bridge associated with the domain. To ensure that your bridge is deleted cleanly and completely, you must delete the client associated with the bridge.

  6. Double-click the ad-id-bridge.exe file.
    The IAM Microsoft Active Directory Bridge Installer appears.
  7. In the Welcome dialog box, click Next.
  8. In the Removal completed dialog box, click Close.
Important

If you can't remove the client for the AD Bridge or the bridge still appears in the Directory integrations page, then complete the following steps:
  1. Run the following CURL command to obtain the Client ID that you used to install the client for the AD Bridge:
    curl -X GET \
    <Identity_Cloud_Service_URL>/admin/v1/IdentityAgents \
    -H 'Authorization: Bearer <access_token>

    <Identity_Cloud_Service_URL> is a placeholder for the IAM URL that you used to install the client for the bridge, and <access_token> is a placeholder for the access token that contains the authorization credentials that are required to obtain the Client ID.

    See the IAM: First REST API Call tutorial to learn how to get this access token.

    A list of AD Bridge clients that are installed for your identity domain appears.

  2. From this list, find the Client ID of the AD Bridge that you want to remove.
  3. Run the following CURL command to remove the client for the AD Bridge:
    curl -X DELETE \
    <Identity_Cloud_Service_URL>/admin/v1/IdentityAgents/<Client_ID> \
    -H 'Authorization: Bearer <access_token>

    <Client_ID> represents the ID of the client for the AD Bridge that you want to remove.

    A 204 (No Content) response appears, signifying that you removed the client for the bridge.

Transfer the Microsoft Active Directory (AD) Bridge

Maintaining the Microsoft Active Directory (AD) Bridge includes transferring the bridge to another machine and restarting the bridge.

Transferring the Microsoft Active Directory (AD) Bridge

After you have setup a Microsoft Active Directory (AD) Bridge, you can transfer that bridge to another machine.

Note

If you can't remove the client for the AD Bridge or the bridge still appears in the Directory Integrations page, then follow the procedure in Removing a Microsoft Active Directory (AD) Bridge.
  1. From the original machine, access the Control Panel, and uninstall the client for the AD Bridge.
  2. On the other machine, install the client. See Create a Microsoft Active Directory (AD) Bridge.
  3. In the IAM Console, expand the Navigation Drawer, click Settings, and then click Directory Integrations.
  4. Verify that the AD Bridge appears in the other machine with an Active status. This bridge can now be used to synchronize with your AD enterprise directory structure.

Restarting the Microsoft Active Directory (AD) Bridge

Restart the Microsoft Active Directory (AD) Bridge if it stops unexpectedly.
  1. Click Start.
  2. In the text box, enter Services, and then press Enter.
    The Services window appears. This window contains a utility that's used to manage daemon processes within the Windows OS. These processes include the back-end service that’s used to establish communication between IAM and AD.
  3. Click Services (Local), click the Standard tab, scroll down the list of services, right-click Oracle Identity Cloud Service Microsoft Active Directory Bridge Service, and then click Start.
  4. Verify that Running appears as the status for the service.

Log Files

Understand how to manage the log files created by the Microsoft AD Bridge, and how to let Oracle access them on demand for support.

Creating and Managing Log Files for the Microsoft Active Directory (AD) Bridge

After you install and configure the Microsoft Active Directory (AD) Bridge, you may want to access the log files for troubleshooting purposes. You can locate these files in the %ProgramData%\Oracle\IDBridge\logs directory.

To modify the log level of the log files for the AD Bridge:

  1. Navigate to the %ProgramFiles%\Oracle\IDBridge directory.
  2. Using a text editor, open the log4net.config file.
  3. In the file, locate the following line of code: <level value="info" />
  4. Change the value of the level value parameter to one of the following log levels:
    Log Level Description
    all Capture all events.
    debug Capture fine-grained informational events that are most useful to debug the AD Bridge.
    error Capture error events that might still allow the AD Bridge to continue running.
    fatal Capture severe error events that will result in the AD Bridge no longer running.
    info Capture informational events that highlight the progress of the AD Bridge at a coarse-grained level.
    off Turn off logging.
    trace Capture finer-grained informational events than the debug log level.
    warn Capture potentially harmful situations to the AD Bridge.
  5. Save and close the log4net.config file.
Note

You must restart the AD Bridge for the change you made to the log level to take effect.

Allowing My Oracle Support to Access Client Log Files

When My Oracle Support are diagnosing Microsoft AD bridge issues, they might need access to the Microsoft AD Bridge client log files.

The default behavior is that My Oracle Support cannot access the client log files, which are on a machine at your premises. You have to add them to the support request. You can give your consent so that My Oracle Support can fetch the logs directly when they need to be analyzed to resolve an issue. This can reduce the time it takes for the support request to be resolved.

Learn about the scope of consent, what it covers, and how long it lasts:

  • How long does consent last?

    After you have given your consent, it remains effective until you remove your consent, or remove the AD Bridge domain.

  • Do I need to give separate consent for every AD Bridge?

    No. Your consent applies at AD domain level. If you have more than one bridge under the same AD domain, the consent applies to all of them.

  • Do I need to provide consent for each AD domain?

    If you have more than one AD domain, a separate consent is needed for each one.

  • Can Oracle fetch any file from the windows machine where the Microsoft AD Bridge client is installed?

    No. Only Microsoft AD Bridge log files are fetched.

  • When is the log file fetched from the client machine?

    Oracle only fetches logs files if they are needed so they can be analyzed as part of resolving a service request that you have raised. If you raise a service request and there is no need for the AD Bridge client log file to be examined, then it is not fetched.

  • Where are the log files stored?

    They are uploaded to tenant Oracle cloud storage.

  • Do the log files stay in cloud storage indefinitely?

    No. They will be removed from cloud storage after 24 hours, after Oracle has analyzed the logs. An automated purge job deletes all log files that are older than 24 hours.