Tutorial 3: OCI IAM as Authoritative Source to Manage Identities in Entra ID
Configure OCI IAM as the authoritative identity store to manage identities, along with entitlements in Entra ID
In this scenario, OCI IAM acts as the identity manager. OCI IAM pushes users, groups, and licenses to Entra ID.
- First, configure OCI IAM to enable IAM as the authoritative identity store to manage identities in Entra ID. Create an app in OCI IAM for MS Office 365 using IAM's App Catalog, which provides pre built integrations with major cloud services.
- Assign a user to the MS Office 365 application in OCI IAM, and assign the groups and roles you want the user to be provisioned to MS Office 365.
Use OCI IAM's App Catalog to create an app which uses MS Office 365.
-
Open a supported browser and enter the Console URL
- Enter your Cloud Account Name, also referred to as your tenancy name, and select Next.
- Select the identity domain to sign in to. This is the identity domain that you will configure user lifecycle management in.
- Sign in with your username and password.
- Open the navigation menu and select Identity & Security. Under Identity, select Domains.
- Click the name of the identity domain that you want to work in. You might need to change the compartment to find the domain that you want. Then, click Integrated applications.
- Select Add Application, and choose Application Catalog and select Launch app catalog which contains pre configured application templates.
- Search for the MS Office 365 application template by entering the string
MS Office, then select the tile. - Select the tile to create an MS Office 365 application.
- Enter a name for the application, or use the default
MS Office 365. - Select Next and then Next again, and on the Configure provisioning page enable provisioning, and confirm that you want to enable provisioning.
- Configure connectivity by selecting Authorize with MS Office 365.
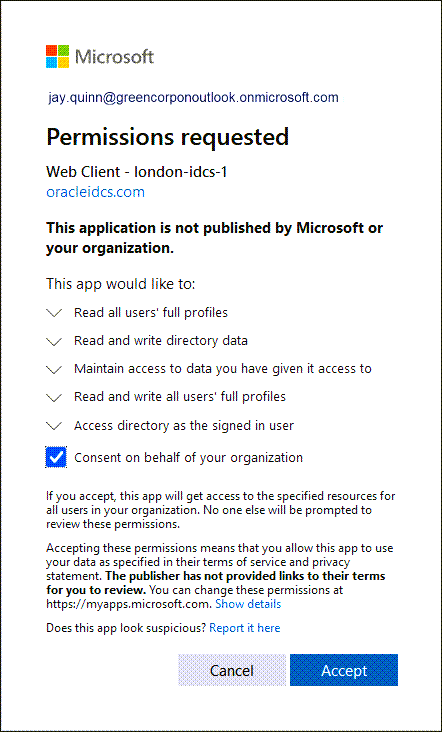
- Microsoft opens a new browser window.
- Log in using your MS Office 365 credentials. On the Permissions requested dialog, Select Consent on behalf of your organization, and select Accept.
-
The new browser closes and you are returned to the Add MS Office 365 page.
- A message pops up to say that the connection has been successful.
- Select Finish.
- On the application overview page, select Activate and confirm that you want to activate the application.
The MS Office application is now active.
You have successfully created an MS Office 365 application in OCI IAM, and configured it to connect to MS Office 365.
Assign a user to the MS Office 365 application, and assign it to the Office roles and groups the user will have when provisioned to MS Office 365.
- In the MS Office 365 application, select Users on the left under Resources.
- Select Assign users.
- Search for the user you want to assign, then select the for that user and select Assign.
- Select Next.
- On the Add Details page, scroll down, and under Licenses, select Add and assign the licences you want the user to be provisioned with on MS Office 365.
- On the Add Details page, scroll down, and under Roles, select Add and assign the roles you want the user to be provisioned with.
- Under Groups, select Add and assign the groups you want the user to be provisioned with.
- Select Assign User.
You can see the new user in the User List with Active status.


