Invoke Anomaly Detection with OCI Streaming
You can use Anomaly Detection to detect anomalies with the OCI Streaming service.
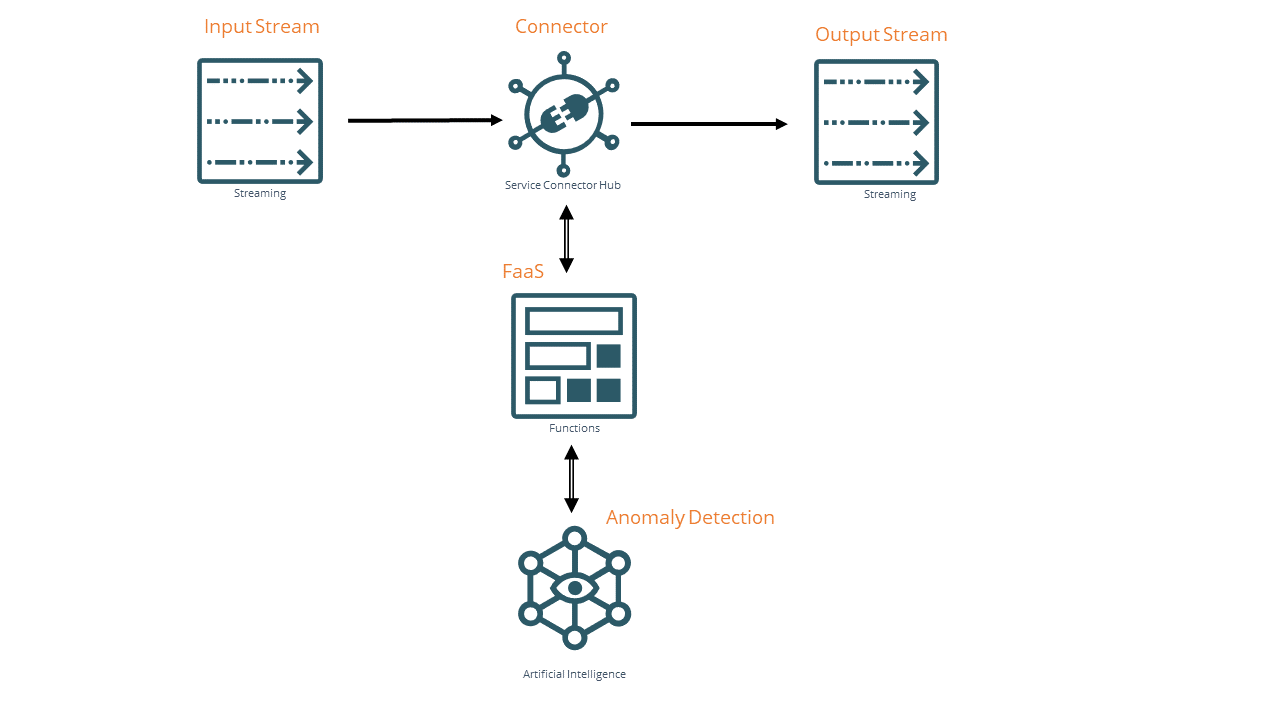
This combination enables input data into a Streaming service stream, then Anomaly Detection performs a detect call on this data stream, which results in the output data being put in another stream.
The OCI Connector Hub service is designed to connect different services together. When you use Connector Hub to connect Anomaly Detection, Functions, and Streaming, you can design a solution to detect the anomalies in streaming data. The solution design is as follows:
-
Specify an input stream using Streaming.
-
Specify an output stream using Streaming.
-
Create a Functions as a Service (FaaS) that invokes Anomaly Detection.
-
Create another FaaS that returns the Anomaly Detection results as the output of the FaaS.
-
Finally, use Connector Hub to put the FaaS output into the output stream.
Detect Anomalies in Streaming Data with Anomaly Detection
Before you begin, you must have:
-
A trained model ready to use for this process. Change the following properties in the sample code to create your FaaS application.
-
endpoint -
model_id -
stream_id -
message_endpoint -
partition_id
-
-
Ensure that you have set up the Anomaly Detection service policies.
-
Set these polices so that the Functions service can call the Anomaly Detection service:
-
Create a dynamic group for the function:
All {resource.compartment.id = <compartment_id>, resource.type = 'fnfunc' } -
Add these permissions for the dynamic group:
DEFINE dynamic-group AD_SERVICE_CALLING_FUNC as <function_dynamic_group>
ALLOW dynamic-group AD_SERVICE_CALLING_FUNC to use ai-service-anomaly-detection-model in compartment <compartment_name>
-
- (Optional)
You have to enable logging if you want to use logs to help you debug your FaaS,
click Logs, click the Actions menu (
 ),
and then click Enable Log and specify:
),
and then click Enable Log and specify:
-
- Compartment: The compartment in which to create the log. By default, the current compartment.
- Log Group: The log group in which to create the log.
Select an existing log group, or select:
- Auto-create a default log group to create a default log group with a default name, if one doesn't exist already.
- Create a new log group to create a log group with a name and description that you provide.
- Log Name: The name of the new log. By default,
<application-name>_invoke. - Log Retention: The length of time to retain log data.
- Click Enable Log to create the log (and the new log group, if you specified one).
-
Now, any messages that are sent to the input stream are passed on to the Anomaly Detection service. The results from the Anomaly Detection service are sent to the output stream.