About the Catalog Page
Use the Catalog Tool to browse, search and discover data either in your Oracle Autonomous AI Database, or connected to it and get information about the entities in and available to your Oracle Autonomous AI Database. You can see the data in an entity, the sources of that data, the objects that are derived from the entity, and the impact on derived objects from changes in the sources.
The Catalog page lists and displays details about:
-
Database objects such as tables, columns, views, cloud objects, analytic views, packages, procedures, shares, share recipients, catalogs, catalog storage links, live table feed, share providers.
-
Other types of object connected to the database, such as Cloud Storage Links, Cloud Storage Buckets, Cloud Objects (files on connected Cloud Storage), Compartments, Data Catalog Links, Catalog Storage Links, Autonomous AI Database.
-
Database data dictionary objects such as tables, columns, views, database links, analytic views, packages, and procedures that have been created by the database tools or a database application such as SQL Developer.
-
Data in connected databases – for example, other Autonomous AI Databases in the same tenancy.
-
Data in connected cloud storage systems – for example, in OCI, AWS S3, Azure, or Google Cloud Platform.
-
Data in registered data catalogs – for example, in OCI Data Catalog, or AWS Glue.
-
Data in registered data shares – for example, shared from Data Bricks.
Catalog Tool Terminology
- Catalog: A catalog consists of one or many schemas, each with one or many tables. A catalog simply represents the set of data in that database as it is organized into schemas and tables. The way you connect to the catalog determines the level of access to those schemas and tables. For other types of catalog, for example, catalogs that are mounted over external data catalogs or shares, the objects in the external system are still organized into schemas and tables but may not exist physically in such a form. For example, a catalog that is mounted over an AWS Glue data catalog may contain tables that actually exist as multiple files on AWS S3 cloud storage.
- Mounting a Catalog: This is the process of adding a new catalog connection to an external system so that the metadata in that system can be represented in the Autonomous AI Database catalog in a standard form.
A Local catalog is all the objects in or directly connected to your Autonomous AI Database as described in the above points. In addition to the local catalog, Catalog Explorer can add in additional catalogs so that you can discover data from other sources.
-
Mount Autonomous Database as Catalog: You can add a catalog to another Autonomous AI Database in your tenancy, which will allow you to search and discover all of the objects in that database based on the permissions for connection.
-
Mount Database Link: The tool can mount an existing Database Link. Where a database link already exists, for example to an on-premises Oracle database, this can be mounted as a catalog. As with adding a catalog over an Autonomous AI Database, this option enables all the objects that are available to connection for search and discovery.
-
Mount Data Share: The tool can mount registered live share or delta share as a catalog.
-
Mount Amazon Glue: A catalog can be mounted over an AWS Glue Data Catalog database region.
-
Mount OCI Data Catalog: The tool can mount data registered in OCI Data Catalog.
Once a new catalog has been mounted, you can add the catalog in the Catalog tool, and search and discover data from that catalog, or across many catalogs.
When you first open the Browse catalog page, it contains the Search catalog field, the Catalog Settings ![]() button, Manage Catalogs icon, a list of recently viewed objects, and several suggested searches. You can enter a search string, click on one of the recent objects to see its details, or click on Show search suggestions icon to view suggestions on the right side of the page.
button, Manage Catalogs icon, a list of recently viewed objects, and several suggested searches. You can enter a search string, click on one of the recent objects to see its details, or click on Show search suggestions icon to view suggestions on the right side of the page.
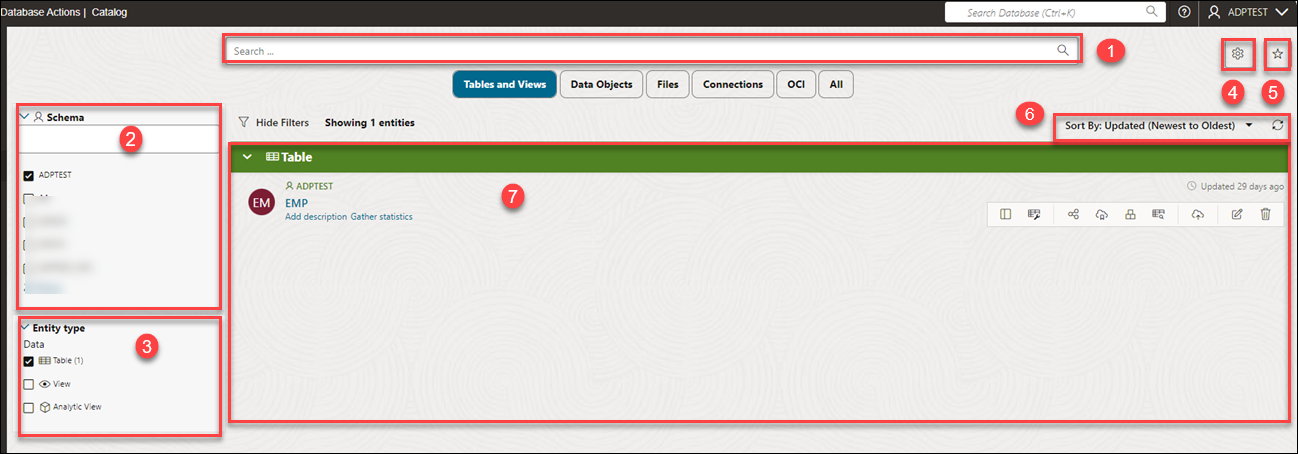
As soon as you select Catalog menu from Data Studio menu bar, the page is displayed as below.
When you hover your mouse over a particular catalog entity, it will show a floating toolbar of common actions. The list is context-sensitive depending on the capabilities available for the particular entity. For example, tables in the current database offer more possibilities than tables in remote catalogs.
The Catalog page contains:
-
Search field
You can search for the entities in the search field. For more details see Browse and Search Catalogs.
- Select Catalogs... field
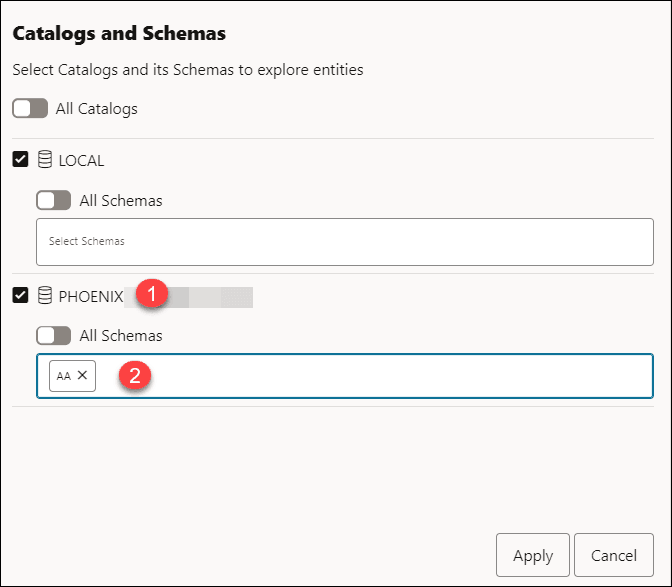
Clicking this icon opens the Catalogs and Schemas dialog box.
You can view a list of all mounted catalogs and schemas in this dialog box.
Select specific schemas from a database of your choice to refine your search.- To show tables of only the AA schema from PHOENIX database, in addition to the default local schema:
- On the Catalogs and Schemas dialog box, click the PHOENIX database and select AA from the Select Schemas search field.
- On the Catalogs and Schemas dialog box, click the PHOENIX database and select AA from the Select Schemas search field.
- To show tables of only the AA schema from PHOENIX database, in addition to the default local schema:
- Default Database name and Schema name
This field displays the default database name along with the schema name.
- Manage Catalogs
Refer to Manage Catalogs for detailed information.
- Catalog Settings
Refer to Catalog Settings for detailed information.
-
Saved Search Suggestions
Click to open or close the Saved Search Suggestions panel.
- Filters option
Click any of the filters icon to filter and refine the search results.
Refer to Browse and Search Catalogs for detailed information.
-
Display area
The area beneath the Search catalog field displays the entities returned by a search and that match the filter criteria set in the Filters panel. You can sort the entities by clicking the Sort By button and then setting sort values.
Hover besides the name of the entity to view details about the entity.
-
Faceted Filters panel
Select one or more filter values to limit the entities shown on the page. Only those entities that match the filter values are shown. That is, the items returned by a search are filtered by these filter settings. The filters also change depending on the quick filters you select. See Filter Entities.
- Toolbar
The toolbar appears after you run an initial search. It contains these buttons:
-
Sort By

To select sorting values, click the Sort By button to open the list of options. Then click the Ascending or Descending icon next to Name or Updated. For example, if you select the Ascending icon next to Name the entities will be sorted in alphabetical order by entity name. If you select Descending icon next to Updated, the entities will be sorted in reverse of the latest updated entity..
Click Reload to refresh the choices in the list.
-
Parent topic: The Catalog Tool

