Adding Labels to Text Using Named Entity Recognition

In Data Labeling you can use named entity recognition (NER), also known as entity extraction, to add labels to text. You add labels to annotate text.

    1. In the Dataset Details page:
      • If Data records is selected, there are two ways to get to the Add labels page:
        • Click the name of the text you want to label.
        • Click the action icon for the image you want to label, and click Label.
      • If Gallery view is selected, click the action icon for the text you want to label, and click Label.
    2. Under Label, select the label for the part of the text you want to label. If there is only one label in the dataset, the label is automatically selected.
    3. Highlight the part of text to be labeled.
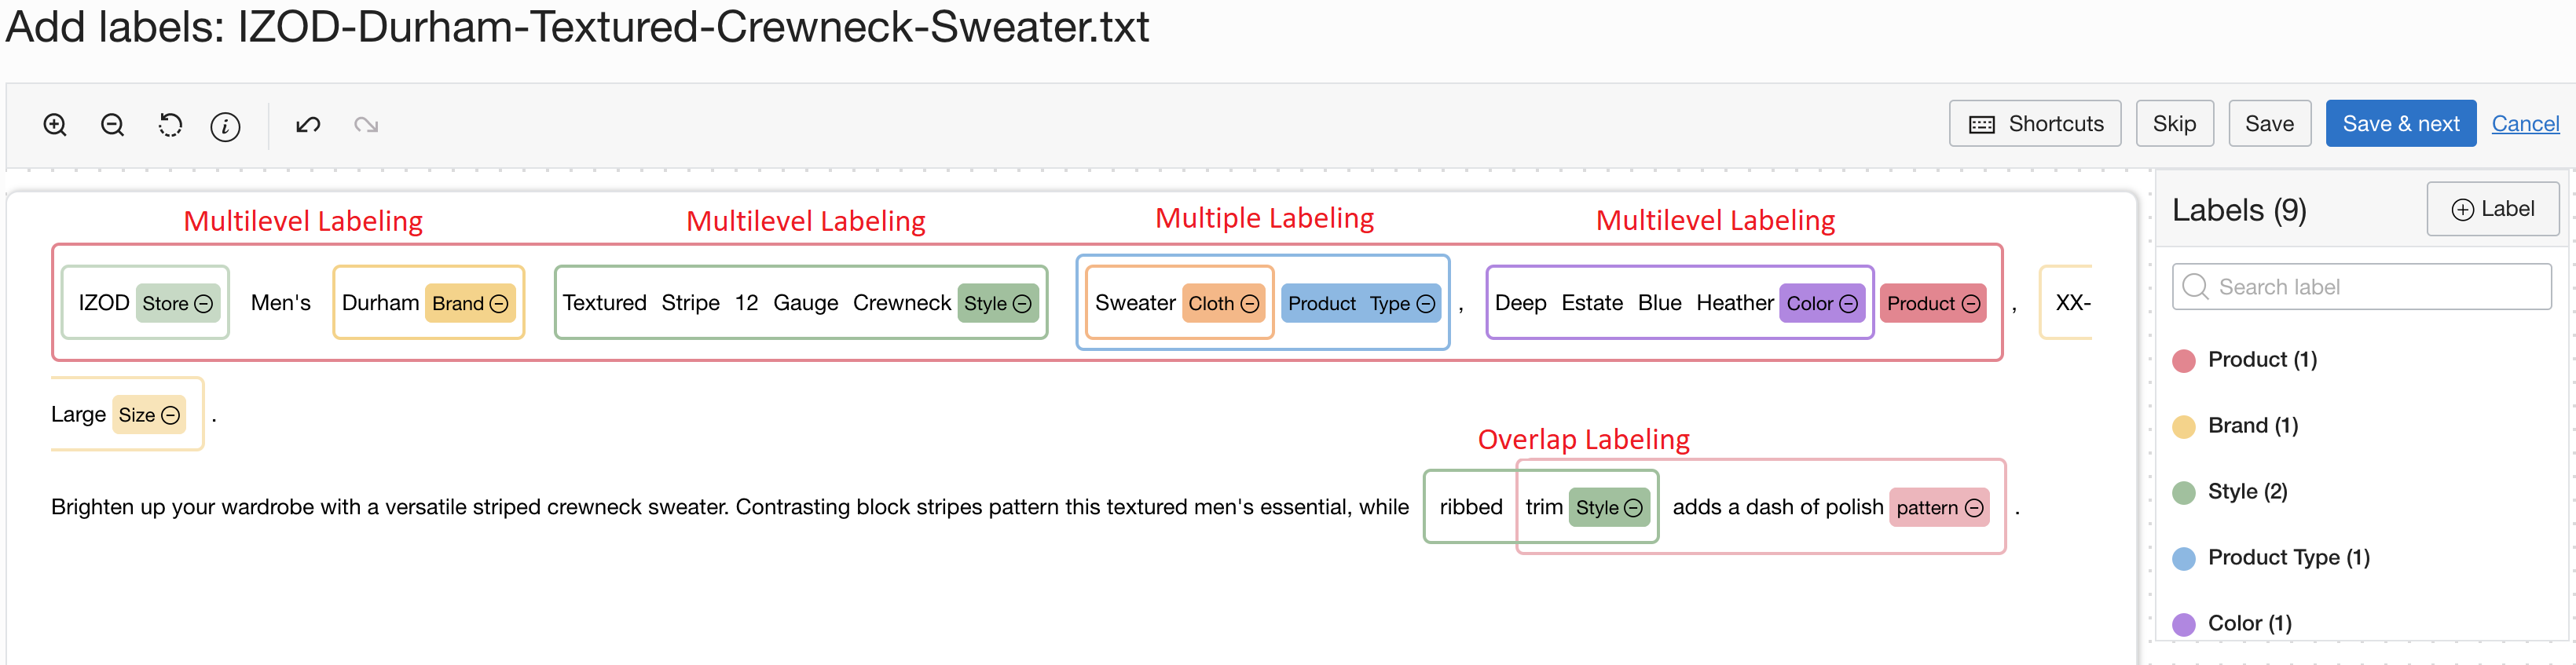
      Nested named entity tecognition (NER) lets you highlight the text in three ways:
      • Overlap - where you can annotate overlapping phrases.
      • Multiple - where you can annotate the same piece of text, with different labels, up to four times.
      • Multilevel - where you can annotate subtexts of already annotated pieces of text, up to 15 times.
      This image illustrates all three nested NER ways:
      Figure 1. Illustration of the nested NER ways
      An example of text that has been annotated using nested NER. Multilevel and Multiple are on the first line of text, Overlap on the second.
    4. Repeat steps 2 and 3 until you have added all the labels you wanted to add to the text.
      There is functionality to help you pick out details in the text:
      • There are some icons you can click to Zoom in, Zoom out, and Reset zoom to adjust the text size.
      • There are Undo and Redo icons to alter the changes when using entity extraction.
      • Click the Info icon, to display the labeling instructions from the dataset creator in a resizeable and draggable panel.
      • Click Shortcuts to display a panel with the list of keystrokes to save you using the mouse to navigate this functionality and other actions on the screen.
      • Click Clear annotations to remove any labels from the text.
      • You can close, minimize, and move the panels that display all these functionalities to make it easier to label the images. The positions of these panels is cached in the browser. If you clear the browser's cache, or start using a different browser, they're displayed in the default positions. After you use a browser, the panels display in the positions you left them the last time you used it.
      Note

      Any change you make as to how the record is displayed, are just for display, and aren't saved.
    5. Click Save & next to save the changes and label the next item of text, or click Save to save the changes. If you don't want to label an item of text, click Skip to move to the next item of text. If you're at the last item of text, click Save & done to save the changes and return to the Dataset Details page.
    6. (Optional) Click Cancel to return to the Dataset Details page.
      If you have added a label to a record, but not saved it, you're prompted to confirm that you want to cancel.
  • Use the dataset update command and required parameters to use Named Entity Recognition (NER), also known as entity extraction, to add labels to text:
    oci data-labeling-service-dataplane record update [OPTIONS]
    For a complete list of flags and variable options for CLI commands, see the CLI Command Reference.
  • Run the UpdateRecord operation to use Named Entity Recognition (NER), also known as entity extraction, to add labels to text in Data Labeling.