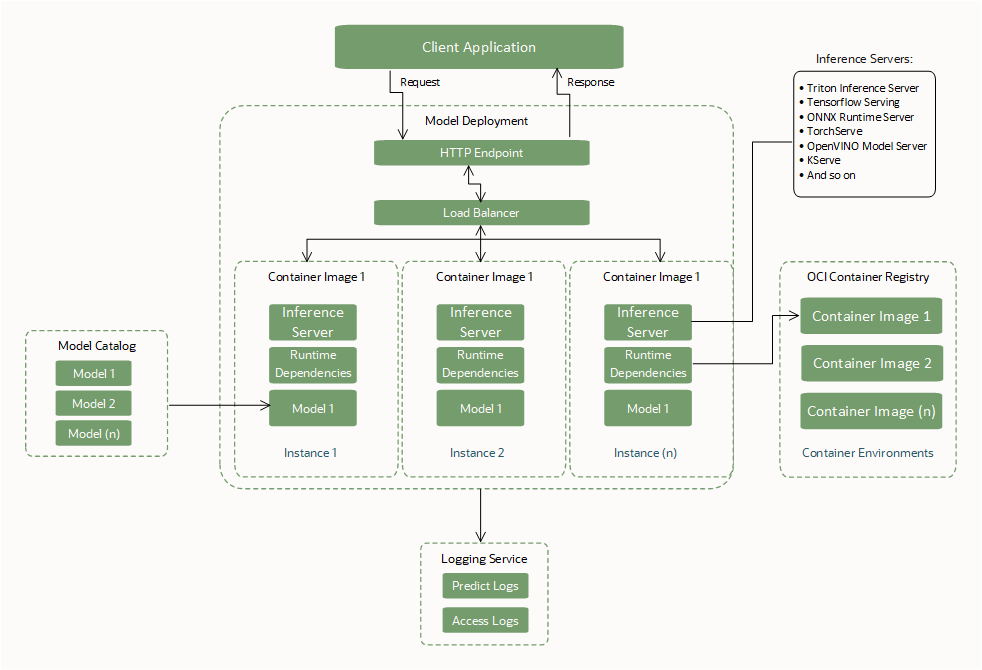
Bring Your Own Container
Build and use a custom container (Bring Your Own Container or BYOC) as the runtime dependency when you create a model deployment.
With custom containers, you can package system and language dependencies, install, and configure inference servers, and setup different language run times. All within the defined boundaries of an interface with a model deployment resource to run the containers.
BYOC enables the transfer of containers between different environments so you can migrate and deploy applications to the OCI Cloud.
To run the job, you must create a Dockerfile, and then build an image. You start
with a Dockerfile, that uses a Python image. The
Dockerfile is designed so that you can make local and remote
builds. Use the local build when you test locally against your code. During the local
development, you don't need to build a new image for every code change.
BYOC Required Interfaces
Create or specify these required interfaces to use a model deployment.
Model Artifact
| Interface | Description |
|---|---|
| Upload model artifacts to the Data Science model catalog. | Model artifacts, such as scoring logic, ML model, and dependent files, must be uploaded to the Data Science model catalog before being used by a model deployment resource. |
| No mandatory files. |
No files are mandatory for creating a BYOC model deployment. Note: When BYOC isn't used for a model deployment, the |
| Location of the mounted model artifacts. |
During bootstrap model deployments unzip the model artifact, and mount the files to Zipping a set of files (including ML model and scoring logic) or a folder containing set of files have different location path to the ML model inside the container. Ensure that the correct path is used when loading the model in the scoring logic. |
Container Image
| Interface | Description |
|---|---|
| Package runtime dependencies. | Package the container image with the necessary runtime dependencies to load and run the ML model binary. |
| Package a web server to expose endpoints. |
Package the container image with a http based stateless web server (FastAPI, Flask, Triton, TensorFlow serving, PyTorch serving, and so on). Expose a
Note: The If your inference server's endpoint can't be customized to meet the Data Science endpoint interface, use a proxy (for example, NGINX ) to map the service-mandated endpoints to the endpoints provided by your framework. |
| Exposed ports. |
The ports to use for the The ports are limited to between 1024 and 65535. Ports 24224, 8446, and 8447 are excluded. The ports provided are be exposed in the container by the service so don't need to be exposed again in the Docker file. |
| Size of the image. | The size of the container image is limited to 16 GB in uncompressed form. |
| Access to the image. | The operator who creates the model deployment must have access to the container image to use. |
| Curl package. | The curl package must be installed in the container image for the Docker HEALTHCHECK policy to succeed. Install the latest stable curl command that has no open vulnerabilities. |
CMD, Entrypoint |
The docker CMD or Entrypoint must be provided either through the API or Docker file that bootstrap the web server. |
CMD, Entrypoint size. |
The combined size of CMD and Entrypoint can't be more the 2048 bytes. If the size is more than 2048 bytes, the specify the application arguments using the model artifact, or use Object Storage to retrieve the data. |
General Recommendations
| Recommendation | Description |
|---|---|
| Package the ML Model in model artifacts. |
Package the ML model as an artifact and upload to the Data Science model catalog to use the model governance and model versioning features though an option to package the ML model in the container image exists. Save the model to the model catalog. After the model is uploaded to model catalog and referenced during the model deployment creation, Data Science downloads a copy of the artifact and unzips it in the |
| Provide image and image digest for all operations | We recommend to provide the image and image digest to create, update, and activate model deployment operations to maintain consistency in the use of the image. During an update operation to a different image, both image, and image digest are essential to update to the expected image. |
| Vulnerability Scanning | We recommend using the OCI Vulnerability Scanning service to scan for vulnerabilities within the image. |
| API field as null | If an API field is empty, don't pass an empty string, empty object, or empty list. Pass the field as null or don't pass at all unless you explicitly want to pass as empty object. |
BYOC Best Practices
- Model deployment only supports container image residing in the OCI Registry.
- Ensure that the container image exists in the OCI Registry throughout the lifecycle of the model deployment. The image must exist to ensure availability in case an instance automatically restarts, or the service team perform patching.
- Only docker containers are supported with BYOC.
- Data Science uses the zipped model artifact to bring the ML model scoring logic and expects it to be available in the Data Science model catalog.
- The size of the container image is limited to 16 GB in uncompressed form.
- Data Science adds a
HEALTHCHECKtask before starting the container so theHEALTHCHECKpolicy doesn't have to be explicitly added in the Docker file because it's overridden. The health check starts running 10 minutes after the container starts, and then checks/healthevery 30 seconds, with timeout of three seconds and three retries per check. - A curl package must be installed in the container image for the Docker
HEALTHCHECKpolicy to succeed. - The user that creates the model deployment resource must have access to the container image in OCI Registry to use it. If not, create a user access IAM policy before creating a model deployment.
- The docker
CMDorEntrypointmust be provided either through the API or Dockerfile, which bootstraps the web server. - The service defined timeout for the container to run is 10 minutes so ensure that the inference serving container starts (is healthy) within this time frame.
- Always test the container locally before deploying to the Cloud using a model deployment.
Docker Image Digests
Images in a Docker registry are identified by repository, name, and a tag. In addition, Docker gives each version of an image a unique alphanumeric digest. When pushing an updated Docker image, we recommend to give the updated image a new tag to identify it, rather than reusing an existing tag. However, even if you push an updated image and give it the same name and tag as an earlier version, the newly pushed version has a different digest to the earlier version.
When you create a model deployment resource, specify the name and tag of a particular version of an image to base the model deployment on. To avoid inconsistencies, the model deployment records the unique digest of that version of the image. You can also provide the digest of the image when creating a model deployment.
By default, when you push an updated version of an image to the Docker registry with the same name and tag as the original version of the image the model deployment is based on, it continues to use the original digest to pull the original version of the image. If you want the model deployment to pull the later version of the image, you can explicitly change the image name with a tag and digest that the model deployment uses to identify which version of the image to pull.
Prepare the Model Artifact
Create an artifact zip file and save it with the model in the model catalog. The artifact includes the code to operate the container and run the inference requests.
The container needs to expose a /health endpoint to return the inference server's health, and a /predict endpoint for inferencing.
The following Python file in the model artifact defines these endpoints using a Flask server with port 5000:
# We now need the json library so we can load and export json data
import json
import os
import numpy as np
from sklearn.discriminant_analysis import LinearDiscriminantAnalysis
from sklearn.neural_network import MLPClassifier
import pandas as pd
from joblib import load
from sklearn import preprocessing
import logging

from flask import Flask, request

# Set environnment variables
WORK_DIRECTORY = os.environ["WORK_DIRECTORY"]
TEST_DATA = os.path.join(WORK_DIRECTORY, "test.json")
MODEL_DIR = os.environ["MODEL_DIR"]
MODEL_FILE_LDA = os.environ["MODEL_FILE_LDA"]
MODEL_PATH_LDA = os.path.join(MODEL_DIR, MODEL_FILE_LDA)

# Loading LDA model
print("Loading model from: {}".format(MODEL_PATH_LDA))
inference_lda = load(MODEL_PATH_LDA)

# Creation of the Flask app
app = Flask(__name__)


# API 1
# Flask route so that we can serve HTTP traffic on that route
@app.route('/health')
# Get data from json and return the requested row defined by the variable Line
def health():
    # We can then find the data for the requested row and send it back as json
    return {"status": "success"}

# API 2
# Flask route so that we can serve HTTP traffic on that route
@app.route('/predict',methods=['POST'])
# Return prediction for both Neural Network and LDA inference model with the requested row as input
def prediction():
    data = pd.read_json(TEST_DATA)
    request_data = request.get_data()
    print(request_data)
    print(type(request_data))
    if isinstance(request_data, bytes):
        print("Data is of type bytes")
        request_data = request_data.decode("utf-8")
    print(request_data)
    line = json.loads(request_data)['line']
    data_test = data.transpose()
    X = data_test.drop(data_test.loc[:, 'Line':'# Letter'].columns, axis = 1)
    X_test = X.iloc[int(line),:].values.reshape(1, -1)

    clf_lda = load(MODEL_PATH_LDA)
    prediction_lda = clf_lda.predict(X_test)

    return {'prediction LDA': int(prediction_lda)}


if __name__ == "__main__":
    app.run(debug=True, host='0.0.0.0', port = 5000)
Build the Container
You can use any image from OCI Container Registry. Following is a sample Dockerfile that uses Flask server:
FROM jupyter/scipy-notebook

USER root
RUN \
  apt-get update && \
  apt-get -y install curl

ENV WORK_DIRECTORY=/opt/ds/model/deployed_model
ENV MODEL_DIR=$WORK_DIRECTORY/models
RUN mkdir -p $MODEL_DIR

ENV MODEL_FILE_LDA=clf_lda.joblib

COPY requirements.txt /opt/requirements.txt
RUN pip install -r /opt/requirements.txtThe Curl package must be installed in the container image for the docker HEALTHCHECK policy to work.
Create a requirements.txt file with the following packages in the same directory as Dockerfile:
flask
flask-restful
joblib
Run the docker build command:
docker build -t ml_flask_app_demo:1.0.0 -f Dockerfile .The maximum size of a decompressed container image that you can use with model deployments is 16 GB. Remember that the size of the container image slows down the provisioning time for the model deployment because it's pulled from the Container Registry. We recommend that you use the smallest container images possible.
Test the Container
Ensure that the model artifact and the inference code are in the same directory as the Dockerfile. Run the container on your local machine. You need to refer to the files stored on your local machine by mounting the local model directory onto /opt/ds/model/deployed_model:
docker run -p 5000:5000 \
  --health-cmd='curl -f http://localhost:5000/health || exit 1' \
  --health-interval=30s \
  --health-retries=3 \
  --health-timeout=3s \
  --health-start-period=1m \
  --mount type=bind,src=$(pwd),dst=/opt/ds/model/deployed_model \
  ml_flask_app_demo:1.0.0 python /opt/ds/model/deployed_model/api.py
Send a health request to verify the container is running within the service defined 10 minutes:
curl -vf http://localhost:5000/healthTest by sending a prediction request:
curl -H "Content-type: application/json" -X POST http://localhost:5000/predict --data '{"line" : "12"}'Push the Container to the OCI Container Registry
Before you can push and pull images to and from Oracle Cloud Infrastructure Registry (also known as Container Registry), you must have an Oracle Cloud Infrastructure authorization token. You only see the auth token string when you create it so be sure to copy the auth token to a secure location immediately.
- To view the details in the Console: In the navigation bar, select the Profile menu and then select User settings or My profile, depending on the option that you see.
- On the Auth Tokens page, select Generate Token.
- Enter a friendly description for the auth token. Avoid entering confidential information.
- Select Generate Token. The new auth token is displayed.
- Copy the auth token immediately to a secure location where you can retrieve it later. You won't see the auth token again in the Console.
- Close the Generate Token dialog.
- Open a terminal window on your local machine.
- Sign in to the Container Registry so that you can build, run, test, tag, and push the container image.
docker login -u '<tenant-namespace>/<username>' <region>.ocir.io - Tag the local container image:
docker tag <local_image_name>:<local_version> <region>.ocir.io/<tenancy_ocir_namespace>/<repository>:<version> - Push the container image:
docker push <region>.ocir.io/<tenancy>/byoc:1.0Note
Ensure that the model deployment resource has a policy for the resource principal so that it can read the image from the OCI Registry from the compartment where you stored the image. Give Model Deployment Access to a Custom Container Using Resource Principal
You're ready to use this container image with the BYOC option when you create a model deployment.
BYOC model deployments don't support cross-region container image pulling. For example, when running a BYOC model deployment in an IAD (Ashburn) region, you can't pull container images from the OCIR (Oracle Cloud Container Registry) in the PHX (Phoenix) region.
BYOC Update Operation Behavior
BYOC update operations are shallow merge type partial updates.
A writable top-level field must be completely replaced when it appears defined in the request content, and otherwise preserved unchanged. For example, for a resource such as the following:
{
    "environmentConfigurationDetails": {
        "environmentConfigurationType": "OCIR_CONTAINER",
        "serverPort": 5454,
        "image": "iad.ocir.io/testtenancy/md_byoc_ref_iris_data:1.0.1",
        "imageDigest": "sha256:a9c8468cb671929aec7ad947b9dccd6fe8e6d77f7bcecfe2e10e1c935a88c2a5",
        "environmentVariables": {
            "a": "b",
            "c": "d",
            "e": "f"
        },
        "entrypoint": [ "python", "-m", "uvicorn", "a/model/server:app", "--port", "5000","--host","0.0.0.0"]
        "cmd": ["param1"]
}
A successful update with the following:
{
    "environmentConfigurationDetails": {
        "serverPort": 2000,
        "environmentVariables": {"x":"y"},
        "entrypoint": []
    }
}
Results in a state in which serverPort and environmentVariables are overwritten by the update content (including destruction of previously present data in deep fields that are absent in update content). The image is preserved unchanged because it didn't appear in the update content, and entrypoint is cleared out by an explicit empty list:
{
    "environmentConfigurationDetails": {
        "environmentConfigurationType": "OCIR_CONTAINER",
        "serverPort": 2000,
        "image": "iad.ocir.io/testtenancy/md_byoc_ref_iris_data:1.0.1",
        "imageDigest": "sha256:a9c8468cb671929aec7ad947b9dccd6fe8e6d77f7bcecfe2e10e1c935a88c2a5",
        "environmentVariables": {"x": "y"},
        "entrypoint": []
        "cmd": ["param1"]
}
A successful update using { "environmentConfigurationDetails": null or {} } results in nothing being overwritten. A complete replacement at the top-level erases all the values that aren't there in the request content so avoid that. All the fields are optional in the update object so if you don't provide the image it shouldn't unset the image in the deployment. Data Science does a replacement on the second-level fields only if they aren't null.
Not setting a field in the request object (passing a null) means that Data Science won't consider that field for finding the difference and replacement with the existing field value.
To reset a value of any field, pass an empty object. For list and map type fields, Data Science can accept an empty list ([]) or map ({}) as an indication to erase the values. In any case, null won't mean erasing the values. However, you can always change the value to something else. To use a default port and unset the field value for it, explicitly set the default port.
Update to the list and map fields are a complete replacement. Data Science doesn't look inside the objects for individual values.
For image and digest, Data Science doesn't let you erase the value.
Deploy with a Triton Inference Server Container
NVIDIA Triton Inference Server streamlines and standardizes AI inference by enabling teams to deploy, run, and scale trained AI models from any framework on any GPU or CPU-based infrastructure.
Some key features of Triton are:
- Concurrent Model Execution: The ability to serve multiple ML models simultaneously. This feature is useful when several models that need to be deployed and managed together in a single system.
- Dynamic batching: Enabling the server to batch requests together dynamically based on the workload to help improve performance.
Model Deployment has special support for NVIDIA Triton Inference Server. You can deploy an existing Triton image from NVIDIA's container catalog, and model deployment ensures that the Triton interfaces are matched without needing to change anything in the container by using the following environment variable when creating the model deployment:
CONTAINER_TYPE = TRITONA complete documented sample on how to deploy ONNX models into Triton is available in the Data Science model deployment GitHub repository.