Get Started with a Non-Highly Available ODH Big Data Cluster
You use an Oracle Cloud Infrastructure account to create a non-highly available Big Data cluster with Oracle Distribution including Apache Hadoop.
You can create Big Data clusters with options for node shapes and storage sizes. Select these options based on your use case and performance needs. In this workshop, you create a non-HA cluster and assign small shapes to the nodes. This cluster is perfect for testing applications.
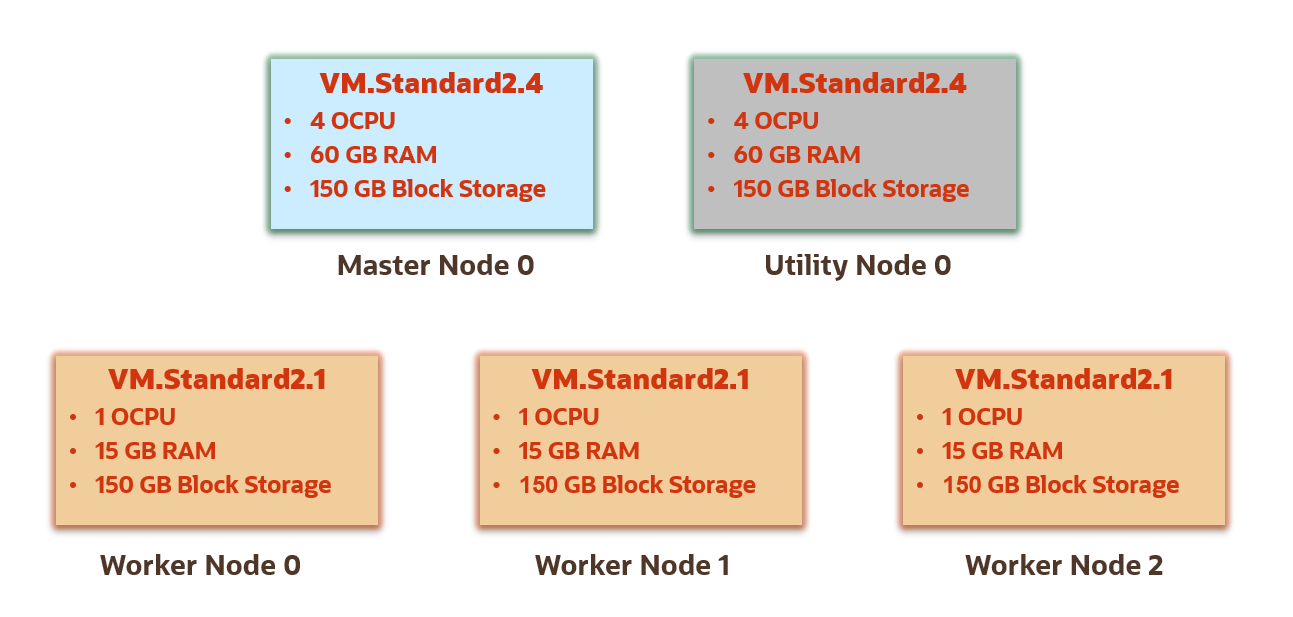
This simple non-HA cluster has the following profile:
-
Nodes: 1 Master node, 1 Utility node, and 3 Worker nodes.
-
Master and Utility Nodes Shapes: VM.Standard2.4 shape for the Master and Utility nodes. This shape provides 4 CPUs and 60 GB of memory.
-
Worker Nodes Shape: VM.Standard2.1 shape for the Worker nodes in the cluster. This shape provides 1 CPU and 150 GB of memory.
-
Storage Size: 150 GB block storage for the Master, Utility, and Worker nodes.
Before You Begin
To successfully perform this tutorial, you must have the following:
- A Oracle Cloud Infrastructure account. See Signing Up for Oracle Cloud Infrastructure.
- A MacOS, Linux, or Windows computer with
sshsupport installed.
Lab 1. Setup OCI Resources Needed for Big Data Clusters
In this lab, you use an Oracle Cloud Infrastructure account to prepare the resources needed to create a Big Data cluster.
- Log in to the Oracle Cloud Infrastructure Console.
- Open the navigation menu, and click Governance and Administration. Under Governance, click Limits, Quotas and Usage.
- Find your service limit for Big Data node shapes:
- Filter for the following options:
- Service: Big Data
- Scope:
<your-region>(Same as the region in the top navigation bar.) - Resource:
VM Standard2.4 - Total OCPUs(for master, utility and Cloud SQL nodes)VM Standard2.1 - Total OCPUs(for worker nodes)
- Compartment:
<tenancy-name>(root)
- Find available OCPU count:
- Limit Name:
vm-standard-2-4-ocpu-count - Available:
- For non-highly available (non-HA) clusters: minimum
3
(One for the master node, one for the utility node, and one for Cloud SQL.)
- For highly available (HA) clusters: minimum 5
(Two for master nodes, two for utility nodes, and one for Cloud SQL.)
- For non-highly available (non-HA) clusters: minimum
3
- Limit Name:
vm-standard-2-1-ocpu-count - Available: minimum 3
- Limit Name:
- Filter for the following options:
In this workshop, you create nodes with the following shapes and storage:
Shape:
- VM Standard2.4 for the master, utility, and Cloud SQL nodes.
- VM Standard2.1 for the worker nodes.
Storage:
- 150 GB of Block Storage for the master, utility, and worker nodes.
- 1,000 GB of Block Storage for the Cloud SQL node.
To use another shape, filter for that shape instead. For a list of all supported shapes in Big Data Service, see Service Limits.
Create ssh encryption keys to connect to your compute
instances or nodes.
See Creating a Key Pair for details on generating ssh
encryption keys.
This workshop does not use Putty keys. Use the instructions in this section to create your key pair.
If your username is in the Administrators group, then skip this section. Otherwise, have your administrator add the following policy to your tenancy:
allow group <the-group-your-username-belongs> to manage compartments in tenancyWith this privilege, you can create a compartment for all the resources in your tutorial.
- In the top navigation bar, open the Profile menu.
- Click your username.
- In the left pane, click Groups.
- In a notepad, copy the Group Name that your username belongs.
- Open the navigation menu and click Identity & Security. Under Identity, click Policies.
- Select your compartment from the Compartment drop-down.
- Click Create Policy.
- Fill in the following information:
- Name:
manage-compartments - Description:
Allow the group <the-group-your-username-belongs> to list, create, update, delete and recover compartments in the tenancy. - Compartment:
<your-tenancy>(root)
- Name:
- For Policy Builder, click Customize (Advanced).
- Paste in the following
policy:
allow group <the-group-your-username-belongs> to manage compartments in tenancy - Click Create.
Reference: The compartments resource-type in Verbs + Resource-Type Combinations for IAM
Create a compartment for the resources that you create in this tutorial.
- Log in to the Oracle Cloud Infrastructure Console.
- Open the navigation menu and click Identity & Security. Under Identity, click Compartments.
- Click Create Compartment.
- Fill in the following information:
- Name:
<your-compartment-name>.Example:
training-compartment. - Description:
Compartment for <your-description>. - Parent Compartment:
<your-tenancy>(root)
- Name:
- Click Create Compartment.
If your username is in the Administrators group, then skip this section. Otherwise, have your administrator add the following policy to your compartment:
allow group <the-group-your-username-belongs> to manage all-resources in compartment <your-compartment-name>With this privilege, you can manage all resources in your compartment, essentially giving you administrative rights in that compartment.
- Open the navigation menu and click Identity & Security. Under Identity, click Policies.
- Select your compartment from the Compartment drop-down.
- Click Create Policy.
- Fill in the following information:
- Name:
manage-<your-compartment-name>-resources - Description:
Allow users to list, create, update, and delete resources in <your-compartment-name>. - Compartment:
<your-compartment-name>
- Name:
- For Policy Builder, select the following choices:
- Policy use cases:
Compartment Management - Common policy templates:
Let compartment admins manage the compartment - Groups:
<the-group-your-username-belongs> - Location:
<your-compartment-name>
- Policy use cases:
- Click Create.
Reference: Common Policies
Big Data service can create a virtual cloud network in your tenancy, only if you give it permission. Add the following policy to your compartment:
allow service bdsprod to {VNC_READ, VNIC_READ, VNIC_ATTACH, VNIC_DETACH, VNIC_CREATE, VNIC_DELETE,VNIC_ATTACHMENT_READ, SUBNET_READ, VCN_READ, SUBNET_ATTACH, SUBNET_DETACH, INSTANCE_ATTACH_SECONDARY_VNIC, INSTANCE_DETACH_SECONDARY_VNIC} in compartment <your-compartment-name>With this privilege, Big Data can create the network resources in your compartment.
- Open the navigation menu and click Identity & Security. Under Identity, click Policies.
- Select your compartment from the Compartment drop-down menu.
- Click Create Policy.
- Fill in the following information:
- Name:
big-data-create-network-resources - Description:
Allow Big Data service to create a virtual cloud network. - Compartment:
<your-compartment-name>
- Name:
- For Policy Builder, enable Show manual editor.
- Paste the following policy in the
editor:
allow service bdsprod to {VNC_READ, VNIC_READ, VNIC_ATTACH, VNIC_DETACH, VNIC_CREATE, VNIC_DELETE,VNIC_ATTACHMENT_READ, SUBNET_READ, VCN_READ, SUBNET_ATTACH, SUBNET_DETACH, INSTANCE_ATTACH_SECONDARY_VNIC, INSTANCE_DETACH_SECONDARY_VNIC} in compartment <your-compartment-name> - Click Create.
Ensure that you create this policy. Without this policy, you cannot create a cluster.
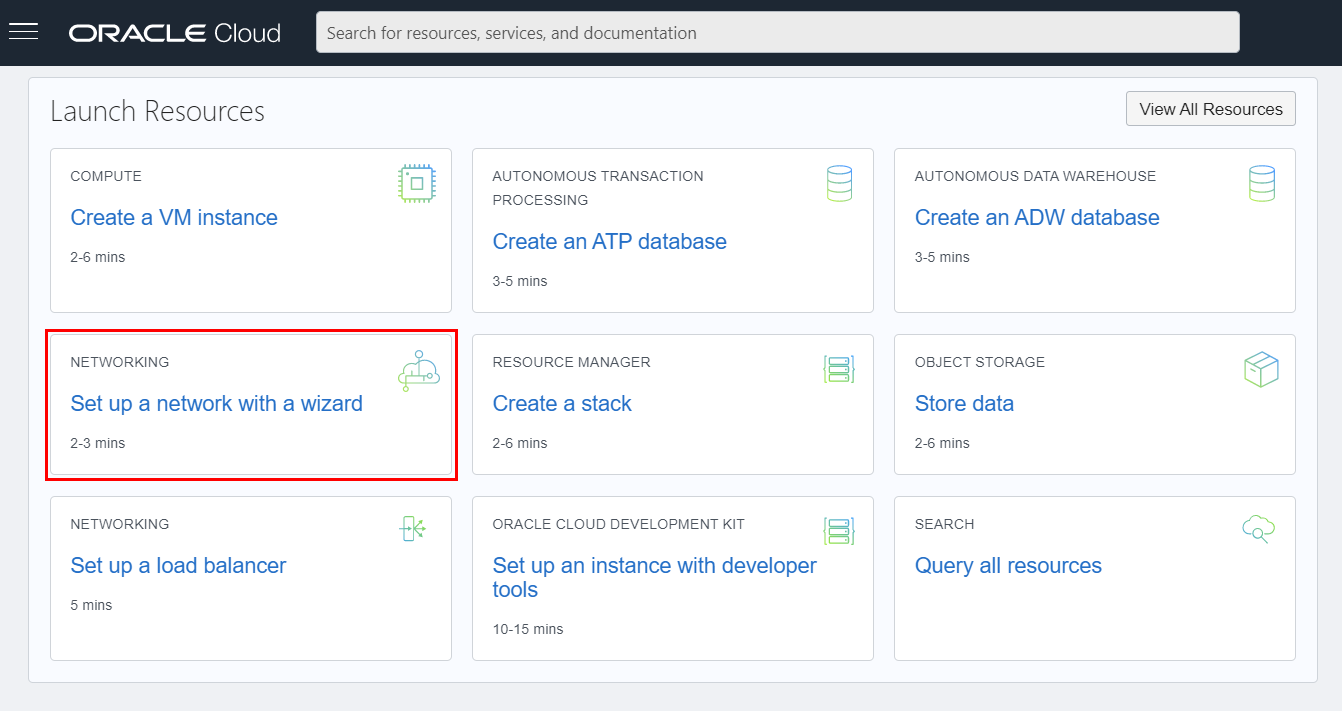
Set up a virtual cloud network to host the nodes in your cluster.
-
In the Console's main landing page, go to Launch Resources and click
Set up a network with a wizard.
To access the nodes with ssh, the Start VCN wizard
automatically opens port 22 on your public subnet. To open other ports, you must add
ingress rules to your VCN's security list.
In this section, to allow access to Apache Ambari, you add an ingress rule to your public subnet.
Lab 2. Create a non-HA ODH Cluster
Create a non-HA cluster and monitor the steps.
If you are using a Free Trial account to run this workshop, Oracle recommends that you delete the BDS cluster when you complete the workshop to avoid unnecessary charges.
The training-cluster is a non-highly available (non-HA)
cluster. In all the ODH non-HA clusters, the services are distributed as
follows:
Master Node, traininmn0 |
Utility Node, traininun0 |
Worker nodes, traininwn0,
traininwn1,
traininwn2 |
|---|---|---|
|
|
|
The process of creating the cluster takes approximately one hour to complete. You can monitor the cluster creation progress as follows:
Lab 3. Add Oracle Cloud SQL to the Cluster
You add Oracle Cloud SQL to a cluster so that you can use SQL to query your big data sources. When you add Cloud SQL support to a cluster, a query server node is added and big data cell servers are created on all worker nodes.
Cloud SQL is not included with Big Data Service. You must pay an extra fee for using Cloud SQL.
-
On the Clusters page, on the row for
training-cluster, click the Actions button. - From the context menu, select Add Cloud SQL.
-
In the Add Cloud SQL dialog box, provide the following
information:
- Query Server Node Shape: Select
VM.Standard2.4. - Query Server Node Block Storage (In GB): Enter
1000. - Cluster Admin Password: Enter your cluster administration
password that you chose when you created the cluster such as
Training123.
- Query Server Node Shape: Select
-
Click Add. The Clusters page is re-displayed. The status of the
training-clusteris now Updating and the number of nodes in the cluster is increased by 1. -
Click the training-cluster name link in the Name column to
display the Cluster Details page. Scroll-down the page to the List of
cluster nodes section. The newly added Cloud SQL node,
traininqs0, is displayed. - Click the Cloud SQL Information tab to display information about the new Cloud SQL node.
-
Click Work Requests in the Resources section. In the Work
Requests section, the
ADD_CLOUD_SQLoperation is displayed along with the status of the operation and percent completed. Click theADD_CLOUD_SQLlink. - The Work Request Details page displays the status, logs, and errors (if any) of adding the Cloud SQL node to the cluster.
- Click the Clusters link in the breadcrumbs at the top of the page to re-display the Clusters page. Once the Cloud SQL node is successfully added to the cluster, the cluster's state changes to Active and the number of nodes in the cluster is now increased by 1.
Lab 4. Map the Private IP Addresses to Public IP Addresses
Big Data Service nodes are by default assigned private IP addresses, which aren't accessible from the public internet.
Using a bastion Host, VPN Connect, and OCI FastConnect provide more private and secure options than making the IP address public.
In this lab, you use Oracle Cloud Infrastructure Cloud Shell, which is a web browser-based terminal accessible from the Oracle Cloud Console.
- Open the navigation menu and click Analytics and AI. Under Data Lake, click Big Data Service.
-
On the Clusters page, click the
training-clusterlink in the Name column to display the Cluster Details page. - In the Cluster Information tab, in the Customer Network Information section, click the Copy link next to Subnet OCID. Next, paste that OCID to an editor or a file, as you will need it later in this workshop.
-
On the same page, in the List of cluster nodes section, in the IP
Address column, find the private IP addresses for the utility node
traininun0, the master nodetraininmn0, and the Cloud SQL nodetraininqs0. Save the IP addresses as you will need them in later tasks.
A utility node generally contains utilities used for accessing the cluster. Making the utility nodes in the cluster publicly available makes services that run on the utility nodes available from the internet.
export
command. These variables are used in the oci network command
that you use to map the private IP address of the utility node to a new public IP
address.-
On the Oracle Cloud Console banner at the top of the page, click
Cloud Shell
 . It may take a few moments to connect and
authenticate you.
To change the Cloud Shell background color theme from dark to light, click Settings
. It may take a few moments to connect and
authenticate you.
To change the Cloud Shell background color theme from dark to light, click Settings on the Cloud Shell banner, and then select Theme > Light from the
Settings menu.
on the Cloud Shell banner, and then select Theme > Light from the
Settings menu.
In this task, you set two variables using the export command.
These variables are used in the oci network command that you use to
map the private IP address of the master node to a new public IP address. You have
done similar work in the previous task.
In this task, you set two variables using the export command.
Next, you use the oci network command to map the private IP address
of the Cloud SQL node to a new public IP address.
In this task, you edit a public IP address using both the Cloud Console and the Cloud Shell.
You can also edit public IP addresses using the OCI CLI. See OCI CLI Command Reference - public-ip.
Do not delete any of your public IP addresses as you need them for this tutorial.
Lab 5. Use Apache Ambari to Access the Cluster
In this task, you use Apache Ambari to access the cluster. In a Big Data cluster,
Apache Ambari runs on the first utility node, traininun0. You use
the reserved public IP address that is associated with traininun0
that you created in Task 2 of Lab 4.
Lab 6. Create a Hadoop Administrator User
In this task, you connect to the cluster's master node using SSH as user
opc (the default Oracle Public Cloud user).
When you created a cluster, you used your SSH public key to create the nodes. In this section, you use the matching private key to connect to the master node.
Create the training Linux administrator user and the OS group
supergroup. Assign training the
supergroup superuser group as the primary group, and
hdfs, hadoop, and hive as the secondary groups.
Lab 7. Upload Data to HDFS and Object Storage
In this step, you download and run two sets of scripts.
First, you will download and run the Hadoop Distributed File System (HDFS) scripts to download data from Citi Bikes NYC to a new local directory on your master node in your BDS cluster. The HDFS scripts manipulates some of the downloaded data files, and then upload them to new HDFS directories. The HDFS scripts also create Hive databases and tables which you will query using Hue.
Second, you will download and run the object storage scripts to download data from Citi Bikes NYC to your local directory using OCI Cloud Shell. The object storage scripts uploads the data to a new bucket in Object Storage. See the Data License Agreement for information about the Citi Bikes NYC data license agreement.
- Open the navigation menu and click Identity & Security. Under Identity, click Compartments.
- In the list of compartments, search for the training-compartment. In the row for the compartment, in the OCID column, hover over the OCID link and then click Copy. Next, paste that OCID to an editor or a file, so that you can retrieve it later in this step.
- Click the Navigation menu and navigate to Networking > Reserved IPs. The Reserved Public IP Addresses page is displayed. In the List Scope on the left pane, make sure that your training-compartment is selected.
-
In row for the
traininmn0-public-ipreserved IP address, copy the reserved public IP address associated with the master node in the Reserved Public IP column. Next, paste that IP address to an editor or a file, so that you can retrieve it later in this step. You might need this IP address to ssh to the master node, if you didn't save your ssh connection in step 5.
In this task, you connect to the master node in the cluster using SSH as the
training Hadoop Administrator user that you created in
Step 5.
In this task, you connect to the master node as the training user
you created in Step 5: Create a Hadoop Administrator User.
In this task, you download two scripts that will set up your HDFS environment and download the HDFS dataset from Citibike System Data. The scripts and a randomized weather data file are stored in a public bucket in Object Storage.
The Citi Bikes detailed trip data files (in zipped format) are first downloaded to a
new local directory. Next, the files are unzipped, and the header row is removed
from each file. Finally, the updated files are uploaded to a new
/data/biketrips HDFS directory. Next, a new
bikes Hive database is created with two Hive tables.
bikes.trips_ext is an external table defined over
the source data. The bikes.trips table is created from this
source; it is a partitioned table that stores the data in Parquet format. The tables
are populated with data from the .csv files in the
/data/biketrips directory.
The stations data file is downloaded (and then manipulated) from the station information page. The updated file
is then uploaded to a new /data/stations HDFS directory.
The weather data is downloaded from a public bucket in Object Storage. Next, the
header row in the file is removed. The updated file is then uploaded to a new
/data/weather HDFS directory. Next, a new
weather Hive database and
weather.weather_ext table are created and populated
with from the weather-newark-airport.csv file in the
/data/weather directory.
To view the complete data files that are available, navigate to Citibike System Data page. In the Citi Bike Trip Histories section, click downloadable files of Citi Bike trip data. The Index of bucket "tripdata" page displays the available data files. In this lab, you will be using only some of the data files on that page.
In this task, you will download two scripts . The scripts and a randomized weather data file are stored in a public bucket in Object Storage.
-
To display the data files in an object such as the biketrip object,
click Expand
 next to the object's name. The files contained in that object are
displayed. To collapse the list of files, click collapse
next to the object's name. The files contained in that object are
displayed. To collapse the list of files, click collapse next to the object's name.
Lab 8. Manage your Cluster
You use the Clusters and Cluster Details pages to maintain your clusters.
Oracle Cloud Infrastructure Tagging allows you to add metadata to resources, which enables you to define keys and values and associate them with resources. You can use the tags to organize and list resources based on your business needs.
You can monitor the cluster's metrics and the metrics of any of its nodes.
-
From the Clusters page, click
training-clusterin the Name column to display the Cluster Details page. - Scroll-down the Cluster Details page. In the Resources section on the left, click Cluster Metrics.
- The Cluster Metrics section shows the various metrics such as HDFS Space Used, HDFS Space Free, Yarn Jobs Completed, and Spark Jobs Completed. You can adjust the Start time, End time, Interval, Statistic, and Options fields, as desired.
- In the Resources section on the left, click Nodes (7).
-
In the List of cluster nodes section, click any node name link to
display its metrics. Click the
traininmn0master node in the Name column. - In the Node Details page, scroll-down to the Node Metrics section. This section is displayed at the bottom of the Node Details page only after the cluster is successfully provisioned. It displays the following charts: CPU Utilization, Memory Utilization, Network Bytes In, Network Bytes Out, and Disk Utilization. You can hover over any chart to get additional details.
- Click the Cluster Details link in the breadcrumbs at the top of the page to re-display the Cluster Details page.
Lab 9. Clean Up Tutorial Resources
You can delete the resources that you created in this workshop. If you want to run the labs in this workshop again, perform these clean up tasks.
If you want to list the resources in your training-compartment,
you can use the Tenancy Explorer page. From the Navigation menu, navigate
to Governance & Administration. In the Governance section, click
Tenancy Explorer. On the Tenancy Explorer page, in the Search
compartments field, type training, and then select
training-compartment from the list of compartments. The
resources in the training-compartment are displayed.
- Open the navigation menu and click Identity & Security. Under Identity, click Policies.
- Click the Actions button associated with the training-admin-policy policy, and then select Delete from the context menu. A confirmation message box is displayed, click Delete.
- Click the Actions button associated with the training-bds-policy policy, and then select Delete from the context menu. A confirmation message box is displayed, click Delete.
To delete a VCN, it must first be empty and have no related resources or attached gateways such as internet gateway, dynamic routing gateway, and so on. To delete a VCN's subnets, they must first be empty too.
- Open the navigation menu and click Networking. Then click Virtual Cloud Networks.
- From the list of available VCNs in your compartment, click the training-vcn name link in the Name column. The Virtual Cloud Network Details page is displayed.
- In the Subnets section, click the Actions button associated with Private Subnet-training-vcn. Select Terminate from the context menu. A confirmation message box is displayed. Click Terminate.
- In the Subnets section, click the Actions button associated with Public Subnet-training-vcn. Select Terminate from the context menu. A confirmation message box is displayed. Click Terminate.
- In the Resources section on the left pane, click Route Tables.
- In the Routes Tables section, click the Actions button associated with Route Table for Private Subnet-training-vcn. Select Terminate from the context menu. A confirmation message box is displayed. Click Terminate.
- In the Routes Tables section, click the Default Route Table for training-vcn link in the Name column. The Route Table Details page is displayed. In the Route Rules section, click the Actions icon associated with Internet Gateway-training-vcn. Select Remove from the context menu. A confirmation message box is displayed. Click Remove. Click training-vcn in the breadcrumbs to return to the training-vcn page.
- In the Resources section on the left pane, click Internet Gateways. In the Internet Gateways section, click the Actions button associated with Internet Gateway-training-vcn. Select Terminate from the context menu. A confirmation message box is displayed. Click Terminate.
- In the Resources section on the left pane, click Security Lists. In the Security Lists section, click the Actions button associated with Security List for Private Subnet-training-vcn. Select Terminate from the context menu. A confirmation message box is displayed. Click Terminate.
- In the Resources section on the left pane, click NAT Gateways. In the NAT Gateways section, click the Actions button associated with NAT Gateway-training-vcn. Select Terminate from the context menu. A confirmation message box is displayed. Click Terminate.
- In the Resources section on the left pane, click Service Gateways. In the Service Gateways section, click the Actions button associated with Service Gateway-training-vcn. Select Terminate from the context menu. A confirmation message box is displayed. Click Terminate.
- At the top of the page, click Terminate to terminate your VCN. A Terminate Virtual Cloud Network window is displayed. After less than a minute, the Terminate All button is enabled. To delete your VCN, click Terminate All.
- When the termination operation is completed successfully, a Virtual Cloud Network termination complete message is displayed in the window. Click Close.
- Click the Navigation menu and navigate to Networking. In the IP Management section, click Reserved IPs. The Reserved Public IP Addresses page is displayed.
- In the List Scope on the left pane, make sure that your training-compartment is selected.
-
In this workshop, you have created three reserved IP addresses:
traininmn0-public-ip,traininqs0-public-ip, andtraininun0-public-ip. -
Click the Actions button associated with
traininmn0-public-ip. Select Terminate from the context menu. A confirmation message box is displayed. Click Terminate. -
Click the Actions button associated with
traininqs0-public-ip. Select Terminate from the context menu. A confirmation message box is displayed. Click Terminate. -
Click the Actions button associated with
traininun0-public-ip. Select Terminate from the context menu. A confirmation message box is displayed. Click Terminate.
Before you can delete a bucket that contains objects, you must delete all the objects in the bucket first.
- Click the Navigation menu and navigate to Storage. In the Object Storage & Archive Storage section, click Buckets. The Buckets page is displayed. In the List Scope on the left pane, make sure that your training-compartment is selected. In the list of available buckets, the newly created training bucket is displayed in the Name column. Click the training link.
- The Bucket Details page for the training bucket is displayed. Scroll-down to the Objects section.
- On the row for the biketrips object, click the Actions button, and then select Delete Folder from the context menu.
- A confirmation message box is displayed. Enter biketrips in the Type the folder name to confirm deletion text box, and then click Delete. The object is deleted and the Bucket Details page is re-displayed.
- On the row for the stations object, click the Actions button, and then select Delete Folder from the context menu.
- A confirmation message box is displayed. Enter stations in the Type the folder name to confirm deletion text box, and then click Delete. The object is deleted and the Bucket Details page is re-displayed.
- On the row for the weather object, click the Actions button, and then select Delete Folder from the context menu.
- A confirmation message box is displayed. Enter weather in the Type the folder name to confirm deletion text box, and then click Delete. The object is deleted and the Bucket Details page is re-displayed.
- Scroll up the page, and then click the Delete button. A confirmation message box is displayed. Click Delete. The bucket is deleted and the Buckets page is re-displayed.
- Open the navigation menu and click Identity & Security. Under Identity, click Compartments.
- From the list of available compartments, search for your training-compartment.
- On the Compartments page, click the Actions button associated with training-compartment. Select Delete from the context menu.
- A confirmation message box is displayed. Click Delete. The status of the deleted compartment changes from Active to Deleting until the compartment is successfully deleted. You can click on the compartment name link in the Name column to display the status of this operation.
What's Next
Learn more about Big Data Service or try other workshops.