SSO Between OCI and Microsoft Entra ID
In this tutorial, configure SSO between the OCI IAM and Microsoft Entra ID, using Entra ID as the identity provider (IdP).
This 30 minute tutorial shows you how to integrate OCI IAM, acting as a service provider (SP), with Entra ID, acting as an IdP. By setting up federation between Entra ID and OCI IAM, you enable users' access to services and applications in OCI using user credentials that Entra ID authenticates.
This tutorial covers setting up Entra ID as an IdP for OCI IAM.
- First, download the metadata from the OCI IAM identity domain.
- In the next few steps you create and configure an app in Entra ID.
- In Entra ID, set up SSO with OCI IAM using the metadata.
- In Entra ID, edit the Attributes and Claims so that the email name is used as the identifier for users.
- In Entra ID, add a user to the app.
- For the next steps, you return to your identity domain to finish the setup and configuration.In OCI IAM, update the default IdP policy to add Entra ID.
- Test that federated authentication works between OCI IAM and Entra ID.
This tutorial is specific to IAM with Identity Domains.
To perform this tutorial, you must have the following:
-
A paid Oracle Cloud Infrastructure (OCI) account, or an OCI trial account. See Oracle Cloud Infrastructure Free Tier.
- Identity domain administrator role for the OCI IAM identity domain. See Understanding Administrator Roles.
- An Entra ID account with one of the following Entra ID roles:
- Global Administrator
- Cloud Application Administrator
- Application Administrator
The user used for Single Sign On (SSO), must exist in both OCI IAM and Entra ID for SSO to work. After you complete this SSO tutorial, there is another tutorial, Identity Lifecycle Management Between OCI IAM and Entra ID. This other tutorial guides you through how to provision user accounts from Entra ID to OCI IAM or from OCI IAM to Entra ID.
You need the SP metadata from your OCI IAM identity domain to import into the SAML Entra ID application you create. OCI IAM provides a direct URL to download the metadata of the identity domain you are using. To download the metadata, follow these steps.
-
Open a supported browser and enter the Console URL:
- Enter your Cloud Account Name, also referred to as the tenancy name, and select Next.
- Select the identity domain to sign in to. This is the identity domain that is used to configure SSO, for example
Default. - Sign in with your username and password.
- Open the navigation menu and select Identity & Security. Under Identity, select Domains.
- Click the name of the identity domain that you want to work in. You might need to change the compartment to find the domain that you want. Then, click Settings and then Domain settings.
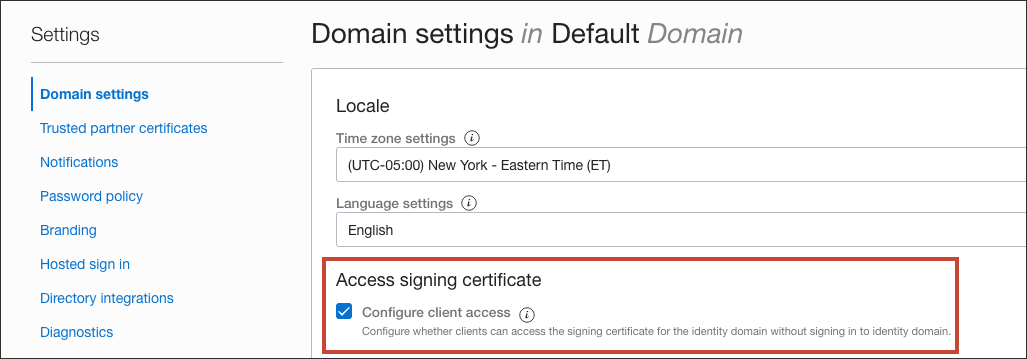
- Under Access signing certificate, check Configure client access.
This lets a client to access the signing certification for the identity domain without signing in to the domain.
- Select Save changes.
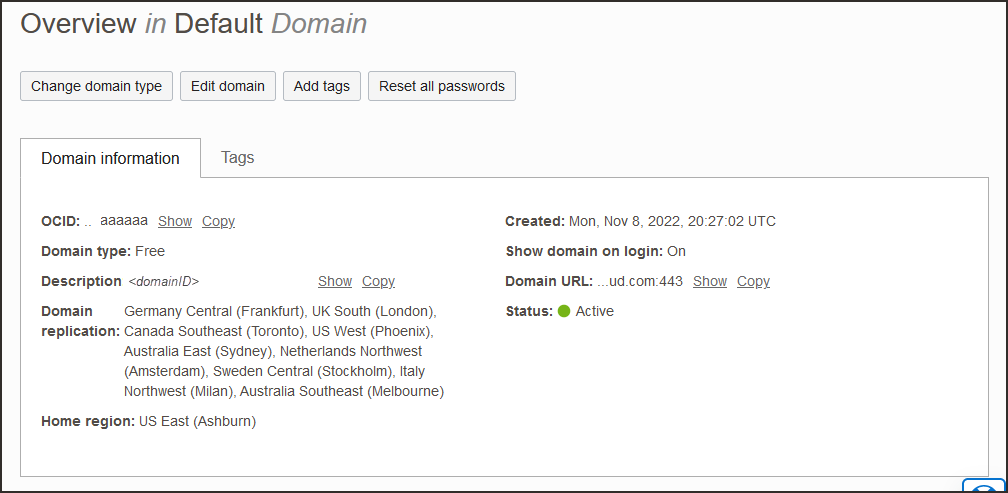
- Return to the identity domain overview by selecting the identity domain name in the breadcrumb navigation trail. Select Copy next to the Domain URL in Domain information and save the URL to an app where you can edit it.
- In a new browser tab, paste the URL you copied and add
/fed/v1/metadatato the end.For example,
https://idcs-<unique_ID>.identity.oraclecloud.com:443/fed/v1/metadata - The metadata for the identity domain is displayed in the browser. Save it as an XML file with the name
OCIMetadata.xml.
For the next few steps, you are working in Entra ID.
Create a SAML enterprise application in Entra ID.
- In the browser, sign in to Microsoft Entra using the URL:
https://entra.microsoft.com - Select Identity then Applications.
- Select Enterprise applications then New application.
- In Search applications, type
Oracle Cloud Infrastructure Console. - Select the Oracle Cloud Infrastructure Console by Oracle Corporation tile.
- Enter a name for the app, for example,
Oracle IAM, and select Create.The enterprise app is created in Entra ID.
Set up SSO for the Entra ID SAML application, and download the Entra ID SAML metadata. In this section, you use the OCI IAM SP metadata file you saved in 1. Get the Service Provider Metadata from OCI IAM.
- In the Getting Started page, select Get started under Set up single sign on.
- Select SAML, then select Upload metadata file (button at the top of the page). Browse to the XML file containing the OCI identity domain metadata,
OCIMetadata.xml. - Provide the Sign on URL. For example
https://idcs-<domain_ID>.identity.oraclecloud.com/ui/v1/myconsole - Select Save.
- Close the Upload metadata file page from the X in the upper right. If you are asked whether you want to test the application now, choose not to because you will test the application later in this tutorial.
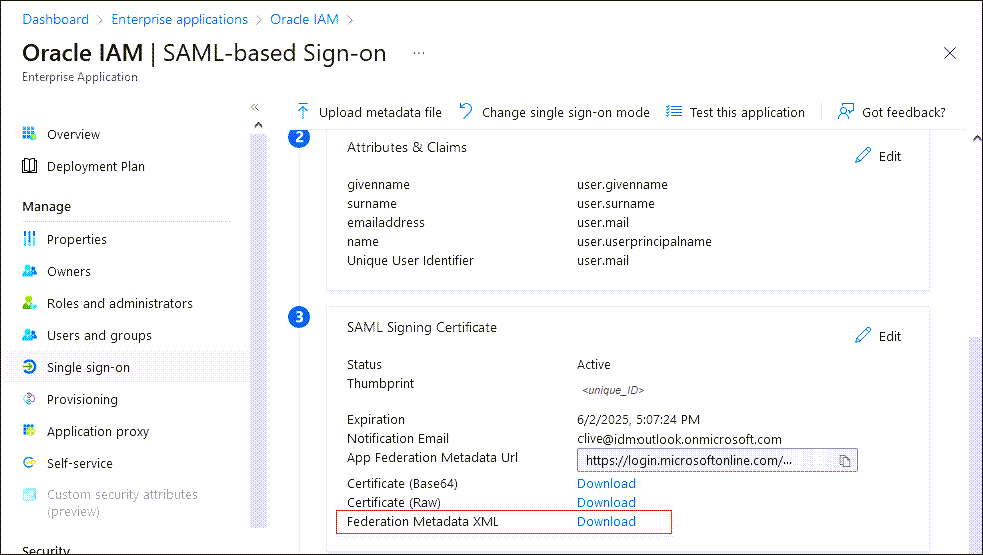
- In the Set up Single Sign-On with SAML page, scroll down and in SAML Signing Certificate, select Download next to Federation Metadata XML.
- When prompted, choose Save File. The metadata is automatically saved with the default filename
<your_enterprise_app_name>.xml. For example,OracleIAM.xml.
Edit the Attributes and Claims in your new Entra ID SAML app so that the user email address is used as the user name.
- In the enterprise application, from the menu on the left, select Single sign-on.
- In Attributes and Claims, select Edit.
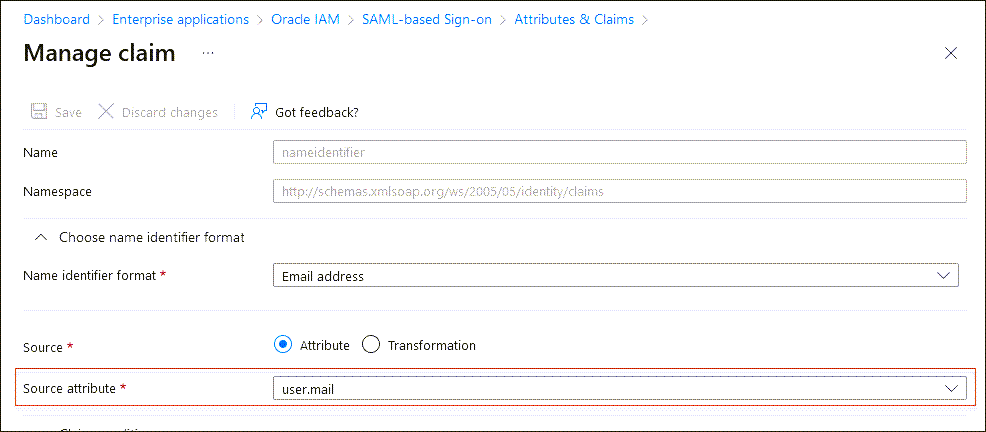
- Select the required claim:
Unique User Identifier (Name ID) = user.mail [nameid-format:emailAddress] - In the Manage claim page, change the Source attribute from
user.userprinciplenametouser.mail. - Select Save.
Additional Entra ID Configurations
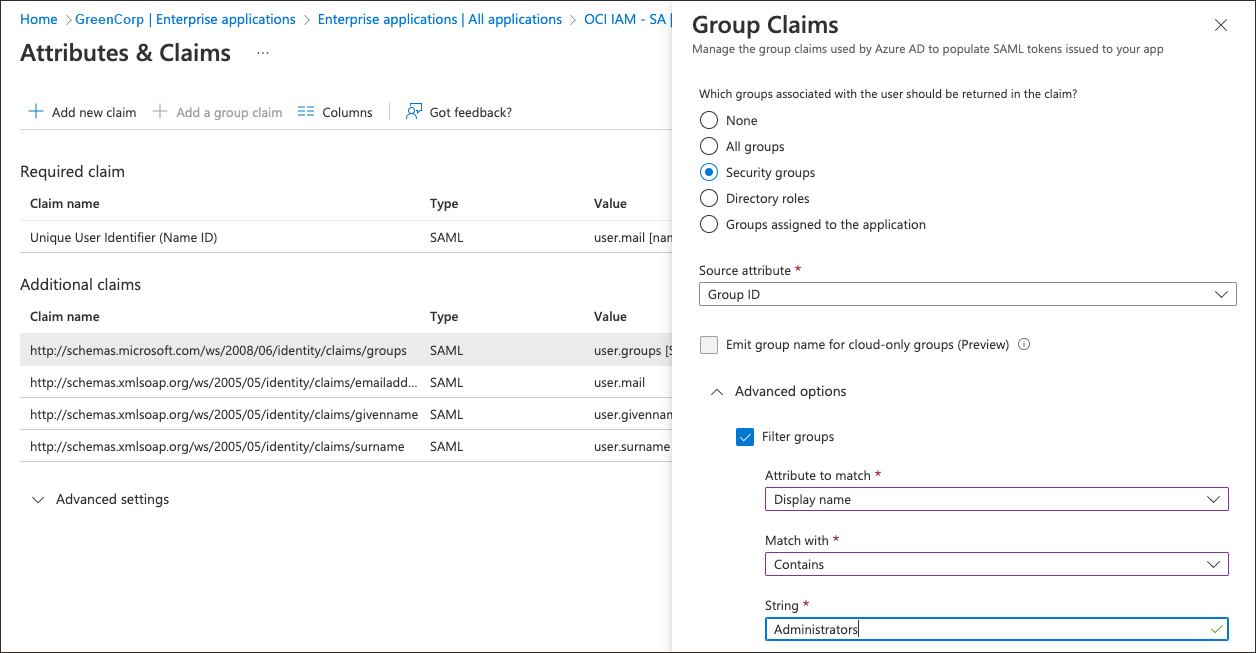
In Entra ID, you can filter groups based on the group name, or sAMAccountName, attribute.
For example, suppose only the Administrators group needs to be sent over using SAML:
- Select the group claim.
- In Group Claims, expand Advanced options.
- Select Filter Groups.
- For Attribute to match, select
Display Name. - For Match with, select
contains. - For String, provide the name of the group, for example,
Administrators.
- For Attribute to match, select
This helps organisations to send only the required groups to OCI IAM from Entra ID.
Create a test user for your Entra ID application. Later, this user can use their Entra ID credentials to sign in to the OCI Console.
- In the Microsoft Entra admin center, select Identity then Users, then All users.
- Select New user then Create new user, and create a user and enter their email ID.Note
Ensure that you use the details of a user present in OCI IAM with the same email id. - Return to the enterprise application menu. Under Getting Started, select Assign users and groups. Alternatively, select Users from under Manage on the menu on the left.
- Select Add user/group, and on the next page under Users select None Selected.
- In the Users page, select the test user you created. As you select it, the user appears under Selected items. Select Select.
- Back on the Add Assignment page, select Assign.
For these steps, you are working in OCI IAM.
Add Entra ID as an IdP for OCI IAM. In this section, you use the Entra ID metadata file you saved in 3. Set Up Single Sign-On for the Entra ID Enterprise App, for example, Oracle IAM.xml.
- In the OCI Console in the domain you are working in, select Security and then Identity providers.
- Select Add IdP, then select Add SAML IdP.
- Enter a name for the SAML IdP, for example
Entra ID. Select Next. - Ensure that Import identity provider metadata is selected, and browse and select, or drag and drop the Entra ID metadata XML file,
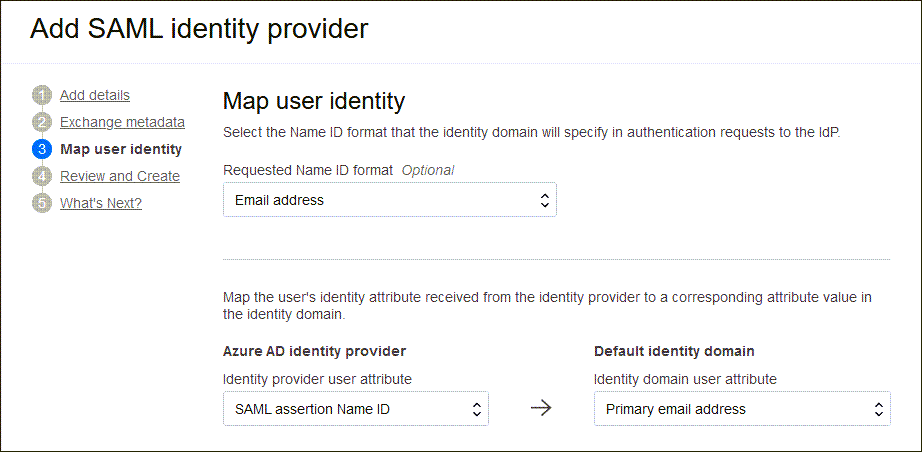
Oracle IAM.xmlinto Identity provider metadata. This is the metadata file you saved when you worked through 3. Set Up Single Sign-On for the Entra ID Enterprise App. Select Next. - In Map user identity, set the following
- Under Requested NameID format, select
Email address. - Under Identity provider user attribute, select
SAML assertion NameID. - Under Identity domain user attribute, select
Primary email address.
- Under Requested NameID format, select
- Select Next.
- Under Review and Create, verify the configurations and select Create IdP.
- Select Activate.
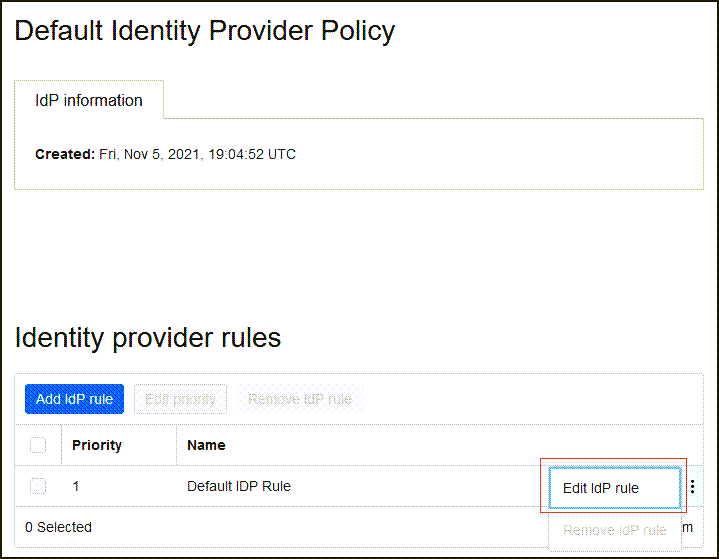
- Select Add to IdP Policy Rule.
-
Select Default Identity Provider Policy to open it, select the and select Edit IdP rule.
-
Select Assign identity providers and then select Entra ID to add it to the list.
- Select Save Changes.
For this to work, the user used for SSO must be present in both OCI IAM and Entra ID. Also, the user must be assigned to the OCI IAM application created in Entra ID.
There are two ways to do this:
- You can manually create a test user in both OCI IAM and Entra ID.
- However, if you want to test with a real time user, you should set up provisioning between Entra ID and OCI IAM by following the steps in the tutorial, Identity Lifecycle Management Between OCI IAM and Entra ID.
Sorry, but we're having trouble signing you in.
AADSTS50105: Your administrator has configured
the application application-name ('<unique_ID>')
to block users unless they are specifically granted
('assigned') access to the application.
Test the SP initiated SSO.
-
Open a supported browser and enter the OCI Console URL:
- Enter your Cloud Account Name, also referred to as your tenancy name, and select Next.
- Select the identity domain in which Entra ID federation has been configured.
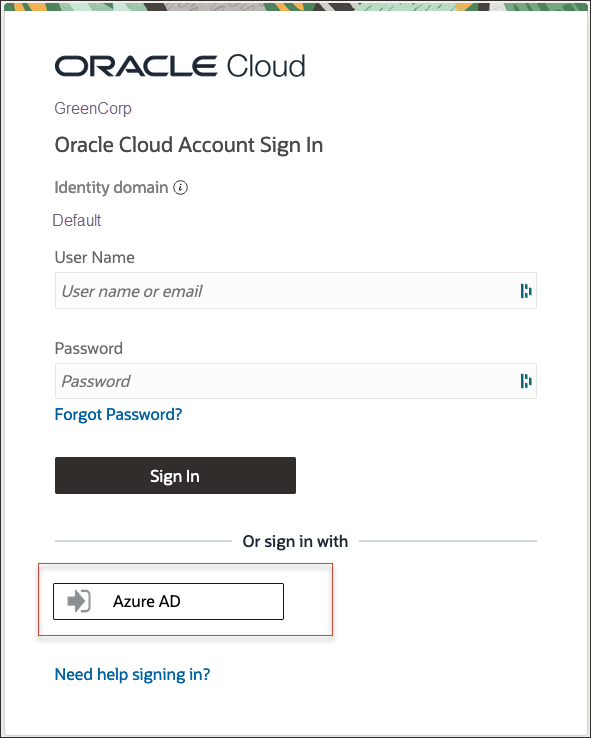
- On the sign-in page, you can see an option to sign in with Entra ID.
- Select Entra ID. You are redirected to the Microsoft login page.
- Provide your Entra ID credentials.
- On successful authentication, you are logged in to the OCI Console.
Congratulations! You have successfully set up SSO between Entra ID and OCI IAM.
If you already had a user created in Entra ID and assigned to the application, that had been provisioned to OCI IAM, you were able to test that federation authentication works between OCI IAM and Entra ID. If you didn't have such a user, you can create one by following one of the Identity Lifecycle Management Between OCI IAM and Entra ID tutorials.
To explore more information about development with Oracle products, check out these sites:
