Tenancies Without Identity Domains and Without the "Security Policy for OCI Console" Sign-On Policy
If you're using multifactor authentication (MFA) in tenancies without identity domains and without the "Security Policy for OCI Console" sign-on policy, and Oracle Identity Cloud Service as an auto-federated identity provider (IdP) in IAM, we recommend that you set up MFA using the following Oracle best practices.
To set up MFA without identity domains:
- Read Prerequisites.
- Enable MFA. See Step 1: Enable MFA Without Identity Domains.
- Create a sign-on policy. See Step 2: Create a New Sign-On Policy.
Prerequisites
Before you begin: Before you configure MFA, complete the following prerequisites.
- Review the MFA factors. The MFA factors available to you depend on the License Type you have. The License Type shows in the top right of the Identity Cloud Service console. See About Oracle Identity Cloud Service Pricing Models for more information about MFA and license types.
- Review the documentation for Use the Oracle Mobile Authenticator App as an Authentication Method to learn how to use Mobile app notification and Mobile app passcode in the Oracle Mobile Authenticator app.
- Optionally, and only during the roll out period, exclude an identity domain administrator from the "Security Policy for OCI Console" policy, so if you make any mistakes during roll out you have not locked yourself out of the Console.
As soon as roll out is complete, and you are confident that your users have all set up MFA and can access the Console, you can remove this user account.
- Identify any Identity Cloud Service groups mapped to OCI IAM groups.
- Register a client application with an Identity Domain Administrator role to enable access to your identity domain using the REST API in case your Sign-On Policy configuration locks you out. If you don't register this client application and a Sign-On Policy configuration restricts access to everyone, then all users are locked out of the identity domain until you contact Oracle Support. For information about registering a Client Application, see Register a Client Application in Using the Oracle Identity Cloud Service REST APIs with Postman.
- Create a bypass code and store that code in a secure location. See Generate and Use the Bypass Code.
Enable multifactor authentication (MFA) settings and compliance policies that define which authentication factors that you want to allow and then configure the MFA factors.
Enable MFA for any Identity Cloud Service stripes which are configured as an identity provider (IdP) in OCI IAM. You don't need to enable MFA for Identity Cloud Service stripes that aren't configured as an IdP in OCI IAM.
- Sign in to the Console in a tenancy without identity domains using your Identity Domain Administrator credentials.Note
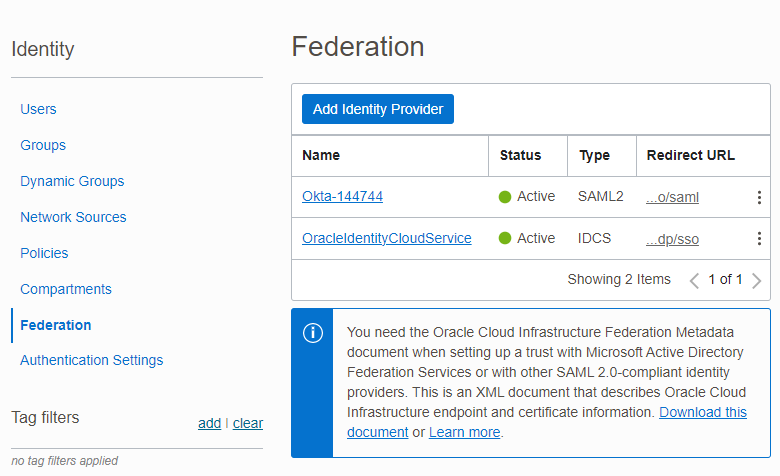
For most tenancies, the identity provider (IdP) is named OracleIdentityCloudService. If you have configured a different 3rd-Party IdP such as Microsoft Azure Active Directory (Azure AD) or Okta, choose that one. - In the Console, open the navigation menu and click Identity & Security. Under Identity, click Federation. A list of all external IdPs configured for OCI IAM is displayed.
- Click the name of your Oracle Identity Cloud Service federation IdP, for example, OracleIdentityCloudService. The Identity Provider details page is displayed.
- Click the Oracle Identity Cloud Service Console URL. The Oracle Identity Cloud Service console displays.
- In the Oracle Identity Cloud Service console, expand the Navigation Drawer, click Security, and then MFA.
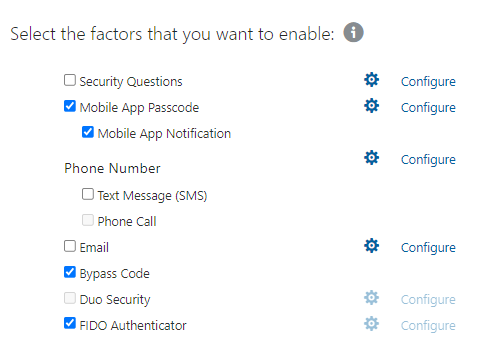
- (Required) Under Select the factors that you want to enable, select each of the factors that you want users to be able to select.Note
The MFA factors available to you depend on the Licence Type you have. The Licence Type shows in the top right of the Identity Cloud Service console. See About Oracle Identity Cloud Service Pricing Models for more information about MFA and license types.
Note
We recommend that you use these phishing-resistant MFA authenticators:
-
Mobile app passcode and Mobile app notification (included in the Foundation pricing tier)
-
Fast ID Online (FIDO) (included in the Standard pricing tier)
See Use the Oracle Mobile Authenticator App as an Authentication Method to learn how to use Mobile app notification and Mobile app passcode in the Oracle Mobile Authenticator app.
For more information about MFA authenticators, see Configure Authentication Factors.
-
- (Required) Always enable Bypass Code so that administrators can generate a one-time passcode as a second factor if users lose their external authenticator such as their mobile app or their FIDO key.
- (Optional) Use the Trusted Device(s) section to configure trusted device settings. Note
Similar to "remember my computer," trusted devices don't require the user to provide secondary authentication each time that they sign in (for a defined period). - (Optional) In the Factors section, set the Maximum number of enrolled factors that your users can configure.
- (Optional) In the Login Rules section, set the Maximum unsuccessful MFA attempts that you want to allow a user to incorrectly provide MFA verification before being locked out.
- Click Save, and then click OK in the Confirmation window.
- (Optional) Click Configure for the MFA factors that you have selected to configure them individually.
What to do next: Create a new Sign-on Policy. See Step 2: Create a New Sign-On Policy
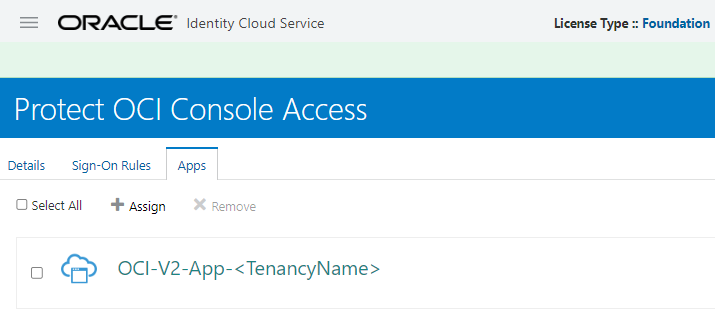
Create a new sign-on policy, add a rule for MFA, prioritize that rule to be the first rule that the identity domain evaluates, add the OCI -V2-App-<TenancyName> app to the new policy, activate the policy, and test the policy.
- In the Identity Cloud Service console, expand the Navigation Drawer, click Security, and then Sign-On Policies. The Default Sign-On Policy and any other sign-on policies you've defined are listed.
- Click Add.
- Add a Policy Name and Description. For the Name, enter Protect OCI Console Access.
- Click Next. Now, add sign-on rules to this policy.
- In the Sign-On Rules pane of the wizard, click Add to add a sign-on rule to this policy.
- Use the following table to configure the new MFA rule. Note
You can create more sign-on rules as you need them and then prioritize them to specify which rules are processed first. Evaluation stops at the first matching rule. If there is no matching rule, access is denied.Field Description Rule Name Enter a name. Enter the name of the sign-on rule. For example name it, Protect OCI Console Access to enable MFA for all users. Or name it Enable MFA for Administrators to enable MFA for administrators. If the user is authenticated by Enter or select all identity providers that will be used to authenticate the user accounts evaluated by this rule. And is a member of these groups Enable MFA for all users by entering or selecting the groups that users must be a member of to meet the criteria of this rule.
If you can't enable MFA for all users at this time, we recommend that you enable MFA for any Identity Cloud Service groups mapped to OCI IAM groups.
Note: If you leave And is a member of these groups empty and uncheck And is an administrator, all users are included in this rule.
And is an administrator Users assigned to the administrator roles in the identity domain are included in this rule.
Best practice. Use And is a member of these groups to enable MFA for all users or, at the least, all administrators. If you can't enable MFA for all users or administrators at this time using group membership, select And is an administrator to include administrators in this rule.
Important: If you create a rule for Administrators only, you must create a second rule without MFA for non-administrators to sign in. If the second rule isn't created, Console access is blocked for non-administrators.
And is not one of these users Best practice. Best practice is not to exclude any users. However, when you are setting up MFA, you can temporarily exclude an administrator account in case you make changes which lock you out of the OCI Console. After roll out is complete, and your users have MFA configured so that they can access the OCI Console, change this back so that no users are excluded from the rule.
See Tenancies Without Identity Domains and With the "Security Policy for OCI Console" Sign-On Policy for a list of prerequisites.
And the user's client IP address is There are two options associated with this field: Anywhere and Restrict to the following network perimeters. -
If you select Anywhere, then users can sign in to the identity domain using any IP address.
-
If you select Restrict to the following network perimeters, then the Network perimeters text box appears. In this text box, enter or select network perimeters that you defined. Users can sign in to the identity domain using only IP addresses that are contained in the defined network perimeters.
Access is Select whether a user will be allowed to access the Console if the user account meets the criteria of this rule.
Best practice. Choose Allowed.
Prompt for reauthentication Select this checkbox to force the user to re-enter credentials to access the assigned application even when there's an existing identity domain session.
When selected, this option prevents Single Sign On for the applications assigned to the Sign On policy. For example, an authenticated user must sign on to a new application.
If not selected, and the user has previously authenticated, they can access the application using their existing Single Sign On session without needing to enter credentials.
Best practice. Turn off Prompt for reauthentication.
Prompt for an additional factor Select this checkbox to prompt the user for an additional factor to sign in to the identity domain.
If you select this checkbox, then you must specify whether the user is required to enroll in multifactor authentication (MFA) and how often this additional factor is to be used to sign in.
Select Any Factor to prompt the user to enroll and verify any factor enabled in the MFA tenant level settings.
Select Specific Factor to prompt the user to enroll and verify a subset of factors enabled in the MFA tenant level settings. After you select Specific Factor, you can select factors that must be enforced by this rule.
Best practice. Choose Specific Factor and then choose any factors except Email or Phone Call .
Always enable Bypass Code.
Frequency Best practice. Choose Every time.
-
Select Once per session or trusted device, so that for each session that the user has opened from an authoritative device, they must use both their user names and passwords, and a second factor.
-
Select Every time, so that each time users sign in from a trusted device, they must use their user names and passwords, and a second factor. Best practice. Choose Every time.
-
Select Custom interval, and then specify how often users must provide a second factor to sign in. For example, if you want users to use this additional factor every two weeks, then click Number, enter 14 in the text field, and then click the Interval drop-down menu to select Days. If you configured multifactor authentication (MFA), then this number must be less than or equal to the number of days a device can be trusted according to MFA settings. .
Enrollment This menu contains two options: Required and Optional.
-
Select Required to force the user to enroll in MFA.
-
Select Optional to give users the option of skipping enrolling in MFA. Users see the inline enrollment setup process after they enter their user name and password, but can click Skip. Users can then enable MFA later from the 2–Step Verification setting in the Security settings of My Profile. Users aren't prompted to set up a factor the next time that they sign in.
-
Note: If you set Enrollment to Required, and later change it to Optional, the change only affects new users. Users already enrolled in MFA won't see the inline enrollment process and will not be able to click Skip when signing in.
-
- Click Save. Note
If you create an MFA rule for Administrators only, you must create a second rule without MFA for non-administrators to sign in. If the second rule is not created, Console access is blocked for non-administrators. - Click Next.
- Add the OCI -V2-App-<TenancyName>
app to the Protect OCI Console Access policy. Important: To ensure that your policy applies to Console access only and that it doesn't apply to any other applications, only add the OCI -V2-App-<TenancyName>
app.
- Click Assign. The list of applications that can be added to the policy is displayed.
- Locate and select OCI -V2-App-<TenancyName> .
- Click OK.
- Click Finish.
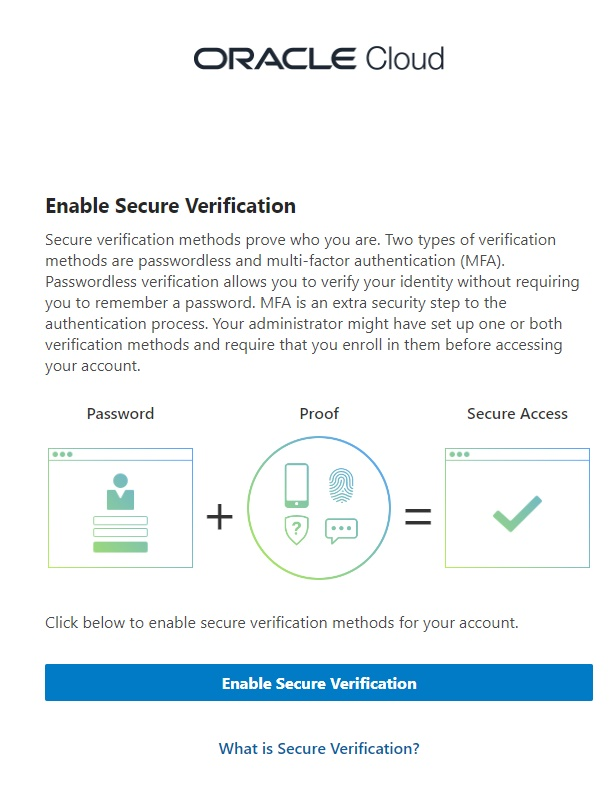
- Activate the sign-on policy and MFA is enabled. Users will be prompted to enroll in MFA the next time they sign in.
- In the Sign-On Policies page, click Protect OCI Console Access.
- Click Activate.
- Sign out of Identity Cloud Service.
- Sign in to Identity Cloud Service. You should be prompted for MFA enrollment. Complete MFA enrollment using the Oracle Mobile Authenticator (OMA). See Use and Manage the Oracle Mobile Authenticator App.


