Create Scripts and State Files with Resource Discovery
Generate Terraform files for existing resources in your compartment.
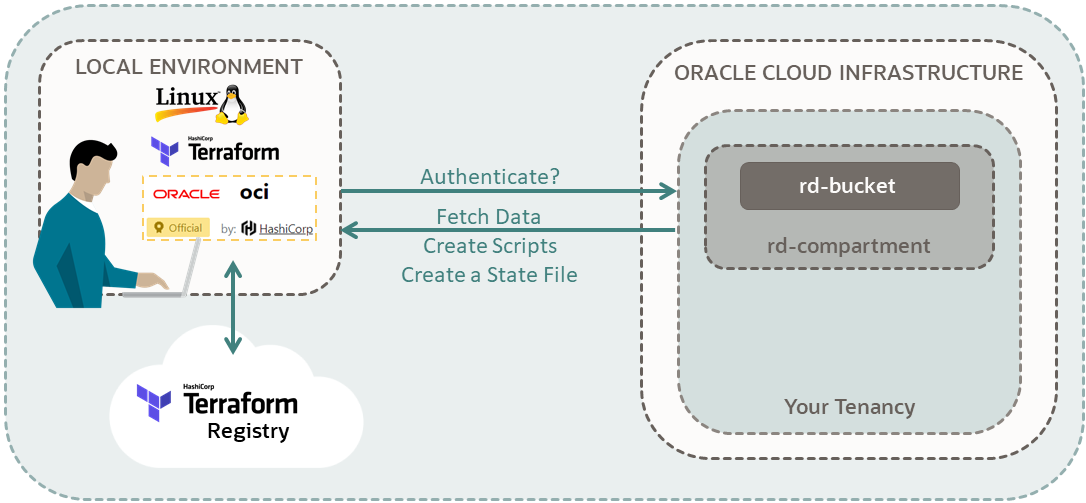
Use the OCI resource discovery feature to:
- Create state files for existing resources in the Console, and then add those resources to a Terraform setup.
- Duplicate your existing infrastructure in a new tenancy or region.
- Detect state drift for updated resources.
In this tutorial, you create scripts and state files for resources in your account through the resource discovery feature. Then you use Terraform to manage the resources.
Key tasks include how to:
- Create a resource through the Console.
- Create scripts and a state file for the resource through the resource discovery feature.
- Update the resource with Terraform.
- Confirm that the resource has been updated in the Console.
For more information, see:
Before You Begin
To successfully perform this tutorial, you must have the following:
- An Oracle Cloud Infrastructure account. See Request and Manage Free Oracle Cloud Promotions.
- A MacOS, Linux, or Windows computer.
- Terraform tutorial resources:
- Go through all the steps in Set Up Resource Discovery.
- Make a note of the OCI Terraform provider command:
-
Cloud Shell:
terraform-provider-oci_<version>from/usr/bin - Compute instance or a local environment: Use the
<shorter-alias>that you created in the previous tutorial to use instead of the command,terraform-provider-oci_<version>.- Example:
tf-oci
- Example:
-
Cloud Shell:
- Terraform v1.1.3+:
- If you're using Cloud Shell, you don't need to install Terraform. Terraform is already installed.
- If you're using a compute instance or a local environment, then follow the steps at Install Terraform.
1. Create a Resource
Create a bucket in your tenancy through the Console. This bucket doesn't have a Terraform script. Later, use resource discovery to create a Terraform script and a state file for the bucket.
If your username is in the Administrators group, then skip this section. Otherwise, ask your administrator to add the following policy to your tenancy:
allow group <a-group-your-username-belongs-to> to manage compartments in tenancyWith this privilege, you can create a compartment for all the resources in your tutorial.
- Sign in to the Oracle Cloud Console.
-
In the navigation menu , select the Profile menu
 and then select User settings or My profile, depending on the option that you see.
- Select Groups or My groups, depending on the option that you see.
- In a notepad, copy the name of a group that your username belongs to.
- Open the navigation menu and select Identity & Security. Under Identity, select Policies.
- Select the compartment:
<your-tenancy>(root) - Select Create Policy.
- On the Create Policy page, enter the following values:
-
Name:
manage-compartments -
Description:
Allow the group <a-group-your-username-belongs-to> to list, create, update, delete and recover compartments in the tenancy. -
Compartment:
<your-tenancy>(root)
-
Name:
- For Policy Builder, select Show manual editor.
- Paste in the following policy:
allow group <a-group-your-username-belongs-to> to manage compartments in tenancy - Select Create.
Reference:
Details for Verbs + Resource-Type Combinations (see the compartments resource-type)
Create a compartment for the resources that you create in this tutorial.
- In the Console: open the navigation menu , select Identity & Security. Under Identity, select Compartments.
- Select Create Compartment.
- Enter the following values:
-
Name:
<your-compartment-name> -
Description:
Compartment for <your-description>. -
Parent Compartment:
<your-tenancy>(root)
-
Name:
- Select Create Compartment.
Reference: Creating a Compartment
If your username is in the Administrators group, then skip this section. Otherwise, ask your administrator to add the following policy to your tenancy:
allow group <a-group-your-username-belongs-to> to manage all-resources in compartment <your-compartment-name>
With this privilege, you can manage all resources in your compartment, giving you administrative rights in that compartment.
- In the Console: Open the navigation menu and select Identity & Security. Under Identity, select Policies.
- Select your compartment.
- Select Create Policy.
- On the Create Policy page, enter the following values:
-
Name:
manage-<your-compartment-name>-resources -
Description:
Allow users to list, create, update, and delete resources in <your-compartment-name>. -
Compartment:
<your-tenancy>(root)
-
Name:
- For Policy Builder, enter the following values:
-
Policy use cases:
Compartment Management -
Common policy templates:
Let compartment admins manage the compartment - Identity domain: <identity-domain>
-
Groups:
<a-group-your-username-belongs-to> -
Location:
<your-compartment-name>
-
Policy use cases:
- Select Create.
Reference: Common Policies
Create a bucket in your compartment.
Ensure that you create your bucket in
<your-compartment-name>
.2. Discover the Resource
Discover the bucket that you created in your compartment.
- Go to Usage (Resource Discovery).
Two command options are listed.
- Select the command option that uses
compartment_nameas a base command:terraform-provider-oci -command=export -compartment_name=<xxx> -output_path=<xxx> - Update the base command:
- Instead of
terraform-provider-oci, use your symbolic link command:tf-oci - Review the Parameter Description section to add proper values to the parameters in the base command:
- Use the export command to perform resource discovery:
-command=export - Enter the name of the compartment that you're discovering its resources:
-compartment_name=<your-compartment-name> - Create and then specify a directory for the discovered resources:
Example:
-output_path=$HOME/resource-discovery
- Use the export command to perform resource discovery:
- Instead of
- Add the following parameter from the Parameter Description
section to the base command:
-
services
-
- From the service names listed for
services, use:-
object_storage - Example:
-services=object_storage - To discover more than one service, separate the service names with a comma.
- Example:
-services=object_storage,core - You don't need quotation marks around the service names.
-
- Construct the command:
Example:
tf-oci -command=export -compartment_name=<your-compartment-name> -services=object_storage -output_path=$HOME/resource-discoveryNote
Troubleshooting[ERROR] output_path does not exist: stat /$HOME/resource-discovery: no such file or directoryThe resource discovery command doesn't create a directory for the discovered resources. Create a directory and specify the path in your command.
[ERROR] no output directory specifiedThe parser stops at the parameter that lacks a dash. Ensure that you add a dash to the beginning of each parameter. For example, if you use
servicesinstead of-services, the parser doesn't reach the output directory.
Congratulations! You have created a state file for your bucket resource.
References:
3. Update the Resource
Update the name of your bucket in the object_storage.tf file and then run your Terraform scripts. Your account authenticates the scripts and then Terraform updates the bucket name. Confirm the new bucket name through the Console.
Update the Bucket
- Run your Terraform
scripts:
terraform apply - When prompted for confirmation, enter
yes, for the bucket name to be replaced.Example output:
Apply complete! Resources: 1 added, 0 changed, 0 destroyed.
Find New Bucket Name in Console
- Open the navigation menu and select Storage. Under Object Storage & Archive Storage, select Buckets.
- Select the compartment:
<your-compartment-name>. - In the list of buckets, check the bucket name.
The name of the bucket is now
<your-bucket-name>-2.
What's Next
Explore other Terraform tutorials:
To explore more information about development with Oracle products, check out these sites: