Set Up Resource Discovery
Set up resource discovery to generate Terraform files for existing resources in your compartment.
Use the OCI resource discovery feature to:
- Create state files for existing resources in the Console, and then add those resources to a Terraform setup.
- Duplicate your existing infrastructure in a new tenancy or region.
- Detect state drift for updated resources.
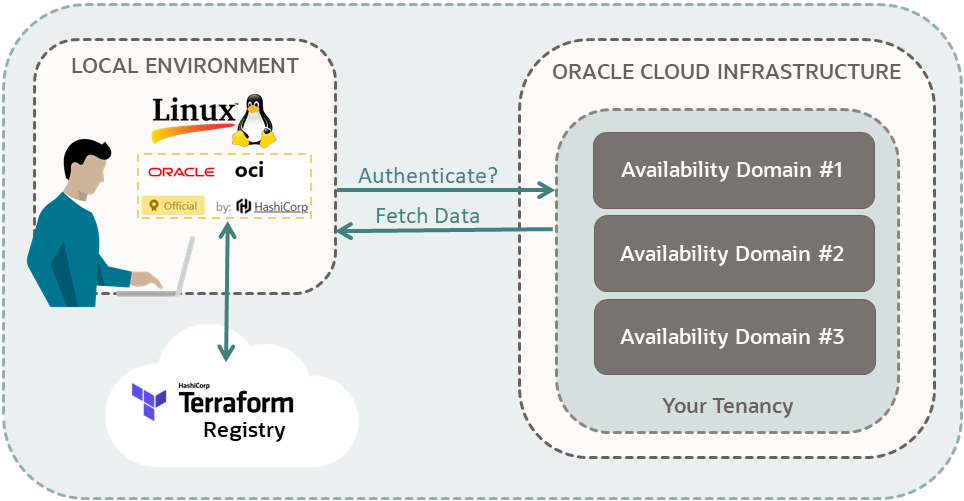
In this tutorial, you set up Oracle Cloud Infrastructure Terraform provider's resource discovery feature in your local environment. To confirm your setup, you run resource discovery to fetch information from your tenancy and create a script for it.
Key tasks include how to:
- Create RSA keys.
- Install Terraform OCI provider binaries.
- Set up Terraform OCI provider API authentication variables.
- Authenticate your OCI provider CLI commands.
- Create a script in your environment, regarding the availability domains in your tenancy, through the resource discovery feature.
For more information, see Use Cases and Benefits.
Before You Begin
To successfully perform this tutorial, you must have the following:
- An Oracle Cloud Infrastructure account. See Request and Manage Free Oracle Cloud Promotions.
- A MacOS, Linux, or Windows environment:
- MacOS
- Linux (Any distribution)
- You can install a Linux VM with an Always Free Compute shape, on Oracle Cloud Infrastructure. See Free Tier: Install Apache and PHP on an Oracle Linux Instance.
-
Oracle Cloud Infrastructure
Cloud Shell:
-
Cloud Shell
Note
If you're using Oracle Cloud Infrastructure Cloud Shell, the OCI Terraform Provider is already installed and you don't need to create RSA keys. Skip that section and proceed to Add List Policy.
-
Cloud Shell
- How to install Linux on Windows with WSL (WSL)
- Git for Windows to access a Linux VM.
1. Prepare
Prepare your environment for authenticating and running resource discovery commands. Also, gather the information your account needs to authenticate your commands.
You create RSA keys for API signing in to your Oracle Cloud Infrastructure account.
If you're using Cloud Shell or Resource Manager, skip creating the RSA keys. You're already authenticated when you sign in to the OCI Console.
-
Add the public key to your user account.
- Sign in to the Oracle Cloud Console.
- In the navigation menu , select the Profile menu
 and then select User settings.
 - Select API keys.
- Select Add API key.
- Select Paste a public key.
- Paste the value from the previous step, including the lines with
BEGIN PUBLIC KEYandEND PUBLIC KEY. - Select Add.
The Configuration file preview dialog box opens. Example:
[DEFAULT] user=ocid1.user.oc1..exampleid fingerprint=exampleid tenancy=ocid1.tenancy.oc1..exampleid region=us-ashburn-1 key_file=<path to your private keyfile> # TODO - Select Copy, then paste into your notepad.
The configuration file preview includes information you'll need later, such as tenancy and user OCIDs, fingerprint, and region.
You have now set up the RSA keys to connect to your OCI account.
- Reference
- How to Generate an API Signing Key
If your username is in the Administrators group, then skip this section. Otherwise, ask your administrator to add the following policy to your tenancy:
allow group <a-group-that-your-username-belongs-to> to read all-resources in tenancyWith this privilege, you can list all the resources in your tenancy.
- Sign in to the Oracle Cloud Console.
-
In the navigation menu , select the Profile menu and then select User settings.
- Select Groups or My groups, depending on the option that you see.
- In a notepad, copy the name of a group that your username belongs to.
- Open the navigation menu and select Identity & Security. Under Identity, select Policies.
- Select the compartment:
<your-tenancy>(root) - Select Create Policy.
- On the Create Policy page, enter the following values:
-
Name:
list-resources -
Description:
Allow the group <a-group-that-your-username-belongs-to> to list the resources in this tenancy. -
Compartment:
<your-tenancy>(root)
-
Name:
- For Policy Builder, select Show manual editor.
- Paste in the following policy:
allow group <a-group-that-your-username-belongs-to> to read all-resources in tenancy - Select Create.
Reference: Common Policies
Prepare the information you need to authenticate your Terraform OCI Provider commands and copy them into your notepad.
If you're using Cloud Shell, you only need to find the
<tenancy-ocid>
from the following step.-
Collect the following credential information from the Oracle Cloud Console.
-
Tenancy OCID:
<tenancy-ocid>-
In the navigation bar, select the Profile menu and then select Tenancy: <your_tenancy_name>.
-
In the navigation bar, select the Profile menu
-
User OCID:
<user-ocid>-
In the navigation menu , select the Profile menu and then select User settings.
- Copy OCID.
-
In the navigation menu , select the Profile menu
-
Fingerprint:
<fingerprint>-
In the navigation menu , select the Profile menu and then select User settings.
- Select API Keys.
- Copy the fingerprint associated with the RSA public key you made in the Create RSA Keys section. The format is:
xx:xx:xx...xx.
-
In the navigation menu , select the Profile menu
-
Region:
<region-identifier>- In the Console navigation bar, find your region.
- Find your region's
<region-identifier>from Regions and Availability Domains. Example:us-ashburn-1.
-
Tenancy OCID:
If you're using Cloud Shell, skip this section.
Install the latest version of Terraform OCI Provider binaries v4.2+:
2. Create an Authentication Script
Create a shell script to assign authentication information to OCI provider authentication variables. Your Oracle Cloud Infrastructure account authenticates your OCI provider commands through the values assigned to these parameters.
If you're using Cloud Shell or Resource Manager, you don't need to add authentication. Proceed to section 3. Discover a Resource.
- Go to Authentication (Resource Discovery).
- Set up the following environment variables for API Key based authentication:
- TF_VAR_tenancy_ocid
- TF_VAR_user_ocid
- TF_VAR_fingerprint
- TF_VAR_private_key_path
- TF_VAR_region
In this section, you run the provider-oci.sh file to add the OCI provider authentication variables to your environment variables.
3. Discover a Resource
Discover the availability domains in your tenancy.
Every tenancy has a list of availability domains. By discovering the availability domains in your region, you confirm that:
- Your Oracle Cloud Infrastructure account can authenticate your Oracle Cloud Infrastructure provider commands.
- You can get information from your account with the resource discovery feature.
- In your
$HOMEdirectory, create a directory calledresource-discovery.cdmkdir resource-discovery - If you're using Cloud Shell, find the installed OCI Terraform Provider file in the
/usr/bindirectory.ls /usr/binThe file name is:
terraform-provider-oci_<version>Sample file name:
terraform-provider-oci_v5.2.1 - Run the following command:
- In Cloud Shell:
terraform-provider-oci_<version> -command=export -compartment_id=<tenancy-ocid> -services=availability_domain -output_path=$HOME/resource-discovery - On your compute instance or in your local environment:
tf-oci -command=export -compartment_id=<tenancy-ocid> -services=availability_domain -output_path=$HOME/resource-discovery
Important
- Replace
<tenancy-ocid>with the information from Gather Required Information. - If you're using Cloud Shell, replace
terraform-provider-oci_<version>with the file name that you found in step 2.
Sample output:
...
INFO <date> [INFO] ===> Generating resource 'oci_identity_availability_domain.export_QnsC-US-ASHBURN-AD-1'
INFO <date> [INFO] ===> Generating resource 'oci_identity_availability_domain.export_QnsC-US-ASHBURN-AD-2'
INFO <date> [INFO] ===> Generating resource 'oci_identity_availability_domain.export_QnsC-US-ASHBURN-AD-3'
...
INFO <date> Found 6 'availability_domain' resources. Generated under '/<home-directory>/resource-discovery/availability_domain.tf'.
INFO <date> === COMPLETED ===
Note
- The tenancy OCID is the compartment OCID for the root compartment. Providing a specific
<compartment-ocid>or your<tenancy-ocid>outputs the same availability domains. - To discover identity resources, you don't need to mention a compartment OCID. In the previous example, you get the same result if you remove the
compartment_idfrom the command. Thecompartment_idis there for you to learn the syntax for other services.
- In Cloud Shell:
-
error message: Failed to query available provider packages:
- If you're on a VPN, check your proxy settings.
-
401 errors - (Service error:NotAuthenticated):
- You have an incorrect value for one of the following:
- tenancy OCID
- user OCID
- fingerprint
- RSA private key (the path or the key)
- You have an incorrect value for one of the following:
-
no such host:
- You have an incorrect value for the following:
- region identifier
- You have an incorrect value for the following:
- Go to Usage (Resource Discovery).
Two command options are listed.
- Select the command option that uses
compartment_idas a base command:terraform-provider-oci -command=export -compartment_id= -output_path= - Update the base command:
- Instead of
terraform-provider-oci, use your symbolic link command:tf-oci - Review the Parameter Description section to add proper values to the parameters in the base command:
- Use the
exportcommand to perform resource discovery:-command=export - Add the OCID of the compartment that you're discovering resources in:
-compartment_id=<tenancy-ocid> - Create and then specify a directory for the discovered resources:
Example:
-output_path=$HOME/resource-discovery
- Use the
- Instead of
- Search for the phrase
availability_domainand observe the following information:Resources that are dependent on availability domains will be generated under availability_domain.tf file. These include: oci_core_boot_volume oci_file_storage_file_system oci_file_storage_mount_target oci_file_storage_snapshot - For services, use:
-
availability_domain(Even though it's not a service, it works with service.) - Example:
-services=availability_domain - You don't need quotation marks around the service names.
-
- Construct the command:
Example:
tf-oci -command=export -compartment_id=<tenancy-ocid> -services=availability_domain -output_path=$HOME/resource-discoveryNote
The resource discovery command doesn't create a directory for the discovered resources. Create a directory and specify the path in your command.
Congratulations! Your Oracle Cloud Infrastructure account can now authenticate your Terraform OCI provider commands. And your environment is ready to run the resource discovery commands.
References:
What's Next
Explore other Terraform tutorials:
To explore more information about development with Oracle products, check out these sites: