Migrating Amazon Redshift to Autonomous AI Database
The SQL Developer Amazon Redshift Migration Assistant, available with SQL Developer 18.3 and later versions provides a framework for easy migration of Amazon Redshift environments on a per-schema basis.
This section describes the steps and the workflow for both an online migration of Amazon Redshift and for the generation of scripts for a scheduled, manual migration that you run at a later time.
- Autonomous AI Database Redshift Migration Overview
Using SQL Developer you can migrate database files from Amazon Redshift to Autonomous AI Database. - Connect to Amazon Redshift
Using SQL Developer you can migrate database Schemas and Tables from Amazon Redshift to Autonomous AI Database. To extract metadata and data from Amazon Redshift for a migration, you need to connect to Amazon Redshift with SQL Developer. - Connect to Autonomous AI Database
Using SQL Developer you create a connection to Autonomous AI Database - Start the Cloud Migration Wizard
Invoke the Cloud Migration Wizard from the Tools menu of SQL Developer to initiate your Amazon Redshift migration to Autonomous AI Database. - Review and Finish the Amazon Redshift Migration
The summary shows a summary of the information that you have specified. - Use Generated Amazon Redshift Migration Scripts
When you choose to generate migration scripts a new subdirectory is created in the local directory specified in the migration Wizard. You can run these scripts in real time or use them for programmatic processing. - Perform Post Migration Tasks
After successful migration of your Redshift environment you should consider the following post-migration tasks:
Autonomous AI Database Redshift Migration Overview
Using SQL Developer you can migrate database files from Amazon Redshift to Autonomous AI Database.
-
Capture: Captures Metadata schemas and tables from source database and stores in Migration Repository.
-
Convert: Redshift Datatypes are mapped to Oracle Datatypes. Redshift Object names are converted to Oracle names based on Oracle Naming Convention. The Column Defaults that use Redshift functions are replaced by their Oracle equivalents.
-
Generate: Generate schemas and DDLs based on the converted metadata.
-
Deploy: Deploy the generated schemas and DDLs.
-
Copy Data: Unload data from Redshift tables to Amazon Storage S3 then copy data from Amazon Storage to Autonomous AI Database tables(in schemas) that were Deployed earlier.
Parent topic: Migrating Amazon Redshift to Autonomous AI Database
Connect to Amazon Redshift
Using SQL Developer you can migrate database Schemas and Tables from Amazon Redshift to Autonomous AI Database. To extract metadata and data from Amazon Redshift for a migration, you need to connect to Amazon Redshift with SQL Developer.
Download Amazon Redshift JDBC Driver and Add the Third Party Driver
-
Download an Amazon Redshift JDBC driver to access Amazon Redshift. Consult the Amazon Redshift documentation for the location of the most recent JDBC driver. For more information, see Configure a JDBC Connection.
Note
Use the Amazon Redshift JDBC Driver JDBC 4.2–compatible driver. -
Store the Amazon Redshift JDBC driver in a local directory where SQL Developer can access the Amazon Redshift JDBC driver.
-
Add the Amazon Redshift JDBC driver as third party to SQL Developer before making a connection. Within SQL Developer, go to Tools > Preferences > Database > Third Party JDBC Drivers (for Mac, this is Oracle SQL Developer > Preferences Database > Third Party JDBC Drivers).
-
Click Add Entry and select the path to the Amazon Redshift JDBC Driver that you download.
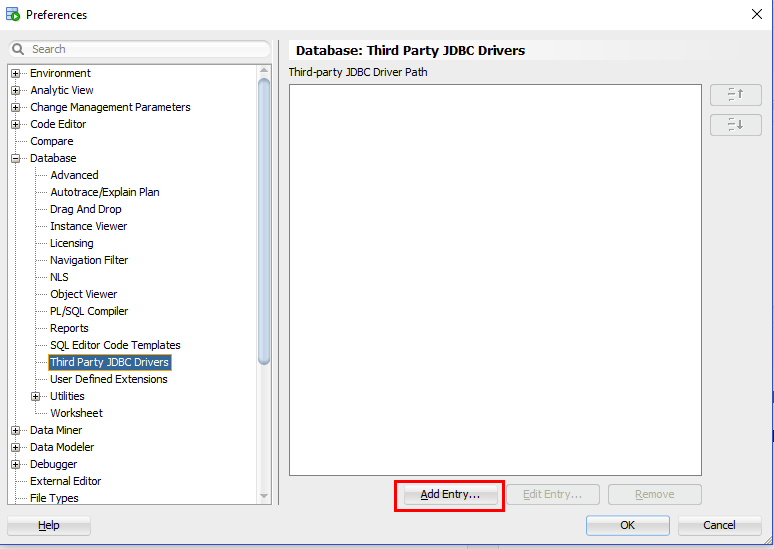
Description of the illustration dwcs_aws_migration_jdbc_add1.png -
Click OK to add the Amazon Redshift JDBC driver that you download.
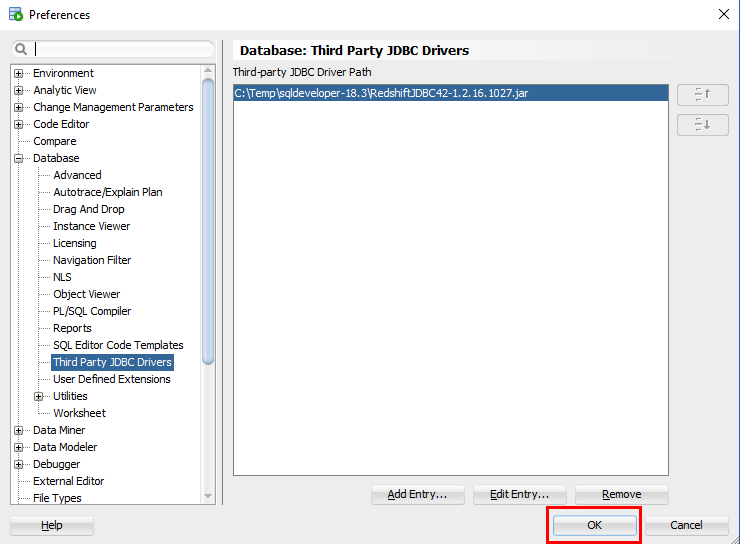
Description of the illustration dwcs_aws_migration_jdbc_add2.png
Add Connection to Amazon Redshift Database
Connect to the Amazon Redshift database.
-
In the Connections panel, right-click Connections and select New Connection....
-
Select the Amazon Redshift tab and enter the connection information for Amazon Redshift.
If you are planning to migrate multiple schemas it is recommended to connect with the Master username to your Amazon Redshift system.
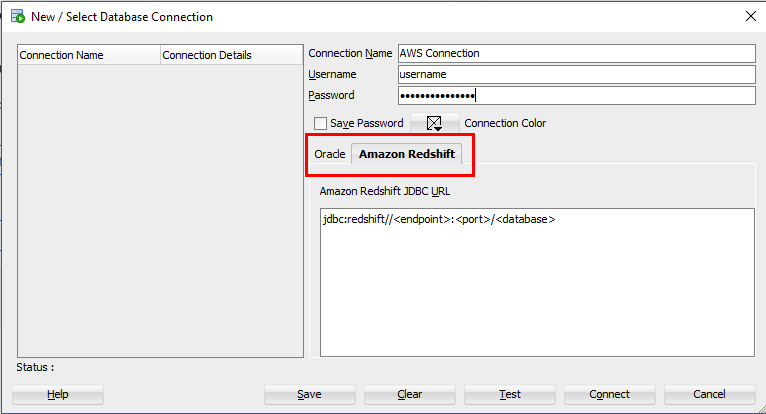
Description of the illustration adw_migrate_aws_connect1.png
-
For more details for configuring a JDBC Connection and obtaining the Amazon Redshift JDBC URL, see AWS: Configure a JDBC Connection.
-
For more details for configuring security options for the connection ( in case of "Amazon [500150] connection error"), see AWS: Configure Security options for Connection ( in case of "Amazon [500150] connection error").
-
If you deployed your Amazon Redshift environment within a Virtual Private Cloud (VPC) you have to ensure that your cluster is accessible from the Internet. See http://docs.aws.amazon.com/redshift/latest/gsg/rs-gsg-authorize-cluster-access.html for details of how to enable public Internet access.
-
If your Amazon Redshift client connection to the database appears to hang or times out when running long queries, see http://docs.aws.amazon.com/redshift/latest/mgmt/connecting-firewall-guidance.html for possible solutions to address this issue.
Test the connection before you save it.
Additional Information for Amazon Authentication and Access Control
Parent topic: Migrating Amazon Redshift to Autonomous AI Database
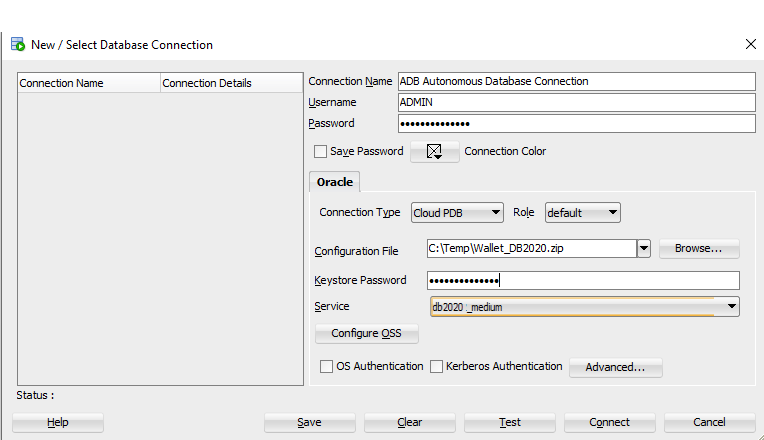
Connect to Autonomous AI Database
Using SQL Developer you create a connection to Autonomous AI Database
Parent topic: Migrating Amazon Redshift to Autonomous AI Database
Start the Cloud Migration Wizard
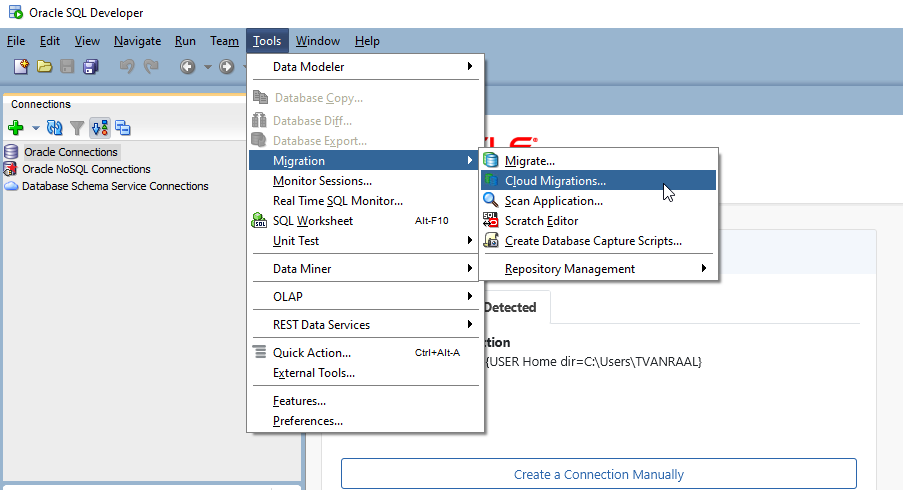
Invoke the Cloud Migration Wizard from the Tools menu of SQL Developer to initiate your Amazon Redshift migration to Autonomous AI Database.
The Cloud Migration wizard starts when you click Cloud Migrations from Migration in the Tools menu. The Cloud Migrations wizard enables you to migrate schemas, objects (tables), and data from an Amazon Redshift database to Autonomous AI Database.
The Cloud Migration Wizard is an easy set of steps. The Cloud Migration Wizard guides you to:
-
Identify the schemas in your Amazon Redshift database that you want to migrate.
-
Identify the target Autonomous AI Database.
-
Define whether you want to migrate the metadata (DDL), the data, or both.
-
Choose to migrate your system online, to generate scripts, or both.
Identify the Amazon Redshift Database
Identify the schemas in the Amazon Redshift database to migrate. All objects, mainly tables, in the schema will be migrated. Migration to Autonomous AI Database is on a per-schema basis. Schemas cannot be renamed as part of the migration.
-
In the AWS Redshift Migration, specify the Connection.
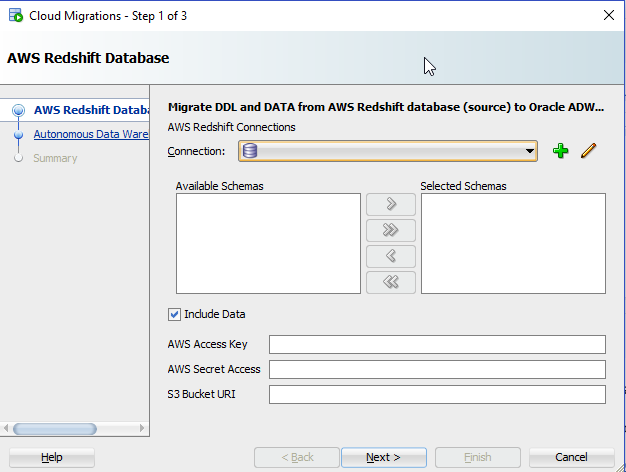
Description of the illustration adw_migrate_redshift_step1of3.png
-
Connection: Name of the Redshift database connection.
-
Available Schemas: Schemas available for the specific connection.
-
Selected Schemas: Click the Add icon to select the schemas you want to migrate from Available Schemas.
-
Include Data: DDL and DATA migrates the selected schemas and data.
When you migrate data, you have to provide the AWS access key, AWS Secret Access Key, and an existing S3 bucket URI where the Redshift data will be unloaded and staged. The security credentials require certain privileges to store data in S3. It is recommended to create new, separate access keys for the migration. The same access key is used later on to load the data into the Autonomous AI Database using secure REST requests.
-
AWS Access Key: For more information on access keys, see AWS Identity and Access Management.
-
AWS Secret Access: For more information on access keys, see AWS Identity and Access Management.
-
S3 Bucket URI: For information on common S3 ServiceException errors, see S3ServiceException Errors.
For more information an S3 buckets, see Creating and Configuring an S3 Bucket.
Amazon S3 Bucket URI Format
For the source files that reside in Amazon S3, see the following for a description of the URI format for accessing your files: Accessing a Bucket For example the following refers to the file folder 'folder_name' in the adwc bucket in the us-west-2 region.
https://s3-us-west-2.amazonaws.com/adwc/folder_nameS3 Bucket Configuration Example 1
If you provide the following S3 Bucket URI :
https://s3-us-west-2.amazonaws.com/my_bucket The wizard verifies the entire path including my_bucket. An attempt is made to write a test file, if it is not accessible there is a prompt. In case, my_bucket does not exist, there is an error reported:
Validation FailedThen the code generation creates the following path for the DBMS_CLOUD.COPY_DATA function:
file_uri_list => "https://s3-us-west-2.amazonaws.com/my_bucket/oracle_schema_name/oracle_table_name/*.gz"The migration assistant creates these folders: oracle_schema_name/oracle_table_name inside the bucket: my_bucket.
S3 Bucket Example 2
If you provide the following S3 Bucket URI :
https://s3-us-west-2.amazonaws.com/my_bucket/another_folder The wizard verifies the entire path including my_bucket. An attempt is made to write a test file, if it is not accessible there is a prompt. In case, my_bucket does not exist, there is an error reported:
Validation FailedIn this case the another_folder does not have to exist. The migration creates the another_folder bucket inside my_bucket.
Then the code generation creates the following path for the DBMS_CLOUD.COPY_DATA function:
file_uri_list => ‘https://s3-us-west-2.amazonaws.com/my_bucket/another_folder/oracle_schema_name/oracle_table_name/*.gzStep 2 of 3: Autonomous AI Lakehouse Cloud
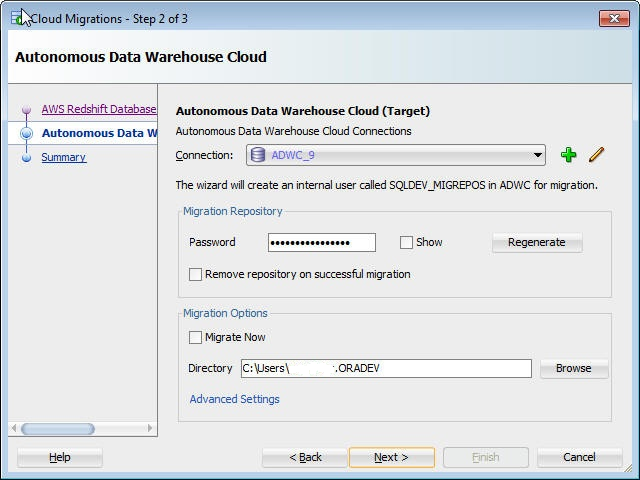
First create a connection for your target Autonomous AI Database See Connect to Autonomous AI Database. The user for this connection must have the administrative privileges; the connection is used throughout the migration to create schemas and objects.
Use the ADMIN user or a user with admin role.
The Amazon Redshift Migration Assistant allows you to do an online migration right away, to generate all scripts necessary for a migration, or both. If you chose to store the scripts in a local directory you have to specify the local directory (the directory must be writable by the user).
-
Connection: Name of the Autonomous AI Lakehouse Cloud connection. Create a connection for the Autonomous AI Database if required. The user must have administrative privileges since this connection is used throughout the migration to create schemas and objects.
-
Migration Repository Password: Password for the migration repository that is installed in the Autonomous AI Database as part of the schema migration. Either use the pre-filled password or enter a new password.
-
Remove repository on successful migration: Select this option to remove the repository after the migration is completed. The repository is not required after migration.
-
Migrate Now: Select this option to perform an online migration immediately.
Note
-
If Include Data from Step 1 and Migrate Now are both unselected, you are opting for just generation of all required SQL Scripts for manual migration.
-
If Include Data from Step 1 is unchecked and Migrate Now is selected, then all selected schemas and their tables will be deployed in Autonomous AI Database but data will not be loaded into tables.
-
If Include Data from Step 1 and Migrate Now are both selected, then all selected schemas and their tables will be deployed in Autonomous AI Database and data will be loaded into tables.
-
-
Directory: Specify the director to store the generated scripts necessary for the migration; this saves the scripts in a local directory.
Advanced Settings (Optional)
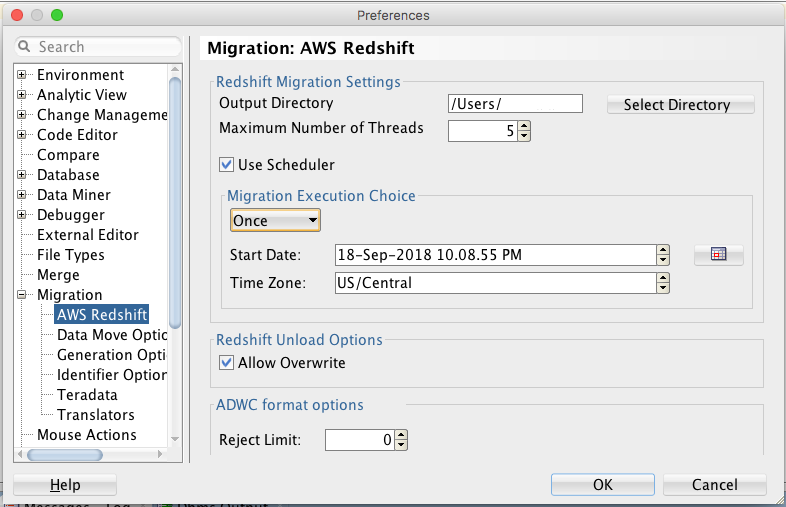
The default settings should work unless you want to control the format options when Unloading to S3 storage or Copying from S3 storage to Autonomous AI Database. For more information on Format Options, see DBMS_CLOUD Package Format Options. To use advanced options, click Advanced Settings.
Output Directory: Enter the path or click Select Directory to select the directory or folder for the migration.
Maximum Number of Threads: Enter the number of parallel threads to enable when loading data to tables in Autonomous AI Database.
Use Scheduler: Select this option to enable the scheduler for migration. You can schedule jobs for data load migration operations from the AWS S3 bucket to Autonomous AI Database. You have the option to run the scheduled jobs immediately or at a future date and time. To monitor the data load scheduled jobs, use the Scheduler node in the Connections navigator.
Migration Execution Choice:
-
Immediate runs the scheduler as soon as the Redshift migration is triggered.
-
Once runs the scheduler on a future date. You specify the Start Date and Time Zone. By default, the Start Date displays the current date and time of the local system. To change the start date, use the calendar icon to double-click and select the date or use the spinner to highlight the date and then click the field to set it.
Redshift Unload Options: Allow Overwrite: If this option is enabled, the unload process will overwrite existing files, including the manifest file (lists the data files that are created by the unload process). By default, unload fails if there are files that can be overwritten.
ADWC format options: Reject Limit: Enter the number of rows to reject when loading data to tables in Autonomous AI Database. The migration operation will error out after the specified number of rows are rejected. The default is 0.
Parent topic: Migrating Amazon Redshift to Autonomous AI Database
Review and Finish the Amazon Redshift Migration
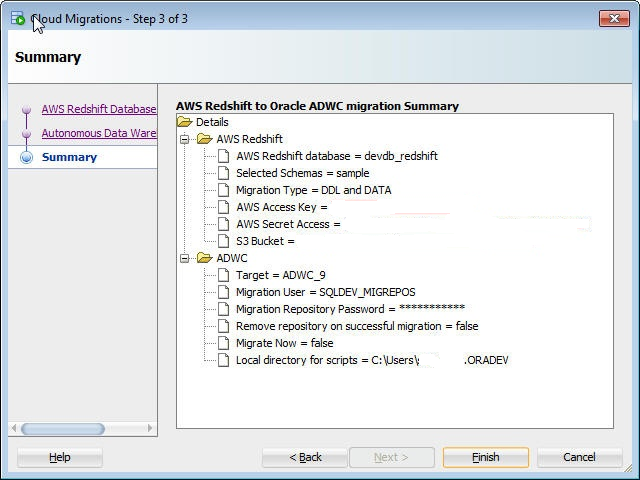
The summary shows a summary of the information that you have specified.
To change any information, press Back as needed.
Description of the illustration adw_migrate_aws_summary.png
If you have chosen an immediate migration, then the dialog of the migration wizard stays open until the migration is finished. If you select generate scripts, the migration process generates the necessary scripts in the specified local directory, and does not run the scripts.
To perform the migration, click Finish
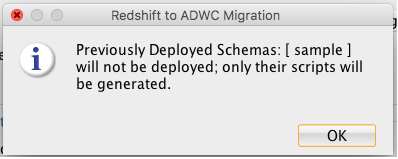
If the selected schema name in AWS Redshift already exists in Autonomous AI Database, the migration process excludes deploying these selected schemas and displays a dialog:
Description of the illustration adw_migrate_aws_schema_exists.png
Summary: What The Migration Assistant Creates
-
Creates a new Autonomous AI Database user using the schema_name from Redshift.
-
Creates a new bucket on S3 based on the schema name.
-
Creates sub-folders on S3 for each table.
Parent topic: Migrating Amazon Redshift to Autonomous AI Database
Use Generated Amazon Redshift Migration Scripts
When you choose to generate migration scripts a new subdirectory is created in the local directory specified in the migration Wizard. You can run these scripts in real time or use them for programmatic processing.
The directory contains the following scripts:
-
redshift_s3unload.sql -
adwc_ddl.sql -
adwc_dataload.sql -
adwc_dataload_scheduler.sql
These scripts contain all necessary commands to migrate your Amazon Redshift system to Autonomous AI Database. You can run these scripts in real time or use them for programmatic processing.
Unload Your Amazon Redshift Data into S3
The first step of a successful migration is to unload your Amazon Redshift data into Amazon S3, which acts as a staging area. Script redshift_s3unload.sql has all the Amazon Redshift unload commands to unload the data using the access credentials and the S3 bucket that were specified in the Migration Wizard workflow.
Connect to your Amazon Redshift environment to run this script.
Create Your Lakehouse Objects
To prepare your Autonomous AI Database create your empty Lakehouse schema prior to loading data. The Amazon Redshift Migration Assistant converted all Amazon Redshift schema structures into Oracle structures in script adwc_ddl.sql.
The script must be executed while you are connected to your Autonomous AI Database as privileged user; for example, ADMIN.
By default, the schema created for the migration has the same name as the schema in Amazon Redshift. You must change the password to the valid password for the specified user either in the script or after the script runs. If you want to change the schema name then change the schema name and all references to the name.
Load Your Amazon Redshift Data into Your Oracle Autonomous AI Database
The script adwc_dataload.sql contains all the load commands necessary to load your unloaded Amazon Redshift data straight from S3 into your Autonomous AI Database.
Execute the script while connected to your Autonomous AI Database as a privileged user; for example ADMIN.
If you want to change the target schema name when you create your Lakehouse objects then you must adjust the target schema names in this script accordingly.
Use of JOB SCHEDULER
SQL Developer provides a graphical interface for using the DBMS_SCHEDULER PL/SQL package to work with Oracle Scheduler objects. To use the SQL Developer scheduling features, please refer 'Scheduling Jobs Using SQL Developer' topic of SQL Developer User Guide and Oracle Database Administrator's Guide to understand the concepts and essential tasks for job scheduling.
The Scheduler node for a connection appears in the Connections navigator and in the DBA navigator. Use ADWC 'admin' user to navigate which displays Scheduler objects owned by the 'admin' monitoring status of data load jobs.
Under ADWC 'admin' Connection → Scheduler → Jobs, you will see AWS Redshift to ADWC data load jobs are created with name <schema_name>_<table_name>.
To see the status of completion of each data load, please expand each scheduled job and check the status.
Also for more detailed information about data load operation see table MD_REPORT in SQLDEV_MIGREPOS schema that stores information about table columns: and
OPERATION_ID, LOGFILE_TABLE, BADFILE_TABLE, SOURCE_SCHEMA_NAME, TARGET_SCHEMA_NAME, SOURCE_TABLE_NAME, and
TARGET_TABLE_NAME, SOURCE_TABLE_ROWS, TARGET_TABLE_ROWS_LOADED, ERROR MESSAGE, and
STATUS (COMPLETED or FAILED)Redshift Migration Log and Report Files
After Redshift Migration, you will find three files:
-
MigrationResults.log: Log file of Redshift migration -
readme.txt: file explains how to use the Generated Amazon Redshift Migration Scripts. -
redshift_migration_reportxxx.txt: Contains information about Migration, here is sample:______________________________________________________________ OPERATION ID : 8566 LOGFILE TABLE : COPY$8566_LOG BADFILE TABLE : COPY$8566_BAD SOURCE SCHEMA : sample TARGET SCHEMA : SAMPLE SOURCE TABLE : listing TARGET TABLE : LISTING SOURCE TABLE ROWS : 192497 TABLE ROWS LOADED : 192497 ERROR MESSAGE : null STATUS : COMPLETED START TIME : 2018-09-27 17:25:18.662075 END TIME : 2018-09-27 17:25:25.012695 ______________________________________________________________
Parent topic: Migrating Amazon Redshift to Autonomous AI Database
Perform Post Migration Tasks
After successful migration of your Redshift environment you should consider the following post-migration tasks:
-
Drop schema
SQLDEV_MIGREPOS -
Drop the Amazon S3 bucket used for staging
-
Harden the Amazon account used for accessing S3
-
Drop the database credential used for data loading from S3
-
Harden your accounts in your Autonomous AI Database
Parent topic: Migrating Amazon Redshift to Autonomous AI Database
