Oracle Database Service for Azure portal lets you provision a HeatWave Cluster, consisting of a database system and one or more HeatWave nodes.
With Oracle HeatWave, analytics queries that meet certain prerequisites are automatically offloaded from the database system to the HeatWave nodes for accelerated processing. You can run online transaction processing (OLTP), online analytical processing (OLAP), and mixed workloads on the same deployment. This means you do not need to perform extract, transfer, and load (ETL) operations, or modify your applications.
Before you begin, if you want to know more about Oracle HeatWave, see Overview of HeatWave.
To provision Oracle HeatWave in OracleDB for Azure, you will need:
- An Azure user account and an Oracle Cloud Infrastructure (OCI) account. When you sign up for OracleDB for Azure, your tenancy is linked to the Azure subscription. If you have already signed up for OracleDB for Azure for any other OCI database, you do not need to sign up again for Oracle HeatWave. For details, see Prerequisites for Oracle Database Service for Azure.
- An Azure VNet (virtual network). The VNet must not already be in use by another Oracle HeatWave instance or another database type in Oracle Database Service for Azure. You can create an Azure VNet in the Azure portal (portal.azure.com) by selecting Home > More services > Virtual networks > Create.
- An Azure resource group to include the Azure VNet and the Oracle HeatWave deployment. You can create this while you are creating the Azure VNet, or using the Resource groups option in the Azure portal (portal.azure.com).
The Azure VNet will be used to set up networking between Azure and Oracle Cloud Infrastructure, which involves peering the Azure VNet with an OCI VCN that OracleDB for Azure creates for you. This virtual network provides client access to the database system (which is created on OCI) from the Azure environment. OracleDB for Azure automatically opens the required ports for client access to the database system.
Follow these steps to provision Oracle HeatWave:
- Use your Azure account credentials to login to the OracleDB for Azure portal.
- Do either of the following:
- Select the Create a resource icon. In the Create a resource blade, click Create under Oracle HeatWave.
- Select the Oracle HeatWave icon. In the Oracle HeatWave blade, click Create.
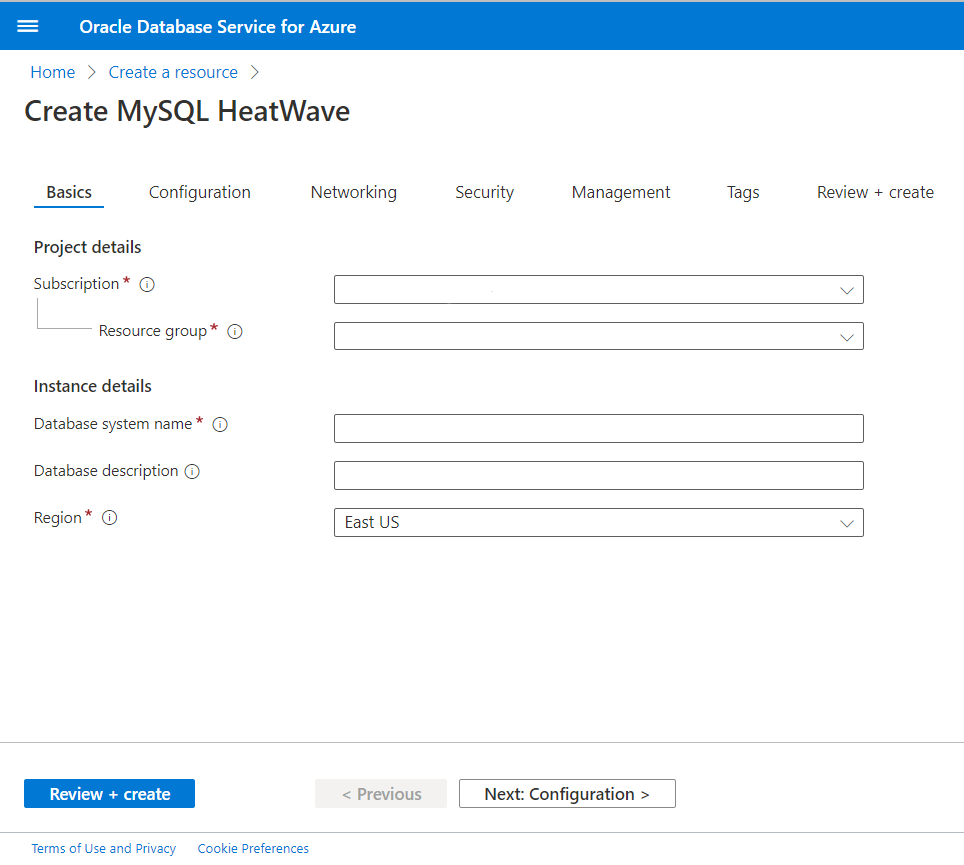
- On the Basics tab in the Create Oracle HeatWave blade, enter the basic information for this Oracle HeatWave deployment.
You can click the Review + create button at any time. When you do, OracleDB for Azure checks whether you have filled in all the required settings, and alerts you if any are missing.
- Under Project details, for Subscription, select any subscription that has been linked to your OCI tenancy through OracleDB for Azure. If you do not have any subscription, see Manage OracleDB for Azure Subscriptions. If you only have a single subscription, you cannot change the value in this field. If you have multiple subscriptions linked to your OCI tenancy, you can change the default value for this field following the instructions in Setting Account UI Settings.
- For Resource group, select the resource group that contains your Azure VNet. For more information on resource groups, see Microsoft Azure Resource Groups.
- Under Instance details, for Database system name, enter a name for the database system that manages the HeatWave Cluster. The name must be unique for your subscription.
- For Description, you can optionally add details about the database system. This description is displayed in the overview page for the deployment.
- For Region, select the region where you want Oracle HeatWave to be provisioned. If you only have a single region configured in OracleDB for Azure, you cannot change the value. If you have multiple regions configured, you can change the default value following the instructions in Setting Account UI Settings. To view the regions where OracleDB for Azure is available, see Regional Availability.
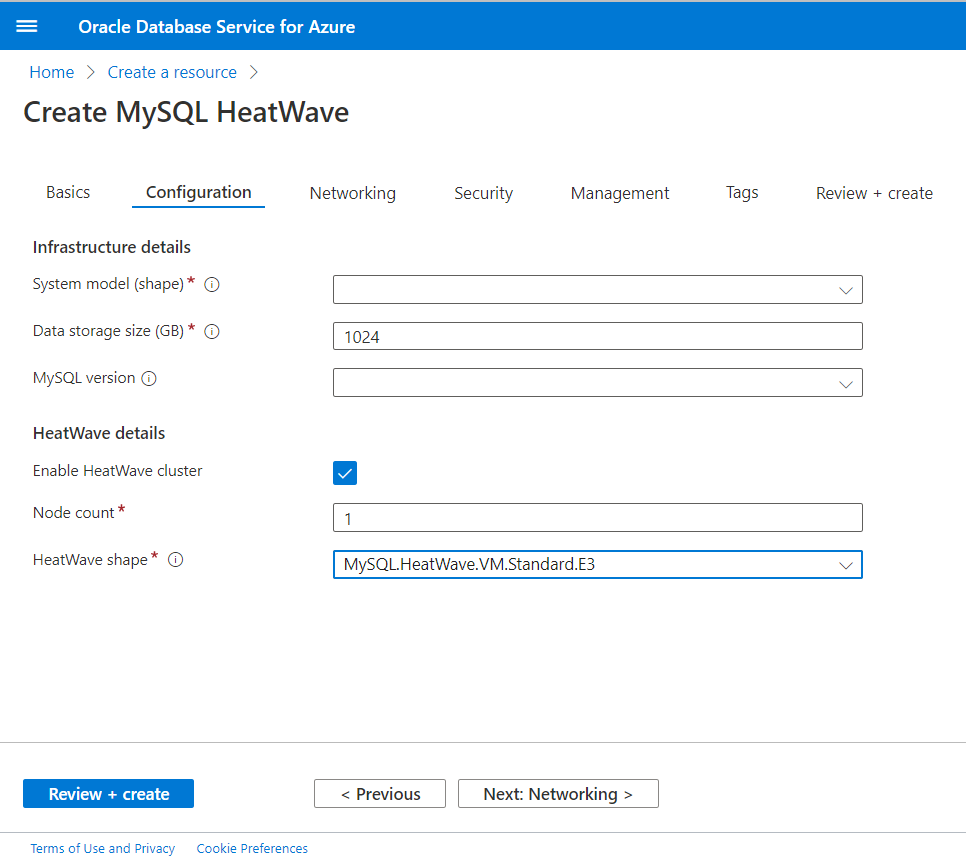
- Select the Next: Configuration > button to open the Configuration tab. On this tab, you can configure the database system and (optionally) the nodes in the HeatWave Cluster.
- Under Infrastructure details, for System model (shape), select the shape to use for the database system from the drop-down list of supported shapes. The shape determines the resources allocated to the database system, and its system configuration.
- For Data storage size (GB), specify the amount of storage to allocate to the database system for all data, log files, and temporary files.
- For MySQL version, you can optionally select a MySQL Server version for the database system from the list of supported versions. If you don't select one, the most recent MySQL Server version supported by OracleDB for Azure is used.
- Under HeatWave details, check the Enable HeatWave Cluster box if you want to create HeatWave nodes now. If you prefer, you can wait until after you have loaded data into the database system, and then create the HeatWave nodes. After the data has been loaded, you can use Oracle HeatWave’s MySQL Autopilot feature to estimate a suitable number of nodes.
- If you are creating a HeatWave Cluster now, for Node count, specify the number of HeatWave nodes to create. The minimum number of nodes is 1, and the maximum is 64.
- For HeatWave shape, select the shape to use for the HeatWave nodes from the drop-down list. The shape determines the resources allocated to each HeatWave node, and their system configuration. See Supported Shapes.
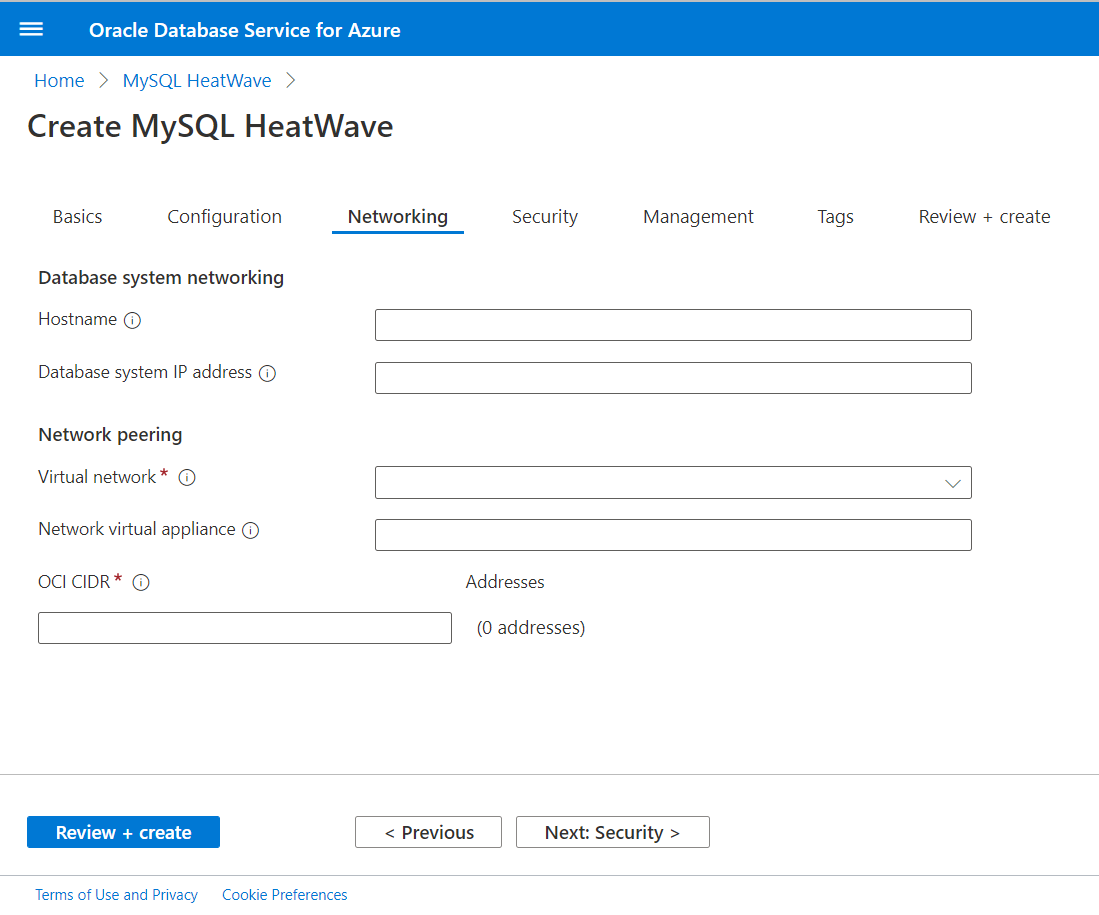
- Select the Next: Networking > button to open the Networking tab. On this tab, you can configure networking for the Oracle HeatWave deployment.
- Under Database system networking, for Hostname, you can optionally specify a hostname prefix that OracleDB for Azure prepends to the fully qualified domain name (FQDN) of the endpoint of the database system (the instance FQDN). The hostname prefix must be unique in your subnet or it cannot provision. If you don't specify a hostname prefix, OracleDB for Azure does not create an instance FQDN, and you will need to connect to the database system using its IP address. If you specify a hostname, it must be a unique resolvable hostname for the database system and will be used to connect externally to the system. The hostname must begin with an alphabetic character, can contain only alphanumeric characters and hyphens, and not exceed 12 characters in length.
- For Database system IP address, you can optionally specify a private IP address to assign to the endpoint of the database system. The address must be available within the subnet range of the CIDR blocks that you are going to use for the OCI VCN. If you don't enter one, OracleDB for Azure assigns a private IP address from the address space that you specify (you can find this later in the Connect tab of the deployment's details page). For more information on setting an appropriate range of IP address, see Network CIDR Sizing.
- Under Network peering, for Virtual network, select a suitable Azure VNet from the choices available in the resource group that you selected on the Basics tab. You cannot use a VNet that has already been peered with an OCI VCN for Oracle Database Service for Azure.
- For Network virtual appliance, you can optionally give an IP address in the Azure VNet to be used by a network virtual appliance for traffic management. If you leave this blank, a network virtual appliance is not used. For more information on NVAs, see Deploy highly available NVAs.
- For OCI CIDR, specify the address space for OracleDB for Azure to create a subnet in a virtual network (VCN) on Oracle Cloud Infrastructure. OracleDB for Azure will create the subnet and the OCI VCN for you when provisioning Oracle HeatWave. You cannot peer an existing OCI VCN with the Azure VNet. For more information on OCI VCNs, see Networking Overview.
The CIDR blocks must be specified in CIDR notation. The address space must not overlap with the address space for the Azure VNet that you are peering with it - the
OCI VCN and the Azure VNet need to have separate address spaces. For more information on setting this properly, see
Network CIDR Sizing.
- Select the Next: Security > button to open the Security tab. On this tab, you can set up the credentials for the database system administrator account, which you can use to connect to and manage the database system. The administrator account is granted a predefined set of MySQL Server privileges.
- Under Database system administrator credentials, for Username, specify a username to use for the database system administrator account.
The maximum length is 32 characters. The username cannot contain quotes and backticks, and it cannot be any of these reserved names: ocirpl, ociadmin, administrator, mysql.sys, mysql.session, mysql.infoschema.
- For Password, specify a password to use for the database system administrator account.
The password must be 8 to 32 characters including at least one number, one uppercase letter, one lowercase letter, and one special (nonalphanumeric) character.
- For Confirm password, re-enter the password.
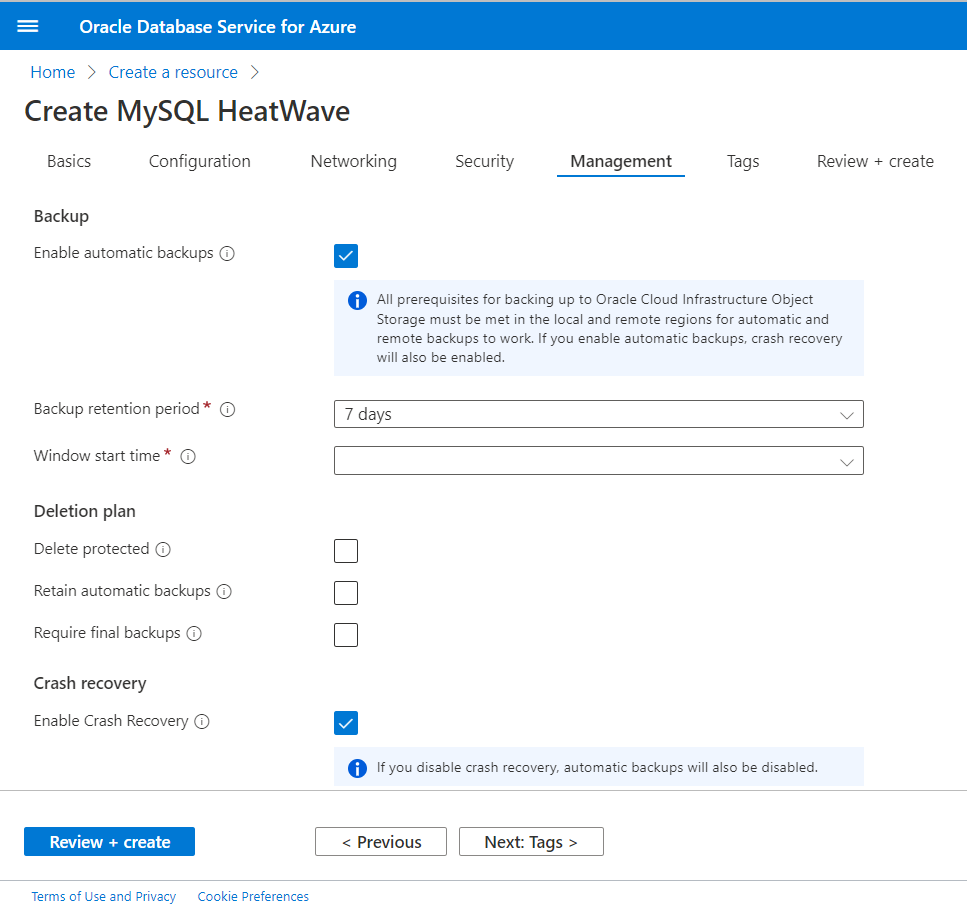
- Select the Next: Management > button to open the Management
tab. On this tab, you can choose options for automatic backups, backup deletion,
and crash recovery.
- Under Backup, for Enable automatic backups, check the box if you want Oracle Database Service for Azure to create scheduled backups for the database system. Backups require storage during the retention period. Enabling this feature also enables crash recovery. You can also enable or disable automatic backups after provisioning.
- For Backup retention period, select a number of days for each
automatic backup to be retained.
- For Window start time, specify the start of the time period during which the database system will be backed up automatically.
- Under Deletion plan, check the box for any deletion protection
feature that you want to apply. By default, all these features are
disabled:
- Delete protected prevents deletion of the database system unless you disable the feature in the settings for this database system.
- Retain automatic backups keeps automatic backups after the database system is deleted. If you leave this box unchecked, they are deleted along with the database system.
- Require final backups creates a final backup before deleting the database system. By default, the final backup is not created.
- Under Enable Crash Recovery, check the box if you want to protect the database system against data loss in the event of an unexpected server exit. You can disable this feature to increase the performance of large data imports. Disabling crash recovery disables automatic backups.
- Select the Next: Tags > button to open the Tags tab. On this tab, you can enter any tags that you want to use to categorize this deployment. Any tags created here are applied to OCI provisioned resources. For more information on tags, see Tagging Overview.
- Select the Next: Review + create > button to open the Review + create tab, and review the settings that you have selected. The Create Oracle HeatWave function checks whether you have filled in all the required settings, and alerts you if any setting is missing or is invalid.
- If you need to add or change any settings, go back to the relevant tab by selecting it or by using the Previous button.
- If your settings are all as you want them, click the Create button.
- If you want to cancel provisioning, select the X (close) icon or use the breadcrumbs or the menu to return to the OracleDB for Azure portal.
- When you select the Create button, the provisioning process is queued. You can track its progress from the Deployments blade (select the Deployments icon on the OracleDB for Azure portal).
- To see details about your deployment and access its actions and settings, you can select Go to resource from the deployment details page, or select its name from the list on the Oracle HeatWave blade.
For instructions to connect as a client to the database system using MySQL Shell, MySQL Client, or another application, see Connecting to Oracle HeatWave.
You can use MySQL Shell's utilities to import data to the database system. For instructions to do that, see Importing Data to Oracle HeatWave.
If you didn't create HeatWave nodes, or want to make an estimate of the appropriate number of nodes after importing your data, see Provisioning HeatWave Nodes for instructions to create them.
As well as viewing and managing the Oracle HeatWave deployment through the OracleDB for Azure portal, you can view and manage it in Oracle Cloud Infrastructure. If you want to do this, select the deployment name in the OracleDB for Azure portal to view its details, then select the link for the OCI resource on the Overview tab. Log in to Oracle Cloud Infrastructure, and you can see the DB System Details page in OCI. From this page, you can stop, start, and restart the HeatWave Cluster and database system, and edit settings using the OCI interface. Any changes that you make here will be reflected in the OracleDB for Azure portal. In the OCI interface you can also view the OCI VCN subnet that was created for the Oracle HeatWave deployment.


