Troubleshooting Instances Using Instance Console Connection
You can remotely troubleshoot malfunctioning instances using a console connection. For example:
- An imported or customized image that does not complete a successful boot
- A previously working instance that stops responding
Two types of instance console connection exist: serial console connections and VNC console connections.
Instance console connections are for troubleshooting purposes only. To connect to a running instance for administration and general use, instead use a Secure Shell (SSH) or Remote Desktop connection. See Connecting to an Instance.
You can connect to the serial console quickly and easily using the Cloud Shell integration. If you're using Cloud Shell to connect to the serial console, the only prerequisite is having the correct permissions. If you want to make a local connection either to the serial console or to the VNC console, follow these configuration steps.
- Make sure you have the correct permissions.
- Complete the prerequisites, including creating your SSH key pair.
- Create the instance console connection.
- Connect to the serial console or connect to the VNC console.
- If you're trying to connect to the serial console and you think the connection isn't working, test your connection to the serial console using Cloud Shell.
Some issues can be diagnosed using information in the console history. Console history lets you see serial output from your instance without having to connect to the instance remotely.
Required IAM Policies
To use Oracle Cloud Infrastructure, an administrator must be a member of a group granted security access in a policy by a tenancy administrator. This access is required whether you're using the Console or the REST API with an SDK, CLI, or other tool. If you get a message that you don't have permission or are unauthorized, verify with the tenancy administrator what type of access you have and which compartment your access works in.
To create an instance console connection, an administrator needs to grant user access to manage instance console connections and to read instances through an IAM policy. The resource name for an instance console connection is instance-console-connection. The resource name for instances is instance. The following policies grant users the ability to create an instance console connection:
Allow group <group_name> to manage instance-console-connection in tenancy
                    Allow group <group_name> to read instance in tenancy
Instance console connection also supports network sources. The following policies grant users the ability to create an instance console connection with a network source:
Allow group <group_name> to manage instance-console-connection in tenancy where request.networkSource.name='example-network-source'
                    Allow group <group_name> to read instance in tenancy where request.networkSource.name='example-network-source'
If you're new to policies, see Getting Started with Policies and Common Policies.
Tagging Resources
Apply tags to resources to help organize them according to your business needs. You can apply tags when you create a resource, and you can update a resource later to add, revise, or remove tags. For general information about applying tags, see Resource Tags.
To manage tags for an instance console connection:
- Open the navigation menu and select Compute. Under Compute, select Instances.
-
Click the instance that you're interested in.
-
Select the option you see:
- From the OS Management tab, scroll down to Console connection.
- Under Resources, select Console connection.
-
For the console connection that you're interested in, from the Actions menu (three dots) select the option you see:
- Manage tags. Tags are displayed and you can add tags with Add tag.
- Add Tags or View Tags to manage your tags.
Before You Begin
Complete these prerequisites before creating the instance console connection.
If you're using Cloud Shell to connect to the serial console, the only prerequisite is having the correct permissions.
Installing an SSH Client and a Command-line Shell (Windows)
Windows does not include an SSH client by default. If you are connecting from a Windows client, you need to install an SSH client. You can use PuTTY plink.exe with Windows PowerShell or software that includes a version of OpenSSH such as:
The instructions in this topic frequently use PuTTY and Windows PowerShell.
If you want to make the console connection from Windows with Windows PowerShell, PowerShell might already be installed on your Windows operating system. If not, follow the steps at the link. If you are connecting to the instance from a Windows client using PowerShell, plink.exe is required. plink.exe is the command link connection tool included with PuTTY. You can install PuTTY or install plink.exe separately. For installation information, see http://www.putty.org.
Creating SSH Key Pairs
To create the secure console connection, you need an SSH key pair. The method to use for creating key pairs depends on your operating system. When connecting to the serial console, you must use an RSA key. The instructions in this section show how to create an RSA SSH key pair.
Creating the SSH key pair for Linux
For detailed instructions about creating an SSH key pair to use on Linux, see Managing Key Pairs on Linux Instances.
If you're using a UNIX-style system, you probably already have the ssh-keygen utility installed. To determine whether the utility is installed, type ssh-keygen on the command line. If the utility isn't installed, you can download OpenSSH for UNIX from http://www.openssh.com/portable.html and install it.
- Open a shell or terminal for entering the commands.
-
At the prompt, enter
ssh-keygenand provide a name for the key when prompted. Optionally, include a passphrase.The keys will be created with the default values: RSA keys of 2048 bits.
Alternatively, you can type a complete ssh-keygen command, for example:
ssh-keygen -t rsa -N "" -b 2048 -C "<key_name>" -f <path/root_name>The command arguments are shown in the following table:
| Argument | Description |
|---|---|
-t rsa
|
Use the RSA algorithm. |
-N "<passphrase>"
|
A passphrase to protect the use of the key (like a password). If you don't want to set a passphrase, don't enter anything between the quotes. A passphrase is not required. You can specify one as a security measure to protect the private key from unauthorized use. If you specify a passphrase, when you connect to the instance you must provide the passphrase, which typically makes it harder to automate connecting to an instance. |
-b 2048
|
Generate a 2048-bit key. You don't have to set this if 2048 is acceptable, as 2048 is the default. A minimum of 2048 bits is recommended for SSH-2 RSA. |
-C "<key_name>"
|
A name to identify the key. |
-f <path/root_name>
|
The location where the key pair will be saved and the root name for the files. |
Creating the SSH key pair for Windows using PuTTY
If you are using a Windows client to connect to the instance console connection, use an SSH key pair generated by PuTTY.
- Find
puttygen.exein the PuTTY folder on your computer, for example,C:\Program Files (x86)\PuTTY. Double-clickputtygen.exeto open it. -
Specify a key type of SSH-2 RSA and a key size of 2048 bits:
- In the Key menu, confirm that the default value of SSH-2 RSA key is selected.
- For the Type of key to generate, accept the default key type of RSA.
- Set the Number of bits in a generated key to 2048 if not already set.
- Click Generate.
-
To generate random data in the key, move your mouse around the blank area in the PuTTY window.
When the key is generated, it appears under Public key for pasting into OpenSSH authorized_keys file.
- A Key comment is generated for you, including the date and timestamp. You can keep the default comment or replace it with your own more descriptive comment.
- Leave the Key passphrase field blank.
-
Click Save private key, and then click Yes in the prompt about saving the key without a passphrase.
The key pair is saved in the PuTTY Private Key (PPK) format, which is a proprietary format that works only with the PuTTY tool set.
You can name the key anything you want, but use the
ppkfile extension. For example,mykey.ppk. -
Select all of the generated key that appears under Public key for pasting into OpenSSH authorized_keys file, copy it using Ctrl + C, paste it into a text file, and then save the file in the same location as the private key.
(Do not use Save public key because it does not save the key in the OpenSSH format.)
You can name the key anything you want, but for consistency, use the same name as the private key and a file extension of
pub. For example,mykey.pub. - Write down the names and location of your public and private key files. You need the public key when creating an instance console connection. You need the private key to connect to the instance console connection using PuTTY.
Signing in to an instance from the serial console (optional)
To troubleshoot instances and see serial output using the serial console, you don't need to sign in. To connect to a running instance for administration and general use with Secure Shell (SSH) or Remote Desktop connection, see Connecting to an Instance.
If you want to sign in to an instance using an instance console connection, you can use Secure Shell (SSH) or Remote Desktop connection to sign in. If you want to sign in with a username and password, you need a user account with a password. Oracle Cloud Infrastructure does not set a default password for the opc user. Therefore, if you want to sign in as the opc user, you need to create a password for the opc user. Otherwise, add a different user with a password and sign in as that user.
Connecting Through Firewalls
If your system is behind a firewall, the system must be able to reach the console servers. The client system connecting to the serial console must be able to reach the serial or VNC console server (for example, instance-console.us-ashburn-1.oci.oraclecorp.com) over SSH using port 443, directly or through a proxy.
Supported Instance Types
Serial console connections are supported on the following types of instances:
- Virtual machine (VM) instances launched in September 2017 or later.
- Bare metal instances launched in November 2017 or later.
VNC console connections are supported on the following types of instances:
VM instances launched on October 13, 2017 or later
Unsupported bare metal instances
Most bare metal instances are supported, with the following exceptions.
- BM.Standard1.36
- BM.Standard2.52 - launched before February 21, 2019
- BM.Standard.B1.44
- BM.Standard.E2.64 - launched before September 17, 2020
- BM.HighIO1.36
- BM.DenseIO1.36
- BM.DenseIO2.52 - launched before February 21, 2019
- BM.GPU2.2 - launched before February 21, 2019
- BM.GPU3.8 - launched before February 21, 2019
- BM.HPC2.36 - launched before February 21, 2019
Creating a Console Connection Using Cloud Shell
You can connect to the serial console quickly and easily using the Cloud Shell integration. Cloud Shell is a web browser-based terminal accessible from the Console. The Cloud Shell integration automatically creates the instance console connection and a temporary SSH key. The only prerequisite for connecting to the serial console from Cloud Shell is granting users the correct permissions. For an introductory walkthrough of using Cloud Shell, see Using Cloud Shell.
By default, Cloud Shell limits network access to Oracle Cloud Infrastructure internal resources in your tenancy home region, unless you enable the Cloud Shell managed Public Network. Your administrator can configure an Identity policy to enable Cloud Shell Public Network. For more information, see Cloud Shell Networking.
You cannot use Cloud Shell for VNC console connections. You can only use it for serial console connections.
When you are finished with the serial console and have terminated the SSH connection, you should delete the serial console connection. If you do not disconnect from the session, Oracle Cloud Infrastructure terminates the serial console session after 24 hours and you must reauthenticate to connect again.
- Sign in to the Console.
- Open the navigation menu and select Compute. Under Compute, select Instances.
- On the instance details page in the Oracle Cloud Infrastructure
Console, select the option you see:
- From the OS Management tab, scroll down to Console connection.
- Under Resources, select Console connection.
- Select Launch Cloud Shell connection. This action displays the Cloud Shell in a "drawer" at the bottom of the Console.
- If a console connection already exists, you are asked if you want to delete the existing resource. Press y, and then press Enter.
- When you are done, exit the instance console connection.
Creating a Local Instance Console Connection
Before you can make a local connection to the serial console or VNC console, you need to create the instance console connection. When you use Cloud Shell to connect the the serial console, the instance console connection is created automatically.
An instance console connection is limited to one client at a time. If the client fails, the connection remains active for approximately five minutes. During this time, no other client can connect. After five minutes, the connection is closed, and a new client can connect. During the five-minute timeout, any attempt to connect a new client fails with the following message:
channel 0: open failed: administratively prohibited: console access is limited to one connection at a time
Connection to <instance and OCID information> closed.- Open the navigation menu and select Compute. Under Compute, select Instances.
- Click the instance that you're interested in.
- Select the option you see:
- From the OS Management tab, scroll down to Console connection.
- Under Resources, select Console connection.
- Select Create local connection.
- Upload the public key portion for the SSH key. You have three options for adding the SSH key.
- Generate a key pair for me: You can have Oracle Cloud Infrastructure generate an SSH key pair to use. If you are using PowerShell or PuTTY to connect to the instance from a Windows client, you cannot use the generated SSH key pair without first converting it to a
.ppkfile.To convert a generated .key private key file-
Open PuTTYgen.
-
Select Load, and select the private key that was generated when you created the instance. The extension for the key file is
.key. -
Select Save private key.
-
Specify a name for the key. The extension for new private key is
.ppk. -
Select Save.
Note
PuTTYgen does not overwrite the.keyfile but creates an additional file of the same name with the.ppkextension.
-
- Upload public key file: Browse to a public key file on your computer. If you followed the prerequisite steps in Creating SSH Key Pairs to create a key pair, use this option to navigate to the
.pubfile. - Paste public key: Paste the content of your public key file into the text box.
- Generate a key pair for me: You can have Oracle Cloud Infrastructure generate an SSH key pair to use. If you are using PowerShell or PuTTY to connect to the instance from a Windows client, you cannot use the generated SSH key pair without first converting it to a
-
Select Create console connection.
When the console connection has been created and is available, the state changes to Active.
Making a Local Connection to the Console
After you create the console connection for the instance, you can connect to the serial console using a Secure Shell (SSH) connection. When making a local connection to the serial console, you must use an RSA key. You can use the same SSH key for the serial console that was used when you launched the instance, or you can use a different SSH key.
When you are finished with the serial console and have terminated the SSH connection, you should delete the serial console connection. If you do not disconnect from the session, Oracle Cloud Infrastructure terminates the serial console session after 24 hours and you must reauthenticate to connect again.
Validating Server Host Keys
When you first connect to the serial console, you're prompted to validate the fingerprint of the server host key. The fingerprint of the server host key is the SHA256 hash of the server host's public SSH key. The server SSH handshake response is signed with the associated private key. Validating the server host key's fingerprint protects against potential attacks.
When you make a manual connection to the serial console, the fingerprint of the server host key is not automatically validated. To manually validate the fingerprint, compare the fingerprint value displayed in the Oracle Cloud Infrastructure Console to the value of the RSA key fingerprint that appears in the terminal when you connect.
- Navigate to the console connection. Use the option you see:
- From the OS Management tab, scroll down to Console connection.
- Under Resources, select Console connection.
- Select your console connection.
- The table displays the fingerprint of the server host key. The fingerprint in the Console should match the value of the RSA key fingerprint shown in the terminal when you connect to the serial console.
The server host keys are periodically rotated for security purposes. Key rotation reduces the risk posed when keys are compromised by limiting the amount of data encrypted or signed by one key version. When your key is rotated and you try to connect to the serial console, a warning appears indicating a potential attack. The warning includes a Host key verification failed error and a line number in your .ssh/known_hosts file. Delete that line in your .ssh/known_hosts file and then reconnect to the serial console. You are then prompted to accept a new server host key fingerprint.
Connecting from Mac OS X and Linux Operating Systems
Use an SSH client to connect to the serial console. Mac OS X and most Linux and UNIX-like operating systems include the SSH client OpenSSH by default.
The minimum version required for OpenSSH to connect to the serial console from Linux and MacOS is OpenSSH 7.2.
- On the instance details page in the Oracle Cloud Infrastructure
Console, select the option you see:
- From the OS Management tab, scroll down to Console connection.
- Under Resources, select Console connection.
- Identify your console connection.
- From the Actions menu (three dots) select Copy serial console connection for Linux/Mac.
-
Paste the connection string into a terminal window on a Mac OS X or Linux system, and then press Enter to connect to the console.
If you are not using the default SSH key or ssh-agent, modify the serial console connection string to include the identity file flag,
-i, to specify the private key portion for the SSH key to use, for example id_rsa. Specify this flag for both the SSH connection and the SSH ProxyCommand, as shown in the following line:ssh -i /<path>/<ssh_key> -o ProxyCommand='ssh -i /<path>/<ssh_key> -W %h:%p -p 443... - If prompted, validate and accept the fingerprint of the server host key. If you have previously accepted a fingerprint for the server host key but the key has been rotated, a warning appears indicating a potential attack. The warning includes a
Host key verification failederror and a line number in your.ssh/known_hostsfile. Delete the specified line in your.ssh/known_hostsfile and then reconnect to the serial console. Validate and accept the new server host key fingerprint. -
Press Enter again to activate the console. If the connection is active, a message appears in the console:
IMPORTANT: Use a console connection to troubleshoot a malfunctioning instance. - In the Oracle Cloud Infrastructure Console, reboot the instance. You do not need to enter a username or password. If the instance is functional and the connection is active, the serial output appears in your console. If serial output does not appear in the console, the instance operating system is not booting.
For more troubleshooting options, see Troubleshooting Instances from Instance Console Connection.
Connecting from Windows Operating Systems
The steps to connect to the serial console from Windows PowerShell are different from the steps for OpenSSH. The following steps do not work in the Windows terminal.
If you are connecting to the instance from a Windows client using PowerShell,
plink.exe is required. plink.exe is the command link connection tool included with PuTTY. You can install PuTTY or install plink.exe separately. For more information, see Installing an SSH Client and a Command-line Shell (Windows).The minimum version required for OpenSSH to connect to the serial console from Windows is PuTTY (0.75).
- Navigate to the Compute instance details page for your instance.
- Navigate to Console connection using the option you see:
- From the OS Management tab, scroll down to Console connection.
- Under Resources, select Console connection.
- From the Actions menu (three dots), depending on the SSH client, do one of the following:
-
For Windows PowerShell, select Copy serial console connection for Windows.
-
For OpenSSH, select Copy serial console connection for Linux/Mac.
Tip
The copied connection string for Windows contains the parameter-ispecifying the location of the private key file. The default value for this parameter in the connection string references an environment variable which might not be configured on your Windows client, or it might not represent the location where the private key file is saved. Verify the value specified for the-iparameter and make any required changes before proceeding to the next step. -
- Paste the connection string copied from the previous step into a text file so that you can add the file path to the private key file.
- In the text file, replace
$env:homedrive$env:homepath\oci\console.ppkwith the file path to the.ppkfile on your computer. This file path appears twice in the string. Replace it in both locations. - Paste the modified connection string into the PowerShell window or your OpenSSH client, and then press Enter to connect to the console.
- If prompted, validate and accept the fingerprint of the server host key. If you have previously accepted a fingerprint for the server host key but the key has been rotated, a warning appears indicating a potential attack. The warning includes a
Host key verification failederror and a line number in your.ssh/known_hostsfile. Delete the specified line in your.ssh/known_hostsfile and then reconnect to the serial console. Validate and accept the new server host key fingerprint. - Press Enter again to activate the console.
- In the Oracle Cloud Infrastructure Console, reboot the instance. You do not need to enter a username or password. If the instance is functional and the connection is active, the serial output appears in your client. If serial output does not appear in the client, the instance operating system is not booting.
For more troubleshooting options, see Troubleshooting Instances from Instance Console Connection.
Connecting to the VNC Console
After you create the console connection for the instance, you need to set up a secure tunnel to the VNC server on the instance, and then you can connect with a VNC client.
The VNC console connection uses SSH port forwarding to create a secure connection from your local system to the VNC server attached to your instance's console. Although this method is a secure way to use VNC over the internet, owners of multiuser systems should know that opening a port on the local system makes it available to all users on that system until a VNC client connects. For this reason, we don't recommend using this product on a multiuser system unless you take proper actions to secure the port or you isolate the VNC client by running it in a virtual environment, such as Oracle VM VirtualBox.
Mac OS X Screen Sharing.app is Not Compatible with VNC Console Connection.
The Mac OS X built-in VNC client, Screen Sharing.app does not work with the VNC console connection in Oracle Cloud Infrastructure. Use another VNC client, such as Real VNC Viewer or Chicken.
- Navigate to the Compute instance details page for your instance.
- Navigate to Console connection using the option you see:
- From the OS Management tab, scroll down to Console connection.
- Under Resources, select Console connection.
- From the Actions menu (three dots) select Copy VNC connection for Linux/Mac.
- Paste the connection string copied from the previous step to a terminal window on a Mac OS X or Linux system, and then press Enter to set up the secure connection.
- After the connection is established, open your VNC client and specify
localhostas the host to connect to and5900as the port to use.Note
Remote management for Remote Desktop on OS X uses port5900. Because VNC console connections in Oracle Cloud Infrastructure also use port5900, VNC console connections are not compatible with remote management. To use VNC console connections, disable remote management.
If you are connecting to the VNC server on the instance from a Windows client using PowerShell, plink.exe is required. plink.exe is the command link connection tool included with PuTTY. You can install PuTTY or install plink.exe separately. For installation information, see http://www.putty.org.
- Navigate to the Compute instance details page for your instance.
- Navigate to Console connection using the option you see:
- From the OS Management tab, scroll down to Console connection.
- Under Resources, select Console connection.
- From the Actions menu (three dots) select Copy VNC connection for Windows. Tip
The copied connection string for Windows contains the parameter-ispecifying the location of the private key file. The default value for this parameter in the connection string references an environment variable which might not be configured on your Windows client, or it might not represent the location where the private key file is saved. Verify the value specified for the-iparameter and make any required changes before proceeding to the next step. - Paste the connection string copied from the previous step into a text file so that you can add the file path to the private key file.
- In the text file, replace
$env:homedrive$env:homepath\oci\console.ppkwith the file path to the.ppkfile on your computer. This file path appears twice in the string. Replace it in both locations. - Paste the connection string to Windows Powershell, and then press Enter to set up the secure connection.
-
After the connection is established, open your VNC client and specify
localhostas the host to connect to and5900as the port to use.
Secure Connection Warning
When you connect, you might see a warning from the VNC client that the connection is not encrypted. Because you are connecting through SSH, the connection is secure, so this warning is not an issue.
Exiting the Instance Console Connection
When using SSH, the ~ character at the beginning of a new line is used as an escape character.
-
To exit the serial console, enter:
~. -
To suspend the SSH session, enter:
~^zThe
^character represents the CTRL key -
To see all the SSH escape commands, enter:
~?
- Close the VNC client.
- In the Terminal or PowerShell window, type
CTRL C
When you are finished using the console connection, delete the connection for the instance.
- Open the navigation menu and select Compute. Under Compute, select Instances.
- Select the instance.
- Navigate to Console connection using the option you see:
- From the OS Management tab, scroll down to Console connection.
- Under Resources, select Console connection.
- From the Actions menu (three dots) select Delete. Confirm when prompted.
Troubleshooting Instances from Instance Console Connection
You can troubleshoot using the boot process of a compute instance with an instance console connection. Troubleshooting options are available for Linux and Windows.
Troubleshooting Linux with Instance Console Connection
The following describes instance console troubleshooting options for instances running one of the following OSs: Oracle Autonomous Linux 8.x, Oracle Autonomous Linux 7.x, Oracle Linux 9.x, Oracle Linux 8.x, Oracle Linux 7.x, and Oracle Linux Cloud Developer 8.x.
Other Linux distributions and SSH clients might require different steps. For example, see details for Ubuntu recovery mode here: Using recovery modes.
After connecting to an instance console, you can perform various tasks, such as:
- Boot into maintenance mode.
- Edit system configuration files.
- Add or reset the SSH keys for the
opcuser. - Reset the password for the
opcuser.
These tasks require you to boot into a bash shell in maintenance mode.
This procedure only applies to Oracle Linux images.
- Reboot the instance from the Console.
Depending on the version of Linux you are using, do one of the following.
- For instances running Oracle Autonomous Linux 8.x, Oracle Linux 8.x, or Oracle Linux Cloud Developer 8.x, follow these steps.
- When the reboot process starts, immediately switch back to the terminal window and press Esc or F5 repeatedly until a menu appears.
- In the menu that appears, select Boot Manager, and press Enter.
- In the Boot Manager menu, select UEFI Oracle BlockVolume, and press Enter. Immediately press the Esc key and continue pressing it until the boot menu appears. If Console messages start to appear in the window, the opportunity to access the boot menu passed, and you need to start the reboot process again.
- For instances running Oracle Autonomous Linux 7.x or Oracle Linux 7.x, when the reboot process starts, switch back to the terminal window, and you see Console messages start to appear in the window. As soon as the GRUB boot menu appears, use the up/down arrow key to stop the automatic boot process, enabling you to use the boot menu.
- For instances running Oracle Autonomous Linux 8.x, Oracle Linux 8.x, or Oracle Linux Cloud Developer 8.x, follow these steps.
- In the boot menu, highlight the top item in the menu, and press
eto edit the boot entry. -
In edit mode, use the down arrow key to scroll down through the entries until you reach the line that starts with the following value, depending on the version of Linux:
- For instances running Oracle Autonomous Linux 8.x, Oracle Autonomous Linux 7.x, Oracle Linux 8.x, and Oracle Linux 7.x, scroll down until you reach the line that starts with
linuxefi. - For instances running Oracle Linux Cloud Developer 8.x, scroll down until you reach the line that starts with
linux.
- For instances running Oracle Autonomous Linux 8.x, Oracle Autonomous Linux 7.x, Oracle Linux 8.x, and Oracle Linux 7.x, scroll down until you reach the line that starts with
- At the end of that line, add the following:
init=/bin/bash - Reboot the instance from the terminal window by entering the keyboard shortcut CTRL+X.
When the instance has rebooted, you see the Bash shell command line prompt, and you can proceed with the following procedures.
- From the Bash shell, run the following command to load the SElinux policies to preserve the context of the files you are modifying:
/usr/sbin/load_policy -i - Run the following command to remount the root partition with read/write permissions:
/bin/mount -o remount, rw / - Edit the configuration files as needed to try to recover the instance.
- After you have finished editing the configuration files, to start the instance from the existing shell, run the following command:
exec /usr/lib/systemd/systemdAlternatively, to reboot the instance, run the following command:
/usr/sbin/reboot -f
- From the Bash shell, run the following command to load the SElinux policies to preserve the context of the files you are modifying:
/usr/sbin/load_policy -i - Run the following command to remount the root partition with read/write permissions:
/bin/mount -o remount, rw / - From the Bash shell, run the following command to change to the SSH key directory for the opc user:
cd ~opc/.ssh - Rename the existing authorized keys file with the following command:
mv authorized_keys authorized_keys.old - Replace the contents of the public key file with the new public key file with the following command:
echo '<contents of public key file>' >> authorized_keys - Reboot the instance by running the following command:
/usr/sbin/reboot -f
- From the Bash shell, run the following command to load the SElinux policies to preserve the context of the files you are modifying. This step is necessary to sign in to your instance using SSH and the Console.
/usr/sbin/load_policy -i - Run the following command to remount the root partition with read/write permissions:
/bin/mount -o remount, rw / - Run the following command to reset the password for the opc user:
sudo passwd opc - Reboot the instance by running the following command:
sudo reboot -f
Troubleshooting Windows Instances from Instance Console Connection
The following Windows tools can help you troubleshoot a compute instance from an instance console connection.
Using Windows Special Administration Console
The Windows Special Administration Console (SAC) allows you to access a PowerShell console or command prompt from the serial terminal. By connecting to the instance's serial console and using SAC, you can interrupt the boot process and boot Windows in safe mode.
When you use SAC, you can create multiple user sessions or channels and switch between them. This feature enables you to use SAC commands while concurrently running command-line commands or viewing setup logs.
To use SAC in the serial console, first enable it on your Windows server. After you activate SAC, it provides a special console on the serial port. When enabled, the SAC> prompt appears in the serial output.
Connect to your instance and run the following commands in Windows PowerShell.
- Enable SAC:
bcdedit /ems '{current}' on bcdedit /emssettings EMSPORT:1 EMSBAUDRATE:115200 - Enable the boot menu:
bcdedit /set '{bootmgr}' displaybootmenu yes bcdedit /set '{bootmgr}' timeout 15 bcdedit /set '{bootmgr}' bootems yes - Reboot the instance to apply the updated configuration:
shutdown -r -t 0
Connect to your instance and run the following commands in the command prompt.
- Enable SAC:
bcdedit /ems {current} on bcdedit /emssettings EMSPORT:1 EMSBAUDRATE:115200 - Enable the boot menu:
bcdedit /set {bootmgr} displaybootmenu yes bcdedit /set {bootmgr} timeout 15 bcdedit /set {bootmgr} bootems yes - Reboot the instance to apply the updated configuration:
shutdown -r -t 0
- Navigate to the Compute instance details page for the instance.
- Navigate to Console connection using the option you see:
- From the OS Management tab, scroll down to Console connection.
- Under Resources, select Console connection.
- From the Actions menu (three dots) select Launch Cloud Shell Connection.
- Connect to the serial console. If SAC is enabled, the
SAC>prompt appears in the serial output. For more information about SAC commands, see Emergency Management Services Tools and Settings in the Microsoft documentation.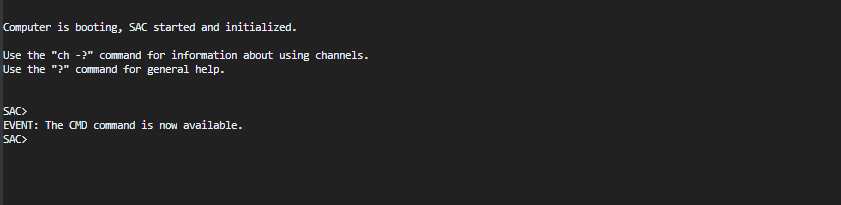
- To view a list of SAC commands, enter ? and then press Enter.
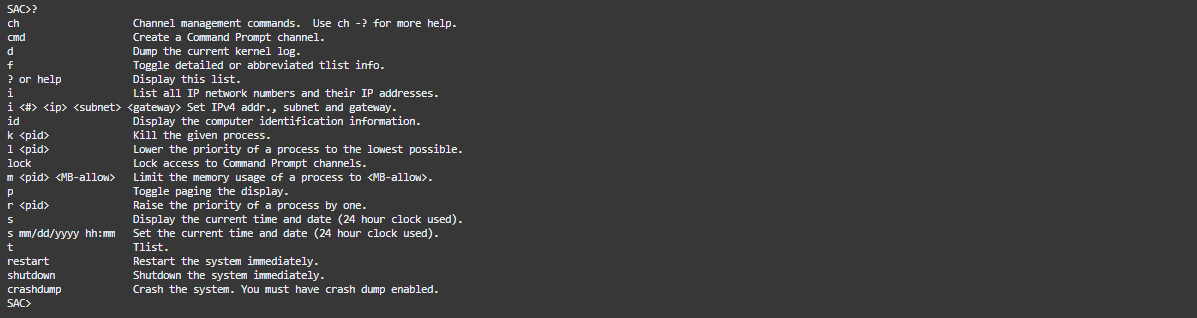
- To view a list of SAC commands, enter ? and then press Enter.
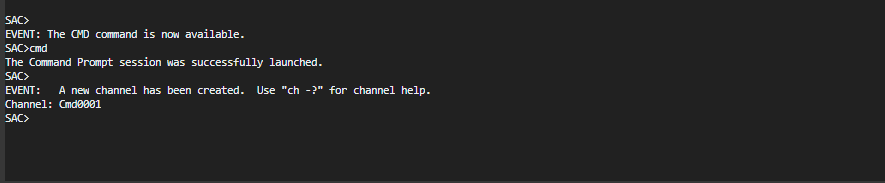
- Create a command prompt channel (example:
cmd0001), entercmd, and then press Enter. - View the command prompt channel, press ESC and then press TAB.
- To switch channels, press ESC+TAB+<channel number> together. For example, if you created a second channel named
cmd0002, to switch tocmd0002, press ESC+TAB+2.
- To switch channels, press ESC+TAB+<channel number> together. For example, if you created a second channel named
- Enter the credentials required in the command prompt channel.

The command prompt has the same command shell features that you get on a desktop, except that it does not allow the reading of characters that were already output.

Boot menu commands
If the instance has the boot menu enabled and is rebooted after connecting through SSH, the Windows boot menu should display in the serial console output. The following list includes commands that you can use with the boot menu:
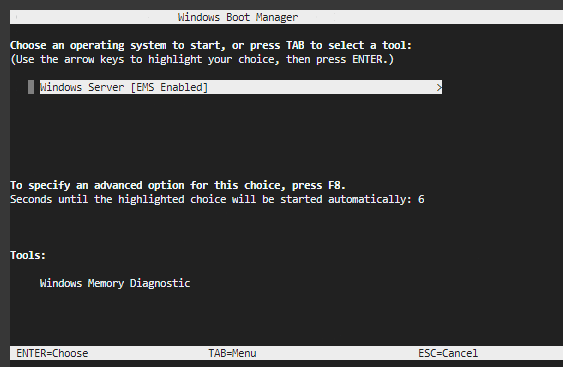
- Enter: When the boot menu initiates and the operating system is highlighted, starts the operating system.
- Tab: Switches to the Tools menu.
- Esc: Exits the boot menu and restarts the instance.
- Esc and then 8 or F8: Displays advanced options for the selected item.
- Esc + left arrow: Returns to the initial boot menu.
Disable SAC and the boot menu
You can use either PowerShell or command prompt to disable SAC and the boot menu.
- Connect to your instance from an elevated PowerShell command line.
- Change the value of the boot menu to
no.bcdedit /set '{bootmgr}' displaybootmenu no - Change the value of SAC to
off.bcdedit /ems '{current}' off - Reboot the instance to apply changes.
shutdown -r -t 0
- Connect to your instance from the command prompt.
- Change the value of the boot menu to
no.bcdedit /set {bootmgr} displaybootmenu no - Change the value of SAC to
off.bcdedit /ems {current} off - Reboot the instance to apply changes.
shutdown -r -t 0
Using Windows Recovery Console
When encountering issues where the Windows operating system is unable to start or is experiencing repeated unexpected restarts, utilizing the Windows Recovery Environment (WinRE) is an effective solution. This environment is designed to assist in troubleshooting and rectifying common problems such as disk corruption, missing or damaged system files, or unfinished updates.
WinRE automatically engages under certain conditions, including:
- Two unsuccessful attempts to boot Windows.
- Two abrupt shutdowns following boot completion within a two-minute interval.
- Two restarts occurring within two minutes of booting.
- Errors related to Secure Boot (excluding
Bootmgr.efiissues). - BitLocker errors on devices only supporting touch.
- Accessing manually
To use Windows Recovery Console, you must first set up a VNC console. For details, see: Connecting to the VNC Console.
The Windows Recovery Partition is a dedicated section of a boot disk that contains essential tools and resources for troubleshooting, repairing, and recovering the Windows operating system. The Windows recovery console is located on the Windows recovery partition.
Security Considerations
When working with Windows recovery console, be aware of these security considerations:
- You can run most tools within Windows recovery console without selecting an administrator account and entering the password.
- When booted into the recovery environment, encrypted files won't be accessible unless the user has the key to decrypt the volume.
- By default, networking is disabled in Windows recovery console. You can turn on networking when you need it. For better security, disable networking when you don't need connectivity.
To access the Windows Recovery Console, follow these steps:
- Access through the Restart button.
- Click Start on the lower-left corner of the Windows screen.
- Navigate to the Power options.
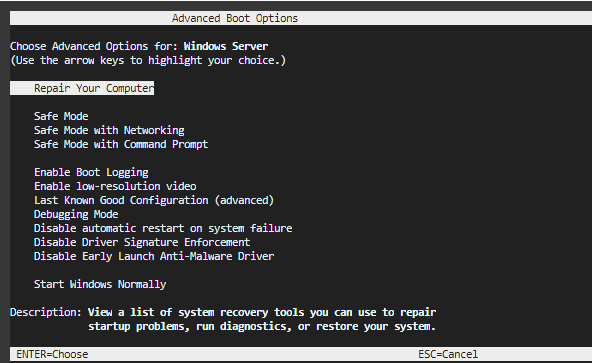
- While holding down the Shift key on the keyboard, click the Restart option. Note
Holding the Shift key triggers the system to reboot into the Advanced Boot Options menu instead of performing a regular restart.
- After restart, on the initial Windows Setup screen, select Repair your computer instead of proceeding with a new installation.
- In the next menu, select Troubleshoot.
- To access the Command Prompt, from the Troubleshoot menu, select Command Prompt. This selection opens the Windows Recovery Console where you can execute commands.
In the Windows Recovery Console, you can use commands to diagnose and repair system issues, including:
diskpart Commands
Use diskpart to manage your partitions:
diskpart
                                    list disk
                                    select disk X  (Replace X with your disk number)
                                    list partition
                                    select partition Y (Replace Y with your EFI partition number)
                                    assign letter=Z  (Replace Z with an unused letter)
                                    exit
Check and Repair the Windows File System
(Optional) If file system errors are suspected (replace C: with your Windows installation drive):
chkdsk C: /f /rRebuild Boot Files
Replace C:\Windows with your actual Windows installation path, and Z: with the EFI partition letter:
cd /d Z:\EFI\Microsoft\Boot\
                                    ren BCD BCD.bak
                                    bcdboot C:\Windows /s Z: /f UEFI
Handle "Access Denied" Error for bootrec /fixboot
If bootrec /fixboot gives an "Access Denied" error, try the following before it:
bootsect /nt60 Z: /force /mbrReplace
Z: with the letter of your EFI partition.Recreate the BCD Store
If the BCD rebuild fails, manually re-create it:
bcdedit /createstore c:\boot\bcd.temp
                                    bcdedit.exe /store c:\boot\bcd.temp /create {bootmgr} /d "Windows Boot Manager"
                                    bcdedit.exe /import c:\boot\bcd.temp
                                    bcdedit /set {default} device partition=C:
                                    bcdedit /set {default} osdevice partition=C:
                                    bcdedit /set {default} path \windows\system32\winload.efi
                                    bcdedit /set {default} systemroot \windows
                                    bcdedit /displayorder {default}
Attempt Boot Records Repair
Try fixing the boot records:
bootrec /fixmbr
                                    bootrec /fixboot
bootrec /rebuildbcdThese instructions are provided as guidance only. If the issue persists after following these steps, you should contact OCI Support and or Microsoft Support for further assistance.
Exit Command Prompt and Reboot
Type exit to close the Command Prompt and restart your system to test for resolution.
These commands can help resolve a wide range of issues, including startup problems, file system errors, and corrupted system files.
The Windows Recovery Console is a powerful tool for Windows troubleshooting and repair. Familiarizing yourself with these commands and their applications can be invaluable when it comes to resolving system issues and ensuring the stability of your Windows operating system.
To access the Windows Recovery Console and log on using the disabled local Administrator account, follow these steps:
- Access the Windows Recovery Console by pressing and holding the Shift key while clicking on the Restart button from the Start menu or login screen.
- In the subsequent screen, choose Troubleshoot.
- Select Advanced options.
- Click Startup Settings.
- Choose Restart.
- After the computer restarts, you see a list of start up options. Press the appropriate key to enable Safe Mode.
- In Safe Mode Windows might prompt you to set a password for the Administrator account if it never had one. When prompted create and confirm a password for the Administrator account.
- When you see the message indicating that Windows is running in Safe Mode, click OK.
- Click the Start button, right-click on My Computer and select Manage.
- In the Computer Management window, expand Local Users and Groups.
- Click Users, then right-click on the OPC account in the right pane.
- To reset the password for the OPC account, select Set Password.
- Follow the prompts to create and confirm a new password for the OPC account.
After completing these steps, the OPC account has a new password, and you can log in again with full privileges using the newly set password, then we recommend you disable the administrator account.