Service Mesh Overview Tutorial
In this tutorial, deploy the Bookinfo application to a Kubernetes cluster. Then, add Oracle Cloud Infrastructure Service Mesh to your application deployment.
Key tasks include how to:
- Install the required software to access your application from a local machine.
- Set up OCI CLI to access your cluster.
- Set up a Kubernetes cluster on OCI.
- Set up Service Mesh required Services.
- Deploy and Configure your Application for Service Mesh.
- Test your application using Service Mesh features.
- Configure your application for Logging and Metrics.
The following image shows the BookInfo application on Service Mesh:
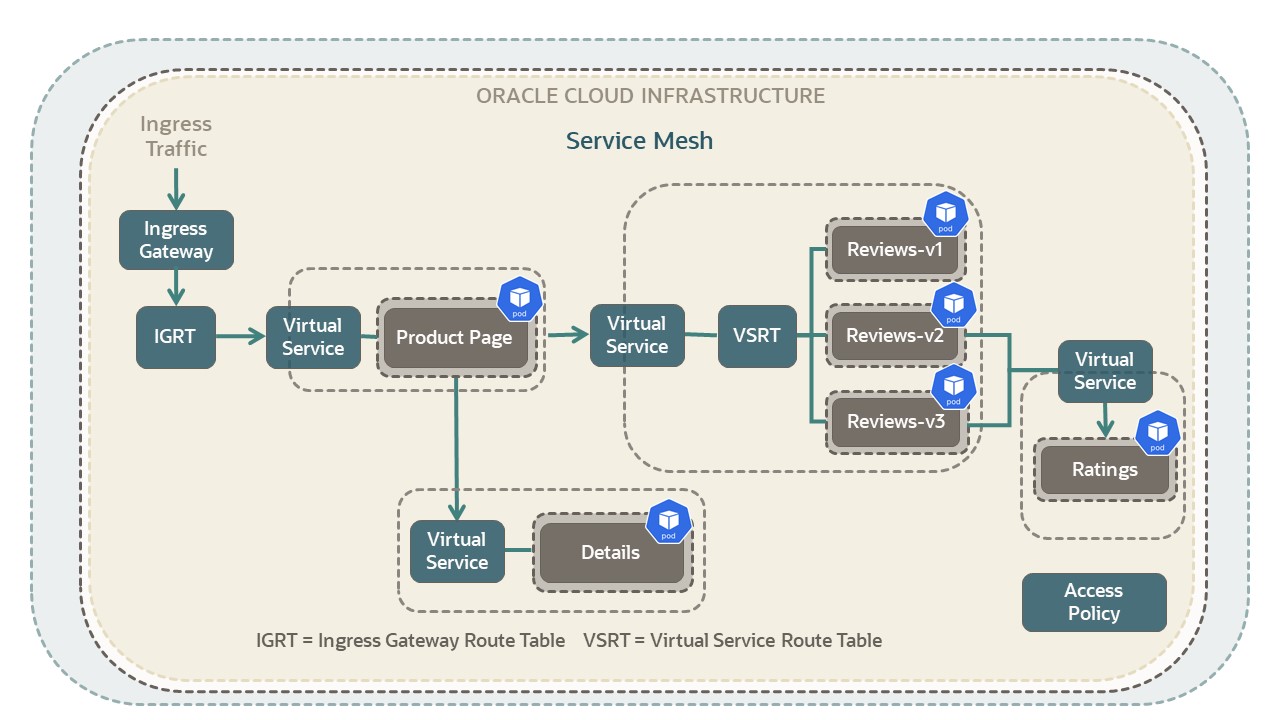
The gray rectangular boxes in the picture represent virtual deployments in the application. The named virtual deployments include: Product Page, Details, Reviews v1 to v3, and Ratings.
For additional information, see:
Before You Begin
To successfully perform this tutorial, you must have the following:
- For Container Registry, Kubernetes and Load Balancers:
- A paid Oracle Cloud Infrastructure account.
- See Signing Up for Oracle Cloud Infrastructure.
- For building applications and Docker images:
- One of the following local environments:
- A MacOS or Linux machine.
- A Windows machine with Linux support. For example:
- The following applications on your local environment:
- Python 3.6.8+ and
pipinstaller for Python 3 - Kubernetes Client 1.11.9+
- Docker 19.0.3+
- Python 3.6.8+ and
- One of the following local environments:
If you want to use an OCI Free Tier Linux compute instance to manage your deployment, the following sections provide information to get the required software installed.
- Install a Linux VM with an Always Free compute shape, on Oracle Cloud
Infrastructure. You need a machine with
sshsupport to connect to your Linux instance.- Install an Oracle Linux VM
- Follow sections 2 and 3.
- If you have a paid account, for section 2, choose your compute options based on your offerings.
- To connect to your instance, in section 4, follow steps 1–5.
- Skip the Apache instructions.
- Install an Ubuntu VM
- Follow sections 2 and 3.
- If you have a paid account, for section 2, choose compute options based on your offerings.
- To connect to your instance, in section 4, follow steps 1–5.
- Skip the Apache instructions.
- To update the firewall settings, in section 4, perform step 8.
- Install an Oracle Linux VM
- Verify your current
installation.
python3 --version - For Python 3, run the following commands:
- Oracle Linux:
sudo yum updatesudo yum install -y python3 - Ubuntu:
sudo apt updatesudo apt install -y python3
- Oracle Linux:
- Verify the pip installation for
Python3.
pip3 -VExample output if pip for Python3 is installed:
pip <version> from xxx/lib/python3.x/site-packages/pip (python 3.x) - To install pip for Python 3, run the following commands:
- Oracle Linux:
sudo yum updatesudo yum install -y python3-pip - Ubuntu:
sudo apt updatesudo apt install -y python3-pip
- Oracle Linux:
- Verify the pip for Python 3
installation.
pip3 -V
- Verify your current installation:
kubectl version --clientIf you have Kubernetes, then the version is<major-version>.<minor-version>. For example, for version 1.20, you get the following:version.Info{Major:"1", Minor:"20"... - To install the
kubectlclient, refer to the following links: - Verify the installation.
kubectl version --client
- Verify your current installation:
docker -v - Oracle Linux
To install Docker on Oracle Linux, run the following commands.
sudo yum install docker-enginesudo systemctl start dockersudo systemctl enable dockerNote: The last command enables Docker to start on reboots.
- Ubuntu Linux
To install Docker on Ubuntu Linux, refer to the following link: Get Docker
- Verify the installation.
docker -v
1. Prepare
Prepare your environment to create and deploy your application.
- Log in to the Oracle Cloud Infrastructure Console.
- Open the navigation menu, and click Governance and Administration. Under Governance, click Limits, Quotas and Usage.
- Find your service limit for Regions:
- Filter for the following options:
- Service: Regions
- Scope: Tenancy
- Resource: Subscribed region count
- Compartment:
<tenancy-name>(root)
- Find service limit:
- Limit Name:
subscribed-region-count - Service Limit: minimum 2
- Limit Name:
- Filter for the following options:
- Find your available Compute
core count for the VM.Standard.E3.Flex shape:
- Filter for the following options:
- Service: Compute
- Scope:
<first-availability-domain>. Example:EMlr:US-ASHBURN-AD-1 - Resource: Cores for Standard.E3.Flex and BM.Standard.E3.128 Instances
- Compartment:
<tenancy-name>(root)
- Find available core count:
- Limit Name:
standard-e3-core-ad-count - Available: minimum 1
- Limit Name:
- Repeat for Scope:
<second-availability-domain>and<third-availability-domain>. Each region must have at least one core available for this shape.
- Filter for the following options:
- Find out if you have 50 GB of Block Volume available:
- Filter for the following options:
- Service: Block Volume
- Scope:
<first-availability-domain>. Example:EMlr:US-ASHBURN-AD-1 - Resource Volume Size (GB)
- Compartment:
<tenancy-name>(root)
- Find available block volume storage:
- Limit Name:
total-storage-gb - Available: minimum 50
- Limit Name:
- Repeat for Scope:
<second-availability-domain>and<third-availability-domain>. Each region must have at least 50 GB of block volume available.
- Filter for the following options:
- Find out how many Flexible Load Balancers you have available:
- Filter for the following options:
- Service: LbaaS
- Scope:
<your-region>. Example:us-ashburn-1 - Resource:
<blank> - Compartment:
<tenancy-name>(root)
- Find the number of available flexible load balancers:
- Limit Name:
lb-flexible-count - Available: minimum 1
- Limit Name:
- Filter for the following options:
This tutorial creates three compute instances with a VM.Standard.E3.Flex shape for the cluster nodes. To use another shape, filter for its core count. For example, for VM.Standard2.4, filter for Cores for Standard2 based VM and BM Instances and get the count.
For a list of all shapes, see VM Standard Shapes.
This tutorial uses a 'Quick Create' workflow to create a cluster with a public regional subnet that hosts a flexible load balancer. To use a different load balancer, you can use a custom workflow to explicitly specify which existing network resources to use, including the existing subnets in which to create the load balancers.
To use another bandwidth for the load balancer, filter for its count, for example 100-Mbps bandwidth or 400-Mbps bandwidth.
- In the Console's top navigation bar, click the Profile menu (your avatar).
- Click your username.
- Click Auth Tokens.
- Click Generate Token.
- Give it a description.
- Click Generate Token.
- Copy the token and save it.
- Click Close.
Ensure that you save your token right after you create it. You have no access to it later.
The Python virtualenv creates a folder that contains all the
executables and libraries for your project.
The virtualenvwrapper is an extension to virtualenv.
It provides a set of commands, which makes working with virtual environments much
more pleasant. It also places all your virtual environments in one place. The
virtualenvwrapper provides tab-completion on environment
names.
- Install
virtualenv.pip3 install --user virtualenv - Install
virtualenvwrapper.pip3 install --user virtualenvwrapper - Find the location of the
virtualenvwrapper.shscript.grep -R virtualenvwrapper.shExample paths:- Linux example:
/home/ubuntu/.local/bin/virtualenvwrapper.sh - MacOS example:
/usr/local/bin/virtualenvwrapper.sh
- Linux example:
- Configure the virtual environment wrapper in
.bashrc.sudo vi .bashrcAppend the following text.
# set up Python env
export WORKON_HOME=~/envs
export VIRTUALENVWRAPPER_PYTHON=/usr/bin/python3
export VIRTUALENVWRAPPER_VIRTUALENV_ARGS=' -p /usr/bin/python3 '
source <path-to-virtualenvwrapper.sh>
Replace
<path-to-virtualenvwrapper.sh>with its value.Based on the location of Python3 binaries in your environment, update
/usr/bin/python3to its correct location.Save the file.
- Activate the commands in the current
window.
source ~/.bashrcExample output:virtualenvwrapper.user_scripts creating /home/ubuntu/envs/premkproject virtualenvwrapper.user_scripts creating /home/ubuntu/envs/postmkproject virtualenvwrapper.user_scripts creating /home/ubuntu/envs/initialize virtualenvwrapper.user_scripts creating /home/ubuntu/envs/premkvirtualenv virtualenvwrapper.user_scripts creating /home/ubuntu/envs/postmkvirtualenv virtualenvwrapper.user_scripts creating /home/ubuntu/envs/prermvirtualenv virtualenvwrapper.user_scripts creating /home/ubuntu/envs/postrmvirtualenv virtualenvwrapper.user_scripts creating /home/ubuntu/envs/predeactivate virtualenvwrapper.user_scripts creating /home/ubuntu/envs/postdeactivate virtualenvwrapper.user_scripts creating /home/ubuntu/envs/preactivate virtualenvwrapper.user_scripts creating /home/ubuntu/envs/postactivate
- Start a virtual
environment.
workon cli-app - Confirm that the name of your virtual environment,
cli-appappears in the left of your command prompt.Example:
(cli-app) ubuntu@<ubuntu-instance-name>:~$ - Install OCI
CLI.
pip3 install oci-cli - Test the
installation:
oci --versionIf everything is set up correctly, you get the version.
oci --help
- Enter the following command in your virtual
environment:
oci setup config - Enter your answers from the Gather Required Information section:
- Location for your config [$HOME/.oci/config]:
<take-default> - User OCID:
<user-ocid> - Tenancy OCID:
<tenancy-ocid> - Region (e.g. us-ashburn-1):
<region-identifier>
- Location for your config [$HOME/.oci/config]:
- Enter the following information to set up your OpenSSL API encryption keys:
- Generate a new API Signing RSA key pair? [Y/n]: Y
- Directory for your keys [$HOME/.oci]:
<take-default> - Name for your key [oci_api_key]
<take-default>
- Deactivate the virtual environment:
deactivateThe
(cli-app)prefix in your environment is not displayed anymore.
Your private key is
oci_api_key.pem and your public key is
oci_api_key_public.pem.- Activate the
cli-appenvironment:workon cli-app - Display the public
key.
cat $HOME/.oci/oci_api_key_public.pem - Copy the public key.
- Add the public key to your user account:
- Go to the Console.
- Click your Profile menu (your avatar), and then click User Settings.
- Click API Keys.
- Click Add API Key.
- Click Paste Public Key.
- Paste value from previous step, including the lines with
BEGIN PUBLIC KEYandEND PUBLIC KEY. - Click Add.
- Whenever you want to use the OCI CLI, activate it with:
workon cli-app - When you change project names,
workondeactivates your current working environment. This way, you can quickly switch between environments.
If your username is in the Administrators group, then skip this section. Otherwise, have your administrator add the following policy to your tenancy:
allow group <the-group-your-username-belongs> to manage compartments in tenancyWith this privilege, you can create a compartment for all the resources in your tutorial.
- In the top navigation bar, open the Profile menu.
- Click your username.
- In the left pane, click Groups.
- In a notepad, copy the Group Name that your username belongs.
- Open the navigation menu and click Identity & Security. Under Identity, click Policies.
- Select your compartment from the Compartment drop-down.
- Click Create Policy.
- Fill in the following information:
- Name:
manage-compartments - Description:
Allow the group <the-group-your-username-belongs> to list, create, update, delete and recover compartments in the tenancy. - Compartment:
<your-tenancy>(root)
- Name:
- For Policy Builder, click Show manual editor.
- Paste in the following
policy:
allow group <the-group-your-username-belongs> to manage compartments in tenancy - Click Create.
Reference: The compartments resource-type in Verbs + Resource-Type Combinations for IAM
Create a compartment for the resources that you create in this tutorial.
For simplicity, the application, Service Mesh, and required resources are created in the same compartment. In production, all these components might be in different compartments.
- Log in to the Oracle Cloud Infrastructure Console.
- Open the navigation menu and click Identity & Security. Under Identity, click Compartments.
- Click Create Compartment.
- Fill in the following information:
- Name:
<your-service-mesh-compartment-name> - Description:
Compartment for <your-description>. - Parent Compartment:
<your-tenancy>(root)
- Name:
- Click Create Compartment.
Reference: Create a compartment
Set up dynamic groups for cluster worker nodes and for the Certificate Service.
Create Dynamic Group for Worker Nodes
The cluster runs three processes that are essential to the working of Service Mesh: Mesh Kubernetes Operator, Mesh Proxies, and Logging Agent. These processes require permissions to required resources for proper functioning. The Service Mesh processes use the Instance Principals of the worker nodes in your cluster. Define a dynamic group consisting of those instances.
Assume you create your cluster in
<your-service-mesh-compartment>.- From the Console, go to Identity & Security under Identity select Dynamic Groups.
- Click Create Dynamic Group.
- Name your dynamic group:
<your-dynamic-group>. - Create your dynamic group using a compartment.
ANY {instance.compartment.id = '<your-service-mesh-compartment-id>'} - Click Create.
Set up a Dynamic Group for the Certificate Authority
The Service Mesh service natively uses the Certificates Service to manage certificates. The Certificates Service needs permissions to use the key and vault services in your compartment. Define a dynamic group to enable Certificate Service permissions for your tenancy.
- Open the navigation menu and click Identity & Security. Under Identity, click Dynamic Groups.
- Click Create Dynamic Group.
The Create Dynamic Group dialog is displayed.
- Fill in the information in Create Dynamic Group.
- Name: <your-certs-dynamic-group>
- Description: <your-description>
- Matching Rules
- Add the following to Rule 1:
ANY {resource.type='certificateauthority', resource.type='certificate'}
- Add the following to Rule 1:
- Click Create.
Your dynamic group is created.
Add the following policy to allow dynamic group to read from service mesh proxy.
allow dynamic-group <your-dynamic-group> TO {MESH_PROXY_DETAILS_READ} IN tenancy Add policies needed for your application, Service Mesh, and your resources. This policy approach defines an administrator group which gives administrator rights to a user for a specific compartment. Only use this approach for development scenarios.
Have your administrator add the following policies to your tenancy:
allow group <the-group-your-username-belongs> to manage all-resources in compartment <your-service-mesh-compartment-name>
allow dynamic-group <your-dynamic-group> to manage all-resources in compartment <your-service-mesh-compartment>
allow dynamic-group <your-certs-dynamic-group> to manage all-resources in compartment <your-service-mesh-compartment>
With this privilege, you can manage all resources in your compartment. Essentially, you have administrative rights in that compartment including all Kubernetes and Service Mesh resources.
Setting the policies in this manner is for development purposes only, not production.
Perform the following steps to add the policies for your compartment.
- From the console, go to Identity & Security under Identity select Policies.
- Click Create Policy.
- Name your policy:
<your-compartment-manage-all-resources-policy-name>. - Ensure that your compartment is selected.
- Enter the following policies into the Policy Builder.
allow group <the-group-your-username-belongs> to manage all-resources in compartment <your-service-mesh-compartment-name> allow dynamic-group <your-dynamic-group> to manage all-resources in compartment <your-service-mesh-compartment> allow dynamic-group <your-certs-dynamic-group> to manage all-resources in compartment <your-service-mesh-compartment> - To save your policy, click Create.
Add policies needed for your application, Service Mesh, and your resources using a resource approach. The approach defines policies for resources used in Service Mesh. This approach allows resources to be stored in multiple compartments. Use this approach for production environments.
The steps described in this section, use a four compartment approach to setting up Service Mesh: cluster, certificates, service mesh, and vault. The preceding option 1 section sets up everything in a single compartment.
Create Policies for Certificates Service
Give permissions to the Certificates Service to use your keys and vault. Assume you
created your key and vault in <your-vault-compartment>.
- From the console, go to Identity & Security under Identity select Policies.
- Click Create Policy.
- Name your policy:
<your-certificate-policy-name>. - Ensure that your compartment is selected.
- Enter the following policies into the Policy Builder.
Allow dynamic-group <your-certs-dynamic-group> to use keys in compartment <your-vault-compartment> Allow dynamic-group <your-certs-dynamic-group> to manage objects in compartment <your-vault-compartment> - To save your policy, click Create.
Create Policies for Service Mesh Kubernetes Operator and Mesh Proxies
Assume that your certificate authority is created in
<your-certificate-compartment>. Using
<your-dynamic-group>, create the policies that give
<your-certficate-compartment> the required access for
Service Mesh.
- From the console, go to Identity & Security under Identity select Policies.
- Click Create Policy.
- Name your policy:
<your-mesh-proxies-policy-name>. - Ensure that your compartment is selected.
- Enter the following policies into the Policy Builder to
enable Service Mesh access for the Mesh Kubernetes Operator and Mesh Proxies.
Allow dynamic-group <your-dynamic-group> to manage service-mesh-family in compartment <your-mesh-compartment> - To enable the Certificates access for the Service Mesh Kubernetes operator,
enter the following policies into the Policy Builder.
Allow dynamic-group <your-dynamic-group> to read certificate-authority-family in compartment <your-certificate-compartment> Allow dynamic-group <your-dynamic-group> to use certificate-authority-delegates in compartment <your-certificate-compartment> Allow dynamic-group <your-dynamic-group> to manage leaf-certificate-family in compartment <your-certificate-compartment> Allow dynamic-group <your-dynamic-group> to manage certificate-authority-associations in compartment <your-certificate-compartment> Allow dynamic-group <your-dynamic-group> to manage certificate-associations in compartment <your-certificate-compartment> Allow dynamic-group <your-dynamic-group> to manage cabundle-associations in compartment <your-certificate-compartment> - To save your policy, click Create.
Create Policies for Observability
To enable the logging agent to publish logs to OCI Logging, create the following policy.
- From the console, go to Identity & Security under Identity select Policies.
- Click Create Policy.
- Name your policy:
<your-mesh-observe-policy-name>. - Ensure that your compartment is selected.
- Enter the following policies into the Policy Builder.
Allow dynamic-group <your-dynamic-group> to use metrics in compartment <your-cluster-compartment> Allow dynamic-group <your-dynamic-group> to use log-content in compartment <your-cluster-compartment> - To save your policy, click Create.
For More IAM Policy Information
2. Set Up a Cluster (Optional)
Install and configure management options for your Kubernetes cluster. Later, deploy your application to this cluster.
If you already have setup a Kubernetes cluster, you can skip this section.
Create a cluster with default settings and new network resources through the 'Quick Create' workflow.
After you create a Kubernetes cluster, set up your local system to access the cluster.
To set up local access to your Kubernetes cluster, the OCI CLI must be installed and configured to access your tenancy. For example, run the following command to get you tenancy name:
$ oci os ns get
{
    "data":"<your-tenancy-name>"
}
If the preceding command returns an error, see Set up OCI Command Line Interface. Ensure that the CLI is installed correctly.
With your cluster access configured, you are now ready to prepare your application for deployment.
3. Set up Service Mesh Required Services
Set up all the OCI services that are required for Service Mesh.
4. Deploy and Configure your App with Service Mesh
In this section, perform the steps required to install and deploy OCI Service Operator for Kubernetes.
Install the OCI Service Operator for Kubernetes so you can create, manage, and connect to OCI resources from a Kubernetes environment.
In this tutorial, the Bookinfo app is deployed to the Kubernetes cluster. The Bookinfo sample app is distributed as part of the Istio open source project. You can download the source code from the Istio sample page on GitHub.
In this tutorial, the deployment file (
bookinfo-v1.yaml) points
to the Bookinfo image on Docker Hub. Downloading and building a Docker image is
optional.Reviewing the Bookinfo App
The following picture displays the Bookinfo application components along with the Service Mesh resources. Bookinfo is a book store application composed of four microservices.
- Product Page Service: The main UI service. Information is pulled from the other services to display a book's information.
- Details Service: This service provides details about each book.
- Reviews Service: This service provides the reviews associated with a
particular book. It calls the ratings service. The reviews service has multiple
versions. Note
The following is a list of behaviors for each review service version:- Version v1 doesn't call the ratings service.
- Version v2 calls the ratings service, and displays each rating as 1–5 black stars.
- Version v3 calls the ratings service, and displays each rating as 1–5 red stars.
- Ratings Service: This service provides the ratings data for a review.
The picture also includes the various Service Mesh resources that are included with the application. More information is provided on Service Mesh resources in the next section.
The gray boxes represent virtual deployments in the application.
Deploy your Application
Follow these steps to deploy the application to your cluster.
-
Create the
bookinfonamespace for the applicationkubectl create namespace bookinfo -
Deploy the Bookinfo application with the Product Page, Details, Reviews, and Ratings services using the following
bookinfo-v1.yamlfile.kubectl apply -f bookinfo-v1.yaml
The Bookinfo application Docker images are precompiled and stored on Docker Hub. Search the YAML file for
image: keys for the URL of each
application component.apiVersion: v1
kind: Service
metadata:
name: bookinfo-ingress
namespace: bookinfo
labels:
app: bookinfo
service: ingress
spec:
ports:
- port: 80
targetPort: 9080
name: http
selector:
app: productpage
type: LoadBalancer
---
apiVersion: v1
kind: Service
metadata:
name: details
namespace: bookinfo
labels:
app: details
service: details
spec:
ports:
- port: 9080
name: http
selector:
app: details
---
apiVersion: v1
kind: ServiceAccount
metadata:
name: bookinfo-details
namespace: bookinfo
labels:
account: details
---
apiVersion: apps/v1
kind: Deployment
metadata:
name: details-v1
namespace: bookinfo
labels:
app: details
version: v1
spec:
replicas: 2
selector:
matchLabels:
app: details
version: v1
template:
metadata:
namespace: bookinfo
labels:
app: details
version: v1
spec:
serviceAccountName: bookinfo-details
containers:
- name: details
image: docker.io/istio/examples-bookinfo-details-v1:1.16.4
imagePullPolicy: IfNotPresent
ports:
- containerPort: 9080
securityContext:
runAsUser: 1000
---
apiVersion: v1
kind: Service
metadata:
name: ratings
namespace: bookinfo
labels:
app: ratings
service: ratings
spec:
ports:
- port: 9080
name: http
selector:
app: ratings
---
apiVersion: v1
kind: ServiceAccount
metadata:
name: bookinfo-ratings
namespace: bookinfo
labels:
account: ratings
---
apiVersion: apps/v1
kind: Deployment
metadata:
name: ratings-v1
namespace: bookinfo
labels:
app: ratings
version: v1
spec:
replicas: 2
selector:
matchLabels:
app: ratings
version: v1
template:
metadata:
namespace: bookinfo
labels:
app: ratings
version: v1
spec:
serviceAccountName: bookinfo-ratings
containers:
- name: ratings
image: docker.io/istio/examples-bookinfo-ratings-v1:1.16.4
imagePullPolicy: IfNotPresent
ports:
- containerPort: 9080
securityContext:
runAsUser: 1000
---
apiVersion: v1
kind: Service
metadata:
name: reviews
namespace: bookinfo
labels:
app: reviews
service: reviews
spec:
ports:
- port: 9080
name: http
selector:
app: reviews
---
apiVersion: v1
kind: Service
metadata:
name: reviews-v1
namespace: bookinfo
labels:
app: reviews
service: reviews
spec:
ports:
- port: 9080
name: http
selector:
app: reviews
version: v1
---
apiVersion: v1
kind: Service
metadata:
name: reviews-v2
namespace: bookinfo
labels:
app: reviews
service: reviews
spec:
ports:
- port: 9080
name: http
selector:
app: reviews
version: v2
---
apiVersion: v1
kind: Service
metadata:
name: reviews-v3
namespace: bookinfo
labels:
app: reviews
service: reviews
spec:
ports:
- port: 9080
name: http
selector:
app: reviews
version: v3
---
apiVersion: v1
kind: ServiceAccount
metadata:
name: bookinfo-reviews
namespace: bookinfo
labels:
account: reviews
---
apiVersion: apps/v1
kind: Deployment
metadata:
name: reviews-v1
namespace: bookinfo
labels:
app: reviews
version: v1
spec:
replicas: 2
selector:
matchLabels:
app: reviews
version: v1
template:
metadata:
namespace: bookinfo
labels:
app: reviews
version: v1
spec:
serviceAccountName: bookinfo-reviews
containers:
- name: reviews
image: docker.io/istio/examples-bookinfo-reviews-v1:1.16.4
imagePullPolicy: IfNotPresent
env:
- name: LOG_DIR
value: "/tmp/logs"
ports:
- containerPort: 9080
volumeMounts:
- name: tmp
mountPath: /tmp
- name: wlp-output
mountPath: /opt/ibm/wlp/output
securityContext:
runAsUser: 1000
volumes:
- name: wlp-output
emptyDir: {}
- name: tmp
emptyDir: {}
---
apiVersion: apps/v1
kind: Deployment
metadata:
name: reviews-v2
namespace: bookinfo
labels:
app: reviews
version: v2
spec:
replicas: 2
selector:
matchLabels:
app: reviews
version: v2
template:
metadata:
namespace: bookinfo
labels:
app: reviews
version: v2
spec:
serviceAccountName: bookinfo-reviews
containers:
- name: reviews
image: docker.io/istio/examples-bookinfo-reviews-v2:1.16.4
imagePullPolicy: IfNotPresent
env:
- name: LOG_DIR
value: "/tmp/logs"
ports:
- containerPort: 9080
volumeMounts:
- name: tmp
mountPath: /tmp
- name: wlp-output
mountPath: /opt/ibm/wlp/output
securityContext:
runAsUser: 1000
volumes:
- name: wlp-output
emptyDir: {}
- name: tmp
emptyDir: {}
---
apiVersion: apps/v1
kind: Deployment
metadata:
name: reviews-v3
namespace: bookinfo
labels:
app: reviews
version: v3
spec:
replicas: 2
selector:
matchLabels:
app: reviews
version: v3
template:
metadata:
namespace: bookinfo
labels:
app: reviews
version: v3
spec:
serviceAccountName: bookinfo-reviews
containers:
- name: reviews
image: docker.io/istio/examples-bookinfo-reviews-v3:1.16.4
imagePullPolicy: IfNotPresent
env:
- name: LOG_DIR
value: "/tmp/logs"
ports:
- containerPort: 9080
volumeMounts:
- name: tmp
mountPath: /tmp
- name: wlp-output
mountPath: /opt/ibm/wlp/output
securityContext:
runAsUser: 1000
volumes:
- name: wlp-output
emptyDir: {}
- name: tmp
emptyDir: {}
---
apiVersion: policy/v1
kind: PodDisruptionBudget
metadata:
name: reviews-pdb
namespace: bookinfo
spec:
minAvailable: 1
selector:
matchLabels:
app: reviews
---
apiVersion: v1
kind: Service
metadata:
name: productpage
namespace: bookinfo
labels:
app: productpage
service: productpage
spec:
ports:
- port: 9080
name: http
selector:
app: productpage
---
apiVersion: v1
kind: ServiceAccount
metadata:
name: bookinfo-productpage
namespace: bookinfo
labels:
account: productpage
---
apiVersion: apps/v1
kind: Deployment
metadata:
name: productpage-v1
namespace: bookinfo
labels:
app: productpage
version: v1
spec:
replicas: 2
selector:
matchLabels:
app: productpage
version: v1
template:
metadata:
namespace: bookinfo
labels:
app: productpage
version: v1
spec:
serviceAccountName: bookinfo-productpage
containers:
- name: productpage
image: docker.io/istio/examples-bookinfo-productpage-v1:1.16.4
imagePullPolicy: IfNotPresent
ports:
- containerPort: 9080
volumeMounts:
- name: tmp
mountPath: /tmp
securityContext:
runAsUser: 1000
volumes:
- name: tmp
emptyDir: {}
---Test your Deployment
Use one of the following methods to get the external IP of the
bookinfo-ingress service load balancer.
- Use
kubectl:kubectl get svc bookinfo-ingress -n bookinfo - Use the OCI Console:
- From the console, go to Networking then Load Balancers.
- In the left navigation, select your compartment.
- The main window lists load balancers by date. Select the newest load balancer.
- Find the IP Address: field to get the public IP address of your load balancer.
View your app in your browser at
http://<external-ip-of-bookinfo-load-balancer>.
Create Service Mesh Resources
In this tutorial, Service Mesh Control Plane resources are managed with
kubectl. To enable Service Mesh for your application, you need
to create two sets of resources:
- Service Mesh Control Plane resources
- Service Mesh binding resources
The required control plane Service Mesh resources created and their names are summarized as follows.
- Mesh:
bookinfo-mesh. - Virtual Services:
- Details Virtual Service:
details- Virtual Deployment:
details-v1 - Virtual Service Route Table:
details-route-table
- Virtual Deployment:
- Ratings Virtual Service:
ratings- Virtual Deployment:
ratings-v1 - Virtual Service Route Table:
ratings-route-table
- Virtual Deployment:
- Reviews Virtual Service:
reviews- Virtual Deployment:
reviews-v1 - Virtual Deployment:
reviews-v2 - Virtual Deployment:
reviews-v3 - Virtual Service Route Table:
reviews-route-table
- Virtual Deployment:
- Product Page Virtual Service:
productpage- Virtual Deployment:
productpage-v1 - Virtual Service Route Table:
productpage-route-table
- Virtual Deployment:
- Details Virtual Service:
- Ingress Gateway:
bookinfo-ingress-gateway- Ingress Gateway Deployment:
bookinfo-ingress-gateway-deployment - Virtual Service Route Table:
bookinfo-ingress-gateway-route-table
- Ingress Gateway Deployment:
- Access Policy:
bookinfo-policy.
The definitions of each resource are included in the
meshify-bookinfo-v1.yaml and
bind-booking-v1.yaml files.
Create Control Plane Resources
Create the Service Mesh control plane resources using a local Service Mesh configuration file on your system.
- Enable sidecar injection in the namespace.
kubectl label namespace bookinfo servicemesh.oci.oracle.com/sidecar-injection=enabled - Save the following
meshify-bookinfo-v1.yamlto your local system. - Update the
meshify-bookinfo-v1.yamlwith your:- Compartment OCID
- Certificate Authority OCID
- To add the resources, run the
applycommand.kubectl apply -f meshify-bookinfo-v1.yaml
---
kind: Mesh
apiVersion: servicemesh.oci.oracle.com/v1beta1
metadata:
  name: bookinfo
  namespace: bookinfo
spec:
  compartmentId: ocid1.compartment.oc1.aaaaaaa...
  certificateAuthorities:
    - id: ocid1.certificateauthority.oc1.iad.aaaaaaa...
  displayName: bookinfo-mesh
  mtls:
    minimum: PERMISSIVE
---
kind: VirtualService
apiVersion: servicemesh.oci.oracle.com/v1beta1
metadata:
  name: details
  namespace: bookinfo
spec:
  mesh:
    ref:
      name: bookinfo
  defaultRoutingPolicy:
    type: UNIFORM
  compartmentId: ocid1.compartment.oc1.aaaaaaa...
  hosts:
    - details:9080
    - details
---
kind: VirtualDeployment
apiVersion: servicemesh.oci.oracle.com/v1beta1
metadata:
  name: details-v1
  namespace: bookinfo
spec:
  virtualService:
    ref:
      name: details
  compartmentId: ocid1.compartment.oc1.aaaaaaa...
  listener:
    - port: 9080
      protocol: HTTP
  accessLogging:
    isEnabled: true
  serviceDiscovery:
    type: DNS
    hostname: details
---
apiVersion: servicemesh.oci.oracle.com/v1beta1
kind: VirtualServiceRouteTable
metadata:
  name: details-route-table
  namespace: bookinfo
spec:
  compartmentId: ocid1.compartment.oc1.aaaaaaa...
  virtualService:
    ref:
      name: details
  routeRules:
    - httpRoute:
        destinations:
          - virtualDeployment:
              ref:
                name: details-v1
            weight: 100
        isGrpc: false
        path: /
        pathType: PREFIX
---
kind: VirtualService
apiVersion: servicemesh.oci.oracle.com/v1beta1
metadata:
  name: ratings
  namespace: bookinfo
spec:
  mesh:
    ref:
      name: bookinfo
  defaultRoutingPolicy:
    type: UNIFORM
  compartmentId: ocid1.compartment.oc1.aaaaaaa...
  hosts:
    - ratings:9080
    - ratings
---
kind: VirtualDeployment
apiVersion: servicemesh.oci.oracle.com/v1beta1
metadata:
  name: ratings-v1
  namespace: bookinfo
spec:
  virtualService:
    ref:
      name: ratings
  compartmentId: ocid1.compartment.oc1.aaaaaaa...

  listener:
    - port: 9080
      protocol: HTTP
  accessLogging:
    isEnabled: true
  serviceDiscovery:
    type: DNS
    hostname: ratings
---
apiVersion: servicemesh.oci.oracle.com/v1beta1
kind: VirtualServiceRouteTable
metadata:
  name: ratings-route-table
  namespace: bookinfo
spec:
  compartmentId: ocid1.compartment.oc1.aaaaaaa...
  virtualService:
    ref:
      name: ratings
  routeRules:
    - httpRoute:
        destinations:
          - virtualDeployment:
              ref:
                name: ratings-v1
            weight: 100
        isGrpc: false
        path: /
        pathType: PREFIX
---
kind: VirtualService
apiVersion: servicemesh.oci.oracle.com/v1beta1
metadata:
  name: reviews
  namespace: bookinfo
spec:
  mesh:
    ref:
      name: bookinfo
  defaultRoutingPolicy:
    type: UNIFORM
  compartmentId: ocid1.compartment.oc1.aaaaaaa...
  hosts:
    - reviews:9080
    - reviews
---
kind: VirtualDeployment
apiVersion: servicemesh.oci.oracle.com/v1beta1
metadata:
  name: reviews-v1
  namespace: bookinfo
spec:
  virtualService:
    ref:
      name: reviews
  compartmentId: ocid1.compartment.oc1.aaaaaaa...
  listener:
    - port: 9080
      protocol: HTTP
  accessLogging:
    isEnabled: true
  serviceDiscovery:
    type: DNS
    hostname: reviews-v1
---
kind: VirtualDeployment
apiVersion: servicemesh.oci.oracle.com/v1beta1
metadata:
  name: reviews-v2
  namespace: bookinfo
spec:
  virtualService:
    ref:
      name: reviews
  compartmentId: ocid1.compartment.oc1.aaaaaaa...
  listener:
    - port: 9080
      protocol: HTTP
  accessLogging:
    isEnabled: true
  serviceDiscovery:
    type: DNS
    hostname: reviews-v2
---
kind: VirtualDeployment
apiVersion: servicemesh.oci.oracle.com/v1beta1
metadata:
  name: reviews-v3
  namespace: bookinfo
spec:
  virtualService:
    ref:
      name: reviews
  compartmentId: ocid1.compartment.oc1.aaaaaaa...
  listener:
    - port: 9080
      protocol: HTTP
  accessLogging:
    isEnabled: true
  serviceDiscovery:
    type: DNS
    hostname: reviews-v3
---
apiVersion: servicemesh.oci.oracle.com/v1beta1
kind: VirtualServiceRouteTable
metadata:
  name: reviews-route-table
  namespace: bookinfo
spec:
  compartmentId: ocid1.compartment.oc1.aaaaaaa...
  virtualService:
    ref:
      name: reviews
  routeRules:
    - httpRoute:
        destinations:
          - virtualDeployment:
              ref:
                name: reviews-v1
            weight: 60
          - virtualDeployment:
              ref:
                name: reviews-v2
            weight: 20
          - virtualDeployment:
              ref:
                name: reviews-v3
            weight: 20
        isGrpc: false
        path: /
        pathType: PREFIX
---
kind: VirtualService
apiVersion: servicemesh.oci.oracle.com/v1beta1
metadata:
  name: productpage
  namespace: bookinfo
spec:
  mesh:
    ref:
      name: bookinfo
  defaultRoutingPolicy:
    type: UNIFORM
  compartmentId: ocid1.compartment.oc1.aaaaaaa...
  hosts:
    - productpage:9080
    - productpage
---
kind: VirtualDeployment
apiVersion: servicemesh.oci.oracle.com/v1beta1
metadata:
  name: productpage-v1
  namespace: bookinfo
spec:
  virtualService:
    ref:
      name: productpage
  compartmentId: ocid1.compartment.oc1.aaaaaaa...

  listener:
    - port: 9080
      protocol: HTTP
  accessLogging:
    isEnabled: true
  serviceDiscovery:
    type: DNS
    hostname: productpage
---
apiVersion: servicemesh.oci.oracle.com/v1beta1
kind: VirtualServiceRouteTable
metadata:
  name: productpage-route-table
  namespace: bookinfo
spec:
  compartmentId: ocid1.compartment.oc1.aaaaaaa...
  virtualService:
    ref:
      name: productpage
  routeRules:
    - httpRoute:
        destinations:
          - virtualDeployment:
              ref:
                name: productpage-v1
            weight: 100
        isGrpc: false
        path: /
        pathType: PREFIX
---
kind: IngressGateway
apiVersion: servicemesh.oci.oracle.com/v1beta1
metadata:
  name: bookinfo-ingress-gateway
  namespace: bookinfo
spec:
  compartmentId: ocid1.compartment.oc1.aaaaaaa...
  mesh:
    ref:
      name: bookinfo
  hosts:
    - name: bookinfoHost
      hostnames:
        - bookinfo.example.com
        - bookinfo.example.com:9080
      listeners:
        - port: 9080
          protocol: HTTP
          tls:
            mode: DISABLED
  accessLogging:
    isEnabled: true
---
apiVersion: servicemesh.oci.oracle.com/v1beta1
kind: IngressGatewayDeployment
metadata:
  name: bookinfo-ingress-gateway-deployment
  namespace: bookinfo
spec:
  ingressGateway:
    ref:
      name: bookinfo-ingress-gateway
  deployment:
    autoscaling:
      minPods: 1
      maxPods: 1
  ports:
    - protocol: TCP
      port: 9080
      serviceport: 80
  service:
    type: LoadBalancer
---
apiVersion: servicemesh.oci.oracle.com/v1beta1
kind: IngressGatewayRouteTable
metadata:
  name: bookinfo-ingress-gateway-route-table
  namespace: bookinfo
spec:
  compartmentId: ocid1.compartment.oc1.aaaaaaa...
  ingressGateway:
    ref:
      name: bookinfo-ingress-gateway
  routeRules:
    - httpRoute:
        destinations:
          - virtualService:
              ref:
                name: productpage
        ingressGatewayHost:
          name: bookinfoHost
---
kind: AccessPolicy
apiVersion: servicemesh.oci.oracle.com/v1beta1
metadata:
  name: bookinfo-policy
  namespace: bookinfo
spec:
  mesh:
    ref:
      name: bookinfo
  compartmentId: ocid1.compartment.oc1.aaaaaaa...
  rules:
    - action: ALLOW
      source:
        virtualService:
          ref:
            name: productpage
      destination:
        virtualService:
          ref:
            name: details
    - action: ALLOW
      source:
        virtualService:
          ref:
            name: productpage
      destination:
        virtualService:
          ref:
            name: reviews
    - action: ALLOW
      source:
        virtualService:
          ref:
            name: reviews
      destination:
        virtualService:
          ref:
            name: ratings
    - action: ALLOW
      source:
        ingressGateway:
          ref:
            name: bookinfo-ingress-gateway
      destination:
        virtualService:
          ref:
            name: productpage
---
Add Service Mesh Binding Resources
Next, bind the Service Mesh control plane resources with the pods in the Kubernetes Cluster.
- Save the following
bind-bookinfo-v1.yamlto your local system. - To add the resources, run the
applycommand.kubectl apply -f bind-bookinfo-v1.yaml
---
kind: VirtualDeploymentBinding
apiVersion: servicemesh.oci.oracle.com/v1beta1
metadata:
  name: details-v1-binding
  namespace: bookinfo
spec:
  virtualDeployment:
    ref:
      name: details-v1
      namespace: bookinfo
  target:
    service:
      ref:
        name: details
        namespace: bookinfo
---
kind: VirtualDeploymentBinding
apiVersion: servicemesh.oci.oracle.com/v1beta1
metadata:
  name: ratings-v1-binding
  namespace: bookinfo
spec:
  virtualDeployment:
    ref:
      name: ratings-v1
      namespace: bookinfo
  target:
    service:
      ref:
        name: ratings
        namespace: bookinfo
---
kind: VirtualDeploymentBinding
apiVersion: servicemesh.oci.oracle.com/v1beta1
metadata:
  name: reviews-v1-binding
  namespace: bookinfo
spec:
  virtualDeployment:
    ref:
      name: reviews-v1
      namespace: bookinfo
  target:
    service:
      ref:
        name: reviews-v1
        namespace: bookinfo
---
kind: VirtualDeploymentBinding
apiVersion: servicemesh.oci.oracle.com/v1beta1
metadata:
  name: reviews-v2-binding
  namespace: bookinfo
spec:
  virtualDeployment:
    ref:
      name: reviews-v2
      namespace: bookinfo
  target:
    service:
      ref:
        name: reviews-v2
        namespace: bookinfo
---
kind: VirtualDeploymentBinding
apiVersion: servicemesh.oci.oracle.com/v1beta1
metadata:
  name: reviews-v3-binding
  namespace: bookinfo
spec:
  virtualDeployment:
    ref:
      name: reviews-v3
      namespace: bookinfo
  target:
    service:
      ref:
        name: reviews-v3
        namespace: bookinfo
---
kind: VirtualDeploymentBinding
apiVersion: servicemesh.oci.oracle.com/v1beta1
metadata:
  name: productpage-v1-binding
  namespace: bookinfo
spec:
  virtualDeployment:
    ref:
      name: productpage-v1
      namespace: bookinfo
  target:
    service:
      ref:
        name: productpage
        namespace: bookinfo
---
Test your Service Mesh Deployment
The application deployment creates an OCI load balancer from the Ingress Gateway Deployment.
Use one of the following methods to get the external IP of the load balancer.
- Use
kubectl:kubectl get svc bookinfo-ingress-gateway-deployment-service -n bookinfo - Use the OCI Console:
- From the console, go to Networking then Load Balancers.
- In the left navigation, select your compartment.
- The main window lists load balancers by date. Select the newest load balancer.
- Find the IP Address: field to get the public IP address of your load balancer.
To view the application, you must use a host name. Make the following update to your hosts file.
- MacOS or Linux:
/etc/hostsx.x.x.x bookinfo.example.com - Windows:
C:\Windows\System32\drivers\etc\hostsx.x.x.x bookinfo.example.com
Test the application.
- View app in browser at http://bookinfo.example.com
curl http://bookinfo.example.com
Setup Logging Service to Store your Logs
Next, set up the OCI Logging service to store your access logs. Set up log scraping by creating a log group and custom Log.
- Create the log group:
oci logging log-group create --compartment-id <your-compartment-ocid> --display-name <your-app-name> - Get the OCID for your new log group.
- From the console, go to Observability & Management under Logging select Log Groups.
- Click the name of the log group you created in the preceding step.
- Locate the OCID field and click Copy. Save the OCID in a text file.
- Create a custom log in the log group:
oci logging log create --log-group-id <your-log-group-ocid> --display-name <your-app-name>-logs --log-type custom - Get the OCID for your new log group.
- From the console, go to Observability & Management under Logging select Logs.
- Click the name of the log you created in the preceding step.
- Locate the OCID field and click Copy. Save the OCID in a text file.
- On your system, create the
logconfig.jsonconfiguration file using the following sample file. Ensure to put in the OCID for your custom log in thelogObjectIdfield. Also update<app-namespace>with your application namespace.{ "configurationType": "LOGGING", "destination": { "logObjectId": "<your-custom-log-ocid>" }, "sources": [ { "name": "proxylogs", "parser": { "fieldTimeKey": null, "isEstimateCurrentEvent": null, "isKeepTimeKey": null, "isNullEmptyString": null, "messageKey": null, "nullValuePattern": null, "parserType": "NONE", "timeoutInMilliseconds": null, "types": null }, "paths": [ "/var/log/containers/*<app-namespace>*oci-sm-proxy*.log" ], "source-type": "LOG_TAIL" } ] } - Create a custom agent-configuration to scrape the log files for the proxy
containers:
oci logging agent-configuration create --compartment-id <your-compartment-ocid> --is-enabled true --service-configuration file://your-log-config.json --display-name <your-app-name>LoggingAgent --description "Custom agent config for mesh" --group-association '{"groupList": ["<your-dynamic-group-ocid>"]}'Note
For information on how to configure your log, see: Agent Management: Managing Agent Configurations
Test the Application
With your logging configuration created, repeat the application test in one of the following ways.
- View app in browser at http://bookinfo.example.com
curl http://bookinfo.example.com
Pick one of the user accounts and reload the page repeatedly. The ratings for the book switch between no stars, black stars, or red stars. After making sufficient calls to the app, you are ready to view the logs.
View the Log Data in the Console
To view the log data in the console, perform the following steps.
- From the console, go to Observability & Management under Logging select Logs.
- Click the name of the log you created previously.
- Click Explore Log in the left navigation.
- Set the time filters to see all the current log entries.
- Click Explore with Log Search to create detailed filters to search the log data.
To see logging details, click individual log entries. The tailed_path field shows the version of the virtual deployment used in that entry. This field shows the version of the reviews service used (v1, v2, or v3).
Add Prometheus and Grafana
To accumulate data from Service Mesh, install Prometheus and Grafana. Create the
monitoring namespace for the applications.
kubectl create namespace monitoringNext, the system adds the following prometheus features to your application.
- Add Application Monitoring and Graphing Support
- The Service Mesh proxies expose the metrics on the
/stats/prometheusendpoint. When creating theClusterRolefor the Prometheus service, include/stats/prometheusin the "nonResourceURLs." See the following deployment yaml for theClusterRoleconfiguration example. - Add Scrape Job
- As a part of the Prometheus scrape config you need to add a job to scrape
metrics from the Service Mesh proxy endpoints. See the following
prometheus.yamlfile for ascrape_configexample.
Install Prometheus
To install Prometheus, perform the following steps:
- Save the following sample
prometheus.yamlfile to your local system. The yaml file provides an example of deploying Prometheus including the/stats/prometheusendpoint andscrape_configfor accumulating metrics data. - To deploy Prometheus, run the following command:
kubectl apply -f prometheus.yaml
---
apiVersion: v1
kind: ServiceAccount
metadata:
  name: prometheus
  namespace: monitoring
---
apiVersion: rbac.authorization.k8s.io/v1
kind: ClusterRole
metadata:
  name: prometheus
rules:
  - apiGroups:
      - ""
    resources:
      - nodes
      - nodes/proxy
      - nodes/metrics
      - services
      - endpoints
      - pods
      - ingresses
      - configmaps
    verbs:
      - get
      - list
      - watch
  - apiGroups:
      - "extensions"
      - "networking.k8s.io"
    resources:
      - ingresses/status
      - ingresses
    verbs:
      - get
      - list
      - watch
  - nonResourceURLs:
      - "/stats/prometheus"
    verbs:
      - get
---
apiVersion: rbac.authorization.k8s.io/v1
kind: ClusterRoleBinding
metadata:
  name: prometheus
subjects:
  - kind: ServiceAccount
    name: prometheus
    namespace: monitoring
roleRef:
  apiGroup: rbac.authorization.k8s.io
  kind: ClusterRole
  name: prometheus
---
apiVersion: v1
kind: ConfigMap
metadata:
  labels:
    name: prometheus-server-conf
  name: prometheus-server-conf
  namespace: monitoring
data:
  prometheus.yml: |-
    global:
      scrape_interval: 5s
      evaluation_interval: 5s

    scrape_configs:
      - job_name: 'kubernetes-pods'

        metrics_path: /stats/prometheus
        kubernetes_sd_configs:
        - role: pod

        relabel_configs:
        - source_labels: [__meta_kubernetes_namespace]
          action: replace
          target_label: kubernetes_namespace
        - source_labels: [__meta_kubernetes_pod_name]
          action: replace
          target_label: kubernetes_pod_name
        - source_labels: [__address__]
          action: replace
          replacement: $1:15006
          regex: ([^:]+)(?::(\d+))?
          target_label: __address__
---
apiVersion: v1
kind: Service
metadata:
  name: prometheus
  namespace: monitoring
spec:
  type: ClusterIP
  ports:
    - name: http
      port: 9090
      protocol: TCP
      targetPort: 9090
  selector:
    app: prometheus-server
---
apiVersion: apps/v1
kind: Deployment
metadata:
  name: prometheus-deployment
  namespace: monitoring
  labels:
    app: prometheus-server
spec:
  replicas: 1
  selector:
    matchLabels:
      app: prometheus-server
  template:
    metadata:
      namespace: monitoring
      labels:
        app: prometheus-server
    spec:
      serviceAccountName: prometheus
      containers:
        - name: prometheus
          image: prom/prometheus
          args:
            - "--storage.tsdb.retention.time=30d"
            - "--config.file=/etc/prometheus/prometheus.yml"
            - "--storage.tsdb.path=/prometheus/"
            - "--web.enable-lifecycle"
          ports:
            - containerPort: 9090
          resources:
            limits:
              cpu: 1
              memory: 1Gi
          volumeMounts:
            - name: prometheus-config-volume
              mountPath: /etc/prometheus/
            - name: prometheus-storage-volume
              mountPath: /prometheus/
      volumes:
        - name: prometheus-config-volume
          configMap:
            defaultMode: 420
            name: prometheus-server-conf

        - name: prometheus-storage-volume
          emptyDir: {}
Installing Grafana
To install Grafana, go to the Grafana install site, and run the installer. Use the installer specific to your platform and the version that you want.
See: Install Grafana - Releases.
As a best practice, install the latest Grafana version. In the following sample file
grafana.yaml, you need to replace the
variable X.Y.Z with the specific Grafana version you
selected.The following is an example deployment grafana.yaml file that
sets up a Grafana instance and creates a Load Balancer to make it accessible in the
cluster. To deploy Grafana, perform the following steps:
- Save the following sample
grafana.yamlfile to your local system. - Update the
X.Y.Zvariable in thegrafana.yamlfile with the Grafana version that you installed. -
To deploy Grafana, run the following command:
kubectl apply -f grafana.yaml
---
# Source: grafana/templates/serviceaccount.yaml
apiVersion: v1
kind: ServiceAccount
metadata:
  labels:
    app.kubernetes.io/name: grafana
    app.kubernetes.io/instance: grafana
  name: grafana
  namespace: monitoring
---
# Source: grafana/templates/configmap.yaml
apiVersion: v1
kind: ConfigMap
metadata:
  name: grafana
  namespace: monitoring
  labels:
    app.kubernetes.io/name: grafana
    app.kubernetes.io/instance: grafana
data:
  grafana.ini: |
    [analytics]
    check_for_updates = false
    [grafana_net]
    url = https://grafana.net
    [log]
    mode = console
    [paths]
    data = /var/lib/grafana/
    logs = /var/log/grafana
    plugins = /var/lib/grafana/plugins
    provisioning = /etc/grafana/provisioning

  datasources.yaml: |
    apiVersion: 1
    datasources:
    - access: proxy
      editable: true
      isDefault: true
      jsonData:
        timeInterval: 5s
      name: Prometheus
      orgId: 1
      type: prometheus
      url: http://prometheus:9090
  dashboardproviders.yaml: |
    apiVersion: 1
    providers:
    - disableDeletion: false
      folder: mesh-demo
      name: mesh-demo
      options:
        path: /var/lib/grafana/dashboards/mesh-demo
      orgId: 1
      type: file
---
# Source: grafana/templates/service.yaml
apiVersion: v1
kind: Service
metadata:
  name: grafana
  namespace: monitoring
  labels:
    app.kubernetes.io/name: grafana
    app.kubernetes.io/instance: grafana
spec:
  type: LoadBalancer
  ports:
    - name: service
      port: 80
      protocol: TCP
      targetPort: 3000

  selector:
    app.kubernetes.io/name: grafana
    app.kubernetes.io/instance: grafana
---
# Source: grafana/templates/deployment.yaml
apiVersion: apps/v1
kind: Deployment
metadata:
  name: grafana
  namespace: monitoring
  labels:
    app.kubernetes.io/name: grafana
    app.kubernetes.io/instance: grafana
spec:
  replicas: 1
  revisionHistoryLimit: 10
  selector:
    matchLabels:
      app.kubernetes.io/name: grafana
      app.kubernetes.io/instance: grafana
  strategy:
    type: RollingUpdate
  template:
    metadata:
      labels:
        app.kubernetes.io/name: grafana
        app.kubernetes.io/instance: grafana
        app: grafana
    spec:
      serviceAccountName: grafana
      securityContext:
        fsGroup: 472
        runAsGroup: 472
        runAsUser: 472
      containers:
        - name: grafana
          image: "grafana/grafana:X.Y.Z"
          imagePullPolicy: IfNotPresent
          volumeMounts:
            - name: config
              mountPath: "/etc/grafana/grafana.ini"
              subPath: grafana.ini
            - name: storage
              mountPath: "/var/lib/grafana"
            - name: dashboards-mesh-demo
              mountPath: "/var/lib/grafana/dashboards/mesh-demo"
            - name: config
              mountPath: "/etc/grafana/provisioning/datasources/datasources.yaml"
              subPath: datasources.yaml
            - name: config
              mountPath: "/etc/grafana/provisioning/dashboards/dashboardproviders.yaml"
              subPath: dashboardproviders.yaml
          ports:
            - name: service
              containerPort: 3000
              protocol: TCP
            - name: grafana
              containerPort: 3000
              protocol: TCP
          env:
            - name: GF_PATHS_DATA
              value: /var/lib/grafana/
            - name: GF_PATHS_LOGS
              value: /var/log/grafana
            - name: GF_PATHS_PLUGINS
              value: /var/lib/grafana/plugins
            - name: GF_PATHS_PROVISIONING
              value: /etc/grafana/provisioning
            - name: "GF_AUTH_ANONYMOUS_ENABLED"
              value: "true"
            - name: "GF_AUTH_ANONYMOUS_ORG_ROLE"
              value: "Admin"
            - name: "GF_AUTH_BASIC_ENABLED"
              value: "false"
            - name: "GF_SECURITY_ADMIN_PASSWORD"
              value: "-"
            - name: "GF_SECURITY_ADMIN_USER"
              value: "-"
          livenessProbe:
            failureThreshold: 10
            httpGet:
              path: /api/health
              port: 3000
            initialDelaySeconds: 60
            timeoutSeconds: 30
          readinessProbe:
            httpGet:
              path: /api/health
              port: 3000
          resources: {}
      volumes:
        - name: config
          configMap:
            name: grafana
        - name: dashboards-mesh-demo
          configMap:
            name: mesh-demo-grafana-dashboards
        - name: storage
          emptyDir: {}
---
apiVersion: v1
data:
  bookinfo-dashboard.json: |
    {"annotations":{"list":[{"builtIn":1,"datasource":"-- Grafana --","enable":true,"hide":true,"iconColor":"rgba(0, 211, 255, 1)","name":"Annotations & Alerts","type":"dashboard"}]},"editable":true,"gnetId":null,"graphTooltip":0,"id":2,"iteration":1655514434857,"links":[],"panels":[{"collapsed":false,"datasource":null,"gridPos":{"h":1,"w":24,"x":0,"y":0},"id":18,"panels":[],"title":"Product Page","type":"row"},{"aliasColors":{},"bars":false,"dashLength":10,"dashes":false,"datasource":null,"description":"","fieldConfig":{"defaults":{},"overrides":[]},"fill":1,"fillGradient":0,"gridPos":{"h":9,"w":12,"x":0,"y":1},"hiddenSeries":false,"id":2,"legend":{"avg":false,"current":false,"max":true,"min":true,"show":true,"total":false,"values":true},"lines":true,"linewidth":1,"nullPointMode":"null","options":{"alertThreshold":true},"percentage":false,"pluginVersion":"X.Y.Z","pointradius":2,"points":false,"renderer":"flot","seriesOverrides":[],"spaceLength":10,"stack":false,"steppedLine":false,"targets":[{"exemplar":false,"expr":"clamp_max((sum(rate(envoy_http_ingress_http_downstream_rq_2xx{virtual_service_name=\"bookinfo/productpage\"}[$successRateGranularity]) + rate(envoy_http_ingress_http_downstream_rq_3xx{virtual_service_name=\"bookinfo/productpage\"}[$successRateGranularity]) + rate(envoy_http_ingress_http_downstream_rq_4xx{virtual_service_name=\"bookinfo/productpage\"}[$successRateGranularity])) by (virtual_service_name)) / sum(rate(envoy_http_ingress_http_downstream_rq_total{virtual_service_name=\"bookinfo/productpage\"}[$successRateGranularity])) by (virtual_service_name), 1)","interval":"","legendFormat":"v1","refId":"A"}],"thresholds":[],"timeFrom":null,"timeRegions":[],"timeShift":null,"title":"Ingress Success Rate","tooltip":{"shared":true,"sort":0,"value_type":"individual"},"type":"graph","xaxis":{"buckets":null,"mode":"time","name":null,"show":true,"values":[]},"yaxes":[{"format":"percentunit","label":"","logBase":1,"max":"1","min":"0","show":true},{"format":"short","label":null,"logBase":1,"max":null,"min":null,"show":true}],"yaxis":{"align":false,"alignLevel":null}},{"aliasColors":{},"bars":false,"dashLength":10,"dashes":false,"datasource":null,"description":"","fieldConfig":{"defaults":{},"overrides":[]},"fill":1,"fillGradient":0,"gridPos":{"h":9,"w":12,"x":12,"y":1},"hiddenSeries":false,"id":5,"legend":{"avg":false,"current":false,"max":true,"min":true,"show":true,"total":false,"values":true},"lines":true,"linewidth":1,"nullPointMode":"null as zero","options":{"alertThreshold":true},"percentage":false,"pluginVersion":"X.Y.Z","pointradius":2,"points":false,"renderer":"flot","seriesOverrides":[],"spaceLength":10,"stack":false,"steppedLine":false,"targets":[{"exemplar":false,"expr":"histogram_quantile(0.95, sum(rate(envoy_http_ingress_http_downstream_rq_time_bucket{virtual_service_name=\"bookinfo/productpage\"}[$latencyGranularity])) by (le))","interval":"","legendFormat":"v1","refId":"A"}],"thresholds":[],"timeFrom":null,"timeRegions":[],"timeShift":null,"title":"Latency (p95)","tooltip":{"shared":true,"sort":0,"value_type":"individual"},"type":"graph","xaxis":{"buckets":null,"mode":"time","name":null,"show":true,"values":[]},"yaxes":[{"format":"ms","label":"","logBase":1,"max":null,"min":"0","show":true},{"format":"short","label":null,"logBase":1,"max":null,"min":null,"show":true}],"yaxis":{"align":false,"alignLevel":null}},{"aliasColors":{},"bars":false,"dashLength":10,"dashes":false,"datasource":null,"description":"","fieldConfig":{"defaults":{},"overrides":[]},"fill":1,"fillGradient":0,"gridPos":{"h":9,"w":12,"x":0,"y":10},"hiddenSeries":false,"id":27,"legend":{"avg":false,"current":false,"max":true,"min":true,"show":true,"total":false,"values":true},"lines":true,"linewidth":1,"nullPointMode":"null","options":{"alertThreshold":true},"percentage":false,"pluginVersion":"X.Y.Z","pointradius":2,"points":false,"renderer":"flot","seriesOverrides":[],"spaceLength":10,"stack":false,"steppedLine":false,"targets":[{"exemplar":false,"expr":"clamp_max((sum(rate(envoy_http_egress_http_downstream_rq_2xx{virtual_service_name=\"bookinfo/productpage\"}[$successRateGranularity]) + rate(envoy_http_egress_http_downstream_rq_3xx{virtual_service_name=\"bookinfo/productpage\"}[$successRateGranularity]) + rate(envoy_http_egress_http_downstream_rq_4xx{virtual_service_name=\"bookinfo/productpage\"}[$successRateGranularity])) by (virtual_service_name)) / sum(rate(envoy_http_egress_http_downstream_rq_total{virtual_service_name=\"bookinfo/productpage\"}[$successRateGranularity])) by (virtual_service_name), 1)","interval":"","legendFormat":"v1","refId":"A"}],"thresholds":[],"timeFrom":null,"timeRegions":[],"timeShift":null,"title":"Egress Success Rate","tooltip":{"shared":true,"sort":0,"value_type":"individual"},"type":"graph","xaxis":{"buckets":null,"mode":"time","name":null,"show":true,"values":[]},"yaxes":[{"format":"percentunit","label":"","logBase":1,"max":"1","min":"0","show":true},{"format":"short","label":null,"logBase":1,"max":null,"min":null,"show":true}],"yaxis":{"align":false,"alignLevel":null}},{"collapsed":false,"datasource":null,"gridPos":{"h":1,"w":24,"x":0,"y":19},"id":16,"panels":[],"title":"Details Page","type":"row"},{"aliasColors":{},"bars":false,"dashLength":10,"dashes":false,"datasource":null,"description":"","fieldConfig":{"defaults":{},"overrides":[]},"fill":1,"fillGradient":0,"gridPos":{"h":9,"w":12,"x":0,"y":20},"hiddenSeries":false,"id":8,"legend":{"avg":false,"current":false,"max":true,"min":true,"show":true,"total":false,"values":true},"lines":true,"linewidth":1,"nullPointMode":"null","options":{"alertThreshold":false},"percentage":false,"pluginVersion":"X.Y.Z","pointradius":2,"points":false,"renderer":"flot","seriesOverrides":[],"spaceLength":10,"stack":false,"steppedLine":false,"targets":[{"exemplar":false,"expr":"clamp_max((sum(rate(envoy_http_ingress_http_downstream_rq_2xx{virtual_service_name=\"bookinfo/details\"}[$successRateGranularity]) + rate(envoy_http_ingress_http_downstream_rq_3xx{virtual_service_name=\"bookinfo/details\"}[$successRateGranularity]) + rate(envoy_http_ingress_http_downstream_rq_4xx{virtual_service_name=\"bookinfo/details\"}[$successRateGranularity])) by (virtual_service_name)) / sum(rate(envoy_http_ingress_http_downstream_rq_total{virtual_service_name=\"bookinfo/details\"}[$successRateGranularity])) by (virtual_service_name), 1)","interval":"","legendFormat":"v1","refId":"A"}],"thresholds":[],"timeFrom":null,"timeRegions":[],"timeShift":null,"title":"Success Rate","tooltip":{"shared":true,"sort":0,"value_type":"individual"},"type":"graph","xaxis":{"buckets":null,"mode":"time","name":null,"show":true,"values":[]},"yaxes":[{"format":"percentunit","label":"","logBase":1,"max":"1","min":"0","show":true},{"format":"short","label":null,"logBase":1,"max":null,"min":null,"show":true}],"yaxis":{"align":false,"alignLevel":null}},{"aliasColors":{},"bars":false,"dashLength":10,"dashes":false,"datasource":null,"description":"","fieldConfig":{"defaults":{},"overrides":[]},"fill":1,"fillGradient":0,"gridPos":{"h":9,"w":12,"x":12,"y":20},"hiddenSeries":false,"id":20,"legend":{"avg":false,"current":false,"max":true,"min":true,"show":true,"total":false,"values":true},"lines":true,"linewidth":1,"nullPointMode":"null as zero","options":{"alertThreshold":true},"percentage":false,"pluginVersion":"X.Y.Z","pointradius":2,"points":false,"renderer":"flot","seriesOverrides":[],"spaceLength":10,"stack":false,"steppedLine":false,"targets":[{"exemplar":false,"expr":"histogram_quantile(0.95, sum(rate(envoy_http_ingress_http_downstream_rq_time_bucket{virtual_service_name=\"bookinfo/details\"}[$latencyGranularity])) by (le))","interval":"","legendFormat":"v1","refId":"A"}],"thresholds":[],"timeFrom":null,"timeRegions":[],"timeShift":null,"title":"Latency (p95)","tooltip":{"shared":true,"sort":0,"value_type":"individual"},"type":"graph","xaxis":{"buckets":null,"mode":"time","name":null,"show":true,"values":[]},"yaxes":[{"format":"ms","label":"","logBase":1,"max":null,"min":"0","show":true},{"format":"short","label":null,"logBase":1,"max":null,"min":null,"show":true}],"yaxis":{"align":false,"alignLevel":null}},{"collapsed":false,"datasource":null,"gridPos":{"h":1,"w":24,"x":0,"y":29},"id":14,"panels":[],"title":"Reviews Page","type":"row"},{"aliasColors":{},"bars":false,"dashLength":10,"dashes":false,"datasource":null,"description":"","fieldConfig":{"defaults":{},"overrides":[]},"fill":1,"fillGradient":0,"gridPos":{"h":9,"w":12,"x":0,"y":30},"hiddenSeries":false,"id":21,"legend":{"avg":false,"current":false,"max":true,"min":true,"show":true,"total":false,"values":true},"lines":true,"linewidth":1,"nullPointMode":"null","options":{"alertThreshold":true},"percentage":false,"pluginVersion":"X.Y.Z","pointradius":2,"points":false,"renderer":"flot","seriesOverrides":[],"spaceLength":10,"stack":false,"steppedLine":false,"targets":[{"exemplar":false,"expr":"clamp_max((sum(rate(envoy_http_ingress_http_downstream_rq_2xx{virtual_deployment_name=\"bookinfo/reviews-v1\"}[$successRateGranularity]) + rate(envoy_http_ingress_http_downstream_rq_3xx{virtual_deployment_name=\"bookinfo/reviews-v1\"}[$successRateGranularity]) + rate(envoy_http_ingress_http_downstream_rq_4xx{virtual_deployment_name=\"bookinfo/reviews-v1\"}[$successRateGranularity])) by (virtual_deployment_name)) / sum(rate(envoy_http_ingress_http_downstream_rq_total{virtual_deployment_name=\"bookinfo/reviews-v1\"}[$successRateGranularity])) by (virtual_deployment_name), 1)","instant":false,"interval":"","legendFormat":"v1","refId":"A"},{"exemplar":false,"expr":"clamp_max((sum(rate(envoy_http_ingress_http_downstream_rq_2xx{virtual_deployment_name=\"bookinfo/reviews-v2\"}[$successRateGranularity]) + rate(envoy_http_ingress_http_downstream_rq_3xx{virtual_deployment_name=\"bookinfo/reviews-v2\"}[$successRateGranularity]) + rate(envoy_http_ingress_http_downstream_rq_4xx{virtual_deployment_name=\"bookinfo/reviews-v2\"}[$successRateGranularity])) by (virtual_deployment_name)) / sum(rate(envoy_http_ingress_http_downstream_rq_total{virtual_deployment_name=\"bookinfo/reviews-v2\"}[$successRateGranularity])) by (virtual_deployment_name), 1)","hide":false,"instant":false,"interval":"","legendFormat":"v2","refId":"B"},{"exemplar":false,"expr":"clamp_max((sum(rate(envoy_http_ingress_http_downstream_rq_2xx{virtual_deployment_name=\"bookinfo/reviews-v3\"}[$successRateGranularity]) + rate(envoy_http_ingress_http_downstream_rq_3xx{virtual_deployment_name=\"bookinfo/reviews-v3\"}[$successRateGranularity]) + rate(envoy_http_ingress_http_downstream_rq_4xx{virtual_deployment_name=\"bookinfo/reviews-v3\"}[$successRateGranularity])) by (virtual_deployment_name)) / sum(rate(envoy_http_ingress_http_downstream_rq_total{virtual_deployment_name=\"bookinfo/reviews-v3\"}[$successRateGranularity])) by (virtual_deployment_name), 1)","hide":false,"instant":false,"interval":"","legendFormat":"v3","refId":"C"}],"thresholds":[],"timeFrom":null,"timeRegions":[],"timeShift":null,"title":"Success Rate","tooltip":{"shared":true,"sort":0,"value_type":"individual"},"type":"graph","xaxis":{"buckets":null,"mode":"time","name":null,"show":true,"values":[]},"yaxes":[{"format":"percentunit","label":"","logBase":1,"max":"1","min":"0","show":true},{"format":"short","label":null,"logBase":1,"max":null,"min":null,"show":true}],"yaxis":{"align":false,"alignLevel":null}},{"aliasColors":{},"bars":false,"dashLength":10,"dashes":false,"datasource":null,"description":"","fieldConfig":{"defaults":{},"overrides":[]},"fill":1,"fillGradient":0,"gridPos":{"h":9,"w":12,"x":12,"y":30},"hiddenSeries":false,"id":23,"legend":{"avg":false,"current":false,"max":true,"min":true,"show":true,"total":false,"values":true},"lines":true,"linewidth":1,"nullPointMode":"null as zero","options":{"alertThreshold":true},"percentage":false,"pluginVersion":"X.Y.Z","pointradius":2,"points":false,"renderer":"flot","seriesOverrides":[],"spaceLength":10,"stack":false,"steppedLine":false,"targets":[{"exemplar":false,"expr":"histogram_quantile(0.95, sum(rate(envoy_http_ingress_http_downstream_rq_time_bucket{virtual_deployment_name=\"bookinfo/reviews-v1\"}[$latencyGranularity])) by (le))","interval":"","legendFormat":"v1","refId":"A"},{"exemplar":false,"expr":"histogram_quantile(0.95, sum(rate(envoy_http_ingress_http_downstream_rq_time_bucket{virtual_deployment_name=\"bookinfo/reviews-v2\"}[$latencyGranularity])) by (le))","hide":false,"interval":"","legendFormat":"v2","refId":"B"},{"exemplar":false,"expr":"histogram_quantile(0.95, sum(rate(envoy_http_ingress_http_downstream_rq_time_bucket{virtual_deployment_name=\"bookinfo/reviews-v3\"}[$latencyGranularity])) by (le))","hide":false,"interval":"","legendFormat":"v3","refId":"C"}],"thresholds":[],"timeFrom":null,"timeRegions":[],"timeShift":null,"title":"Latency (p95)","tooltip":{"shared":true,"sort":0,"value_type":"individual"},"type":"graph","xaxis":{"buckets":null,"mode":"time","name":null,"show":true,"values":[]},"yaxes":[{"format":"ms","label":"","logBase":1,"max":null,"min":"0","show":true},{"format":"short","label":null,"logBase":1,"max":null,"min":null,"show":true}],"yaxis":{"align":false,"alignLevel":null}},{"aliasColors":{},"bars":false,"dashLength":10,"dashes":false,"datasource":null,"description":"","fieldConfig":{"defaults":{},"overrides":[]},"fill":1,"fillGradient":0,"gridPos":{"h":9,"w":12,"x":0,"y":39},"hiddenSeries":false,"id":28,"legend":{"avg":false,"current":false,"max":true,"min":true,"show":true,"total":false,"values":true},"lines":true,"linewidth":1,"nullPointMode":"null","options":{"alertThreshold":true},"percentage":false,"pluginVersion":"X.Y.Z","pointradius":2,"points":false,"renderer":"flot","seriesOverrides":[],"spaceLength":10,"stack":false,"steppedLine":false,"targets":[{"exemplar":false,"expr":"clamp_max((sum(rate(envoy_http_egress_http_downstream_rq_2xx{virtual_deployment_name=\"bookinfo/reviews-v1\"}[$successRateGranularity]) + rate(envoy_http_egress_http_downstream_rq_3xx{virtual_deployment_name=\"bookinfo/reviews-v1\"}[$successRateGranularity]) + rate(envoy_http_egress_http_downstream_rq_4xx{virtual_deployment_name=\"bookinfo/reviews-v1\"}[$successRateGranularity])) by (virtual_deployment_name)) / sum(rate(envoy_http_egress_http_downstream_rq_total{virtual_deployment_name=\"bookinfo/reviews-v1\"}[$successRateGranularity])) by (virtual_deployment_name), 1)","interval":"","legendFormat":"v1","refId":"A"},{"exemplar":false,"expr":"clamp_max((sum(rate(envoy_http_egress_http_downstream_rq_2xx{virtual_deployment_name=\"bookinfo/reviews-v2\"}[$successRateGranularity]) + rate(envoy_http_egress_http_downstream_rq_3xx{virtual_deployment_name=\"bookinfo/reviews-v2\"}[$successRateGranularity]) + rate(envoy_http_egress_http_downstream_rq_4xx{virtual_deployment_name=\"bookinfo/reviews-v2\"}[$successRateGranularity])) by (virtual_deployment_name)) / sum(rate(envoy_http_egress_http_downstream_rq_total{virtual_deployment_name=\"bookinfo/reviews-v2\"}[$successRateGranularity])) by (virtual_deployment_name), 1)","hide":false,"interval":"","legendFormat":"v2","refId":"B"},{"exemplar":false,"expr":"clamp_max((sum(rate(envoy_http_egress_http_downstream_rq_2xx{virtual_deployment_name=\"bookinfo/reviews-v3\"}[$successRateGranularity]) + rate(envoy_http_egress_http_downstream_rq_3xx{virtual_deployment_name=\"bookinfo/reviews-v3\"}[$successRateGranularity]) + rate(envoy_http_egress_http_downstream_rq_4xx{virtual_deployment_name=\"bookinfo/reviews-v3\"}[$successRateGranularity])) by (virtual_deployment_name)) / sum(rate(envoy_http_egress_http_downstream_rq_total{virtual_deployment_name=\"bookinfo/reviews-v3\"}[$successRateGranularity])) by (virtual_deployment_name), 1)","hide":false,"interval":"","legendFormat":"v3","refId":"C"}],"thresholds":[],"timeFrom":null,"timeRegions":[],"timeShift":null,"title":"Egress Success Rate","tooltip":{"shared":true,"sort":0,"value_type":"individual"},"type":"graph","xaxis":{"buckets":null,"mode":"time","name":null,"show":true,"values":[]},"yaxes":[{"format":"percentunit","label":"","logBase":1,"max":"1","min":"0","show":true},{"format":"short","label":null,"logBase":1,"max":null,"min":null,"show":true}],"yaxis":{"align":false,"alignLevel":null}},{"aliasColors":{},"bars":false,"dashLength":10,"dashes":false,"datasource":null,"fieldConfig":{"defaults":{},"overrides":[]},"fill":1,"fillGradient":0,"gridPos":{"h":8,"w":12,"x":12,"y":39},"hiddenSeries":false,"id":26,"legend":{"avg":false,"current":false,"max":false,"min":false,"show":true,"total":false,"values":false},"lines":true,"linewidth":1,"nullPointMode":"null as zero","options":{"alertThreshold":true},"percentage":false,"pluginVersion":"X.Y.Z","pointradius":2,"points":false,"renderer":"flot","seriesOverrides":[],"spaceLength":10,"stack":false,"steppedLine":false,"targets":[{"exemplar":false,"expr":"sum(rate(envoy_http_ingress_http_downstream_rq_total{virtual_deployment_name=\"bookinfo/reviews-v1\"}[$successRateGranularity])) by (virtual_service_name) / sum(rate(envoy_http_ingress_http_downstream_rq_total{virtual_service_name=\"bookinfo/reviews\"}[$successRateGranularity])) by (virtual_service_name)","interval":"","legendFormat":"v1","refId":"A"},{"exemplar":false,"expr":"sum(rate(envoy_http_ingress_http_downstream_rq_total{virtual_deployment_name=\"bookinfo/reviews-v2\"}[$successRateGranularity])) by (virtual_service_name) / sum(rate(envoy_http_ingress_http_downstream_rq_total{virtual_service_name=\"bookinfo/reviews\"}[$successRateGranularity])) by (virtual_service_name)","hide":false,"interval":"","legendFormat":"v2","refId":"B"},{"exemplar":false,"expr":"sum(rate(envoy_http_ingress_http_downstream_rq_total{virtual_deployment_name=\"bookinfo/reviews-v3\"}[$successRateGranularity])) by (virtual_service_name) / sum(rate(envoy_http_ingress_http_downstream_rq_total{virtual_service_name=\"bookinfo/reviews\"}[$successRateGranularity])) by (virtual_service_name)","hide":false,"interval":"","legendFormat":"v3","refId":"C"}],"thresholds":[],"timeFrom":null,"timeRegions":[],"timeShift":null,"title":"Traffic Split","tooltip":{"shared":true,"sort":0,"value_type":"individual"},"type":"graph","xaxis":{"buckets":null,"mode":"time","name":null,"show":true,"values":[]},"yaxes":[{"format":"percentunit","label":null,"logBase":1,"max":null,"min":"0","show":true},{"format":"short","label":null,"logBase":1,"max":null,"min":null,"show":true}],"yaxis":{"align":false,"alignLevel":null}},{"collapsed":false,"datasource":null,"gridPos":{"h":1,"w":24,"x":0,"y":48},"id":12,"panels":[],"title":"Ratings Page","type":"row"},{"aliasColors":{},"bars":false,"dashLength":10,"dashes":false,"datasource":null,"description":"","fieldConfig":{"defaults":{},"overrides":[]},"fill":1,"fillGradient":0,"gridPos":{"h":9,"w":12,"x":0,"y":49},"hiddenSeries":false,"id":22,"legend":{"avg":false,"current":false,"max":true,"min":true,"show":true,"total":false,"values":true},"lines":true,"linewidth":1,"nullPointMode":"null","options":{"alertThreshold":true},"percentage":false,"pluginVersion":"X.Y.Z","pointradius":2,"points":false,"renderer":"flot","seriesOverrides":[],"spaceLength":10,"stack":false,"steppedLine":false,"targets":[{"exemplar":false,"expr":"clamp_max((sum(rate(envoy_http_ingress_http_downstream_rq_2xx{virtual_service_name=\"bookinfo/ratings\"}[$successRateGranularity]) + rate(envoy_http_ingress_http_downstream_rq_3xx{virtual_service_name=\"bookinfo/ratings\"}[$successRateGranularity]) + rate(envoy_http_ingress_http_downstream_rq_4xx{virtual_service_name=\"bookinfo/ratings\"}[$successRateGranularity])) by (virtual_service_name)) / sum(rate(envoy_http_ingress_http_downstream_rq_total{virtual_service_name=\"bookinfo/ratings\"}[$successRateGranularity])) by (virtual_service_name), 1)","interval":"","legendFormat":"v1","refId":"A"}],"thresholds":[],"timeFrom":null,"timeRegions":[],"timeShift":null,"title":"Success Rate","tooltip":{"shared":true,"sort":0,"value_type":"individual"},"type":"graph","xaxis":{"buckets":null,"mode":"time","name":null,"show":true,"values":[]},"yaxes":[{"format":"percentunit","label":"","logBase":1,"max":"1","min":"0","show":true},{"format":"short","label":null,"logBase":1,"max":null,"min":null,"show":true}],"yaxis":{"align":false,"alignLevel":null}},{"aliasColors":{},"bars":false,"dashLength":10,"dashes":false,"datasource":null,"description":"","fieldConfig":{"defaults":{},"overrides":[]},"fill":1,"fillGradient":0,"gridPos":{"h":9,"w":12,"x":12,"y":49},"hiddenSeries":false,"id":24,"legend":{"avg":false,"current":false,"max":true,"min":true,"show":true,"total":false,"values":true},"lines":true,"linewidth":1,"nullPointMode":"null as zero","options":{"alertThreshold":true},"percentage":false,"pluginVersion":"X.Y.Z","pointradius":2,"points":false,"renderer":"flot","seriesOverrides":[],"spaceLength":10,"stack":false,"steppedLine":false,"targets":[{"exemplar":false,"expr":"histogram_quantile(0.95, sum(rate(envoy_http_ingress_http_downstream_rq_time_bucket{virtual_service_name=\"bookinfo/ratings\"}[$latencyGranularity])) by (le))","interval":"","legendFormat":"v1","refId":"A"}],"thresholds":[],"timeFrom":null,"timeRegions":[],"timeShift":null,"title":"Latency (p95)","tooltip":{"shared":true,"sort":0,"value_type":"individual"},"type":"graph","xaxis":{"buckets":null,"mode":"time","name":null,"show":true,"values":[]},"yaxes":[{"format":"ms","label":"","logBase":1,"max":null,"min":"0","show":true},{"format":"short","label":null,"logBase":1,"max":null,"min":null,"show":true}],"yaxis":{"align":false,"alignLevel":null}}],"refresh":"5s","schemaVersion":27,"style":"dark","tags":[],"templating":{"list":[{"allValue":null,"current":{"selected":true,"text":"5m","value":"5m"},"description":null,"error":null,"hide":0,"includeAll":false,"label":"Success Rate Granularity","multi":false,"name":"successRateGranularity","options":[{"selected":false,"text":"1m","value":"1m"},{"selected":true,"text":"5m","value":"5m"},{"selected":false,"text":"10m","value":"10m"},{"selected":false,"text":"15m","value":"15m"}],"query":"1m,5m,10m,15m","queryValue":"","skipUrlSync":false,"type":"custom"},{"allValue":null,"current":{"selected":true,"text":"1m","value":"1m"},"description":null,"error":null,"hide":0,"includeAll":false,"label":"Latency Granularity","multi":false,"name":"latencyGranularity","options":[{"selected":true,"text":"1m","value":"1m"},{"selected":false,"text":"5m","value":"5m"},{"selected":false,"text":"10m","value":"10m"},{"selected":false,"text":"15m","value":"15m"}],"query":"1m,5m,10m,15m","queryValue":"","skipUrlSync":false,"type":"custom"}]},"time":{"from":"now-1h","to":"now"},"timepicker":{},"timezone":"","title":"Bookinfo Dashboard","uid":"7-yqJP97k","version":2}:
kind: ConfigMap
metadata:
  creationTimestamp: null
  name: mesh-demo-grafana-dashboards
  namespace: monitoring
Deploy and View Grafana
After deployment, get the external IP to access for the Grafana instance load balancer using one of the following methods:
- Use
kubectl:kubectl get svc grafana -n monitoring - Use the OCI Console:
- From the console, go to Networking then Load Balancers.
- In the left navigation, select your compartment.
- The main window lists load balancers by date. Select the newest load balancer.
- Find the IP Address: field to get the public IP address of your load balancer.
- Use
- In a browser, go to the external IP address of the Grafana instance.
- Go to Dashboards then Manage on the left navigation bar.
- Navigate into the mesh-demo folder on the page.
- Click Bookinfo Dashboard.
- The Bookinfo Dashboard page displays graphs for all the Bookinfo services including ingress success rate, egress success rate, P95 latency, and traffic split of the Review service versions.
- To see some data, browse to the Bookinfo page and generate some traffic. Metrics start showing up afterward.
If you need to remove Service Mesh support from your application, follow these steps.
Delete Ingress Gateway Deployment
- Identify your load balancers.
Before you delete your ingress gateway deployment, take a note of the LoadBalancers currently serving traffic. The following commands identify the LoadBalancers serving traffic for your application.
kubectl get svc bookinfo-ingress -n bookinfo NAME TYPE CLUSTER-IP EXTERNAL-IP PORT(S) AGE bookinfo-ingress LoadBalancer x.y.z.w a.b.c.d 80:30018/TCP 14dkubectl get svc bookinfo-ingress-gateway-deployment-service -n bookinfo NAME TYPE CLUSTER-IP EXTERNAL-IP PORT(S) AGE bookinfo-ingress-gateway-deployment-service LoadBalancer l.m.n.o p.q.r.s 80:31434/TCP 13dThe application is available through
bookinfo-ingress. Note the following information.- Kubernetes LoadBalancer's
EXTERNAL-IPisa.b.c.d. - OCI Service Mesh's ingress gateway deployment host name is
bookinfo.example.com.Note
The host name isbookinfo.example.comafter adding an entry similar top.q.r.s bookinfo.example.comin the/etc/hostsfile.
- Kubernetes LoadBalancer's
- Delete the ingress gateway deployment.
To delete the ingress gateway deployment, run the following commands:
# List the IGDs
kubectl get ingressgatewaydeployments -n bookinfo

# Delete the IGDs
kubectl delete ingressgatewaydeployments/bookinfo-ingress-gateway-deployment -n bookinfo
Note
The bookinfo application continues to serve traffic before, during, and after the deletion of IGD using the Kubernetes LoadBalancerbookinfo-ingresswith anEXTERNAL-IPofa.b.c.d.
Disable Sidecar Injection
Disable sidecar injection on the namespace where the application resides. Run the following commands:
# List existing labels for the bookinfo namespace
kubectl get namespace bookinfo --show-labels

# Set the label to disabled
kubectl label namespace bookinfo servicemesh.oci.oracle.com/sidecar-injection=disabled --overwrite
Restart the Deployments
Roll out deployment restarts to prevent downtime. Perform this step as the preceding step (removal/disabling of the label) doesn't remove the proxy sidecars automatically. This step removes the proxy sidecars. Run the following commands:
# List all deployments in bookinfo namespace
kubectl get deployments -n bookinfo

# Rollout restart the deployments in bookinfo namespace
kubectl rollout restart deployment/details-v1 -n bookinfo
kubectl rollout restart deployment/productpage-v1 -n bookinfo
kubectl rollout restart deployment/ratings-v1 -n bookinfo
kubectl rollout restart deployment/reviews-v1 -n bookinfo
kubectl rollout restart deployment/reviews-v2 -n bookinfo
kubectl rollout restart deployment/reviews-v3 -n bookinfo
Delete the Virtual Deployment Bindings
To delete the virtual deployment bindings, run the following commands:
# List all VDBs in bookinfo namespace
kubectl get virtualdeploymentbindings -n bookinfo

# Delete all VDBs in bookinfo namespace
kubectl delete virtualdeploymentbindings/details-v1-binding -n bookinfo
kubectl delete virtualdeploymentbindings/productpage-v1-binding -n bookinfo
kubectl delete virtualdeploymentbindings/ratings-v1-binding -n bookinfo
kubectl delete virtualdeploymentbindings/reviews-v1-binding -n bookinfo
kubectl delete virtualdeploymentbindings/reviews-v2-binding -n bookinfo
kubectl delete virtualdeploymentbindings/reviews-v3-binding -n bookinfo
Delete the Remaining Mesh Resources
Delete all the remaining mesh resources in the following order:
- Access Policies
- Virtual Service Route Tables
- Ingress Gateway Route Tables
- Ingress Gateways
- Virtual Deployments
- Virtual Services
- Meshes
- Delete Access Policies.
# List all APs in bookinfo namespace kubectl get accesspolicies -n bookinfo # Delete all APs in bookinfo namespace kubectl delete accesspolicies/bookinfo-policy -n bookinfo - Delete Virtual Service Route Tables.
# List all VSRTs in bookinfo namespace kubectl get virtualserviceroutetables -n bookinfo # Delete all VSRTs in bookinfo namespace kubectl delete virtualserviceroutetables/details-route-table -n bookinfo kubectl delete virtualserviceroutetables/productpage-route-table -n bookinfo kubectl delete virtualserviceroutetables/ratings-route-table -n bookinfo kubectl delete virtualserviceroutetables/reviews-route-table -n bookinfo - Delete Ingress Gateway Route Tables.
# List all IGRTs in bookinfo namespace kubectl get ingressgatewayroutetables -n bookinfo # Delete all IGRTs in bookinfo namespace kubectl delete ingressgatewayroutetables/bookinfo-ingress-gateway-route-table -n bookinfo - Delete Ingress Gateways.
# List all IGs in bookinfo namespace kubectl get ingressGateways -n bookinfo # Delete all IGs in bookinfo namespace kubectl delete ingressGateways/bookinfo-ingress-gateway -n bookinfo - Delete Virtual Deployments.
# List all VDs in bookinfo namespace kubectl get virtualDeployments -n bookinfo # Delete all VDs in bookinfo namespace kubectl delete virtualDeployments/details-v1 -n bookinfo kubectl delete virtualDeployments/productpage-v1 -n bookinfo kubectl delete virtualDeployments/ratings-v1 -n bookinfo kubectl delete virtualDeployments/reviews-v1 -n bookinfo kubectl delete virtualDeployments/reviews-v2 -n bookinfo kubectl delete virtualDeployments/reviews-v3 -n bookinfo - Delete Virtual Services.
# List all VSs in bookinfo namespace kubectl get virtualServices -n bookinfo # Delete all VSs in bookinfo namespace kubectl delete virtualServices/details -n bookinfo kubectl delete virtualServices/productpage -n bookinfo kubectl delete virtualServices/ratings -n bookinfo kubectl delete virtualServices/reviews -n bookinfo - Delete Meshes.
# List all Meshes in bookinfo namespace
kubectl get meshes -n bookinfo

# Delete all Meshes in bookinfo namespace
kubectl delete meshes/bookinfo -n bookinfo
What's Next
Congratulations! You have successfully deployed the Bookinfo app to a Kubernetes cluster and added Service Mesh to your app.
To explore more information about development with Oracle products, check out these sites: