Setting Up Users and Groups in Cloud Accounts That Use Identity Domains

For a cloud account in a region updated to use identity domains prior to the creation of the cloud account, users and groups are set up in only Oracle Cloud Infrastructure (IAM).

Note

This section applies only to cloud accounts that use identity domains. If you are not sure if your cloud account uses identity domains, see About Setting Up Users and Groups.

For more information about Oracle Cloud Infrastructure IAM and the documentation that provides the information you need, see Documentation to Use for Cloud Identity in Overview of IAM in the Oracle Cloud Infrastructure documentation.

With identity domains, roles are assigned to Oracle Cloud Infrastructure IAM groups within a domain, as illustrated in the following diagram.
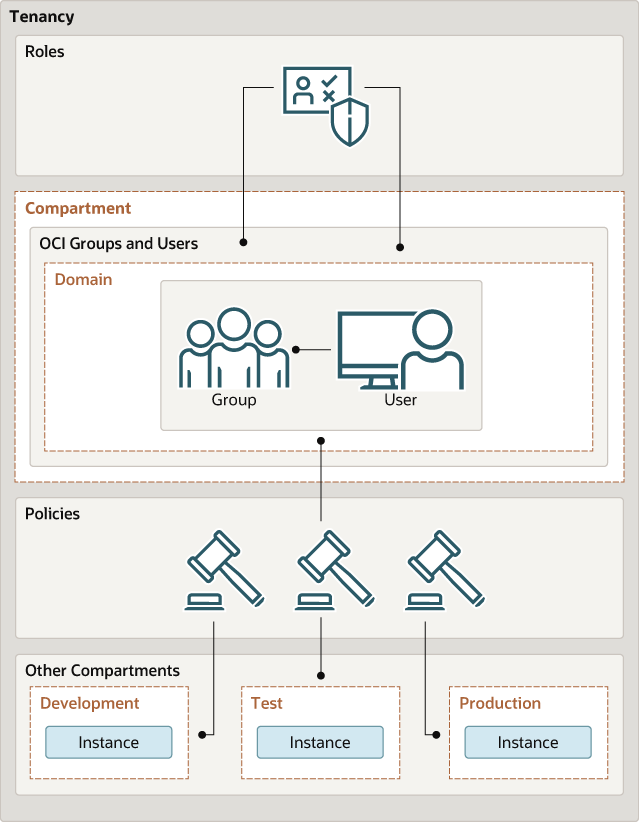
Description of identity-domain-config.png follows

Creating an Identity Domain

Create an identity domain in which to configure users and groups.

In an Oracle Cloud Infrastructure tenancy (cloud account) your environment includes a root (default) compartment and possibly several other compartments, depending on how your environment is configured. To create compartments, see Create a Compartment for Visual Builder. Within each compartment, you can create users and groups. For example, as a best practice:

  • In the root (default) compartment, create a default domain for administrators only.
  • In another compartment (for example, named Dev), create a domain for users and groups in a development environment
  • In another compartment (for example, named Prod), create a domain for users and groups in a production environment.

You can also create multiple domains in a single compartment.

  1. Open the navigation menu and click Identity & Security. Under Identity, click Domains.
    The Domains page is displayed.
  2. If not already selected, select the Compartment where you want to create the domain.
  3. Click Create domain.
  4. Enter required information in the Create domain page. See Creating Identity Domains in the Oracle Cloud Infrastructure documentation.

Creating an Oracle Cloud Infrastructure Group in an Identity Domain

Create a group, such as an instance administrator or read only group, in an identity domain.

  1. Open the navigation menu and click Identity & Security. Under Identity, click Domains.
    The Domains page is displayed.
  2. If not already selected, select the Compartment in which the domain where you want to create the group resides.
  3. In the Name column, click the domain in which you want to create the group for creating and managing instances.
    The domain Overview page is displayed.
  4. Click Groups.
    The Groups page for the domain is displayed.
  5. Click Create group.
  6. In the Create group screen, assign a name to the group (for example, oci-visualbuilder-admins), and enter a description.
  7. Click Create.

Creating an Oracle Cloud Infrastructure Policy in an Identity Domain

Create a policy to grant permissions to users in a domain group to work with Oracle Cloud Infrastructure instances within a specified tenancy or compartment.

  1. Open the navigation menu and click Identity & Security. Under Identity, click Policies.
  2. Click Create Policy.
  3. In the Create Policy window, enter a name (for example, VisualBuilderGroupPolicy) and a description.
  4. In the Policy Builder, select Show manual editor and enter the required policy statements.

    Syntax:

    • allow group domain-name/group_name to verb resource-type in compartment compartment-name

    • allow group domain-name/group_name to verb resource-type in tenancy

    Example: allow group admin/oci-visualbuilder-admins to manage visualbuilder-instances in compartment VBCompartment

    Note

    If you omit the domain name, the default domain is assumed.

    This policy statement allows the oci-visualbuilder-admins group in the admin domain to manage instance visualbuilder-instances in compartment VBCompartment.

    You can create separate groups for different permissions, such as a group with read permission only.

    Want to learn more about policies? See How Policies Work and Policy Reference, or click Help in the window.

    • When defining policy statements, you can specify either verbs (as used in these steps) or permissions (typically used by power users).

    • The read and manage verbs are most applicable to Visual Builder. The manage verb has the most permissions (create, delete, edit, move, and view).

      Verb Access

      read

      Includes permission to view Oracle Visual Builder instances and their details.

      manage

      Includes all permissions for Oracle Visual Builder instances.

  5. If you intend to use custom endpoints, add one or more additional policy statements. Otherwise, skip this step.
    Add policies that specify the compartment in which vaults and secrets reside and allow the admin group to manage secrets in it. See Create and Configure a Custom Endpoint for Your Visual Builder Instance.
    Note that you should specify the resource to return in resource-type, as described in Details for the Vault Service. Also note that Oracle Visual Builder requires the read verb only but manage is recommended if the same group will also be administering the secrets (uploading/lifecycle operations).

    Examples::

    • allow group admin/oci-visualbuilder-admins to manage secrets in compartment SecretsCompartment

    • allow group admin/oci-visualbuilder-admins to manage vaults in compartment SecretsCompartment

  6. Click Create.
    The policy statements are validated and syntax errors are displayed.

Creating a User in an Identity Domain

Create a user to assign to a group in an Oracle Cloud Infrastructure identity domain.

  1. Open the navigation menu and click Identity & Security. Under Identity, click Domains.
    The Domains page is displayed.
  2. If not already selected, select the Compartment in which the domain that contains the group to which you want to add a new user resides.
  3. In the Name column, click the domain for the group in which you want to create the user.
    The domain Overview page is displayed.
  4. Click Users.
    The Users page for the domain is displayed.
  5. Click Create user.
  6. In the Create user screen, enter the user's first and last name, and their username, then select the one or more groups to which the user should be assigned.
  7. Click Create.
    The new user is added to the selected group(s) and has permissions assigned to the group by its policy statement.
  8. On the user details page that is displayed, you can edit user information as needed, and reset the user's password.
  9. Provide new users with the credentials they need to sign in to their cloud account. Upon signing in, they will be prompted to enter a new password.

Assigning Visual Builder Service Roles to Groups in an Identity Domain

After a Visual Builder instance has been created, assign Oracle Visual Builder service roles to groups of users to allow them to work with the features of the instance.

Note

It's a best practice to assign Oracle Visual Builder service roles to selected groups rather than individual users.

Oracle Visual Builder provides a standard set of set of service roles, which govern access to features. Depending on the Oracle Visual Builder features your organization uses, you may choose to create groups named for the service role they are granted. For example, VisualBuilderServiceAdministrators for the Oracle Visual Builder ServiceAdministrator role.

  1. Open the navigation menu and click Identity & Security. Under Identity, click Domains.
    The Domains page is displayed.
  2. If not already selected, select the Compartment in which the domain that contains the group to which you want to assign Oracle Visual Builder roles resides.
  3. In the Name column, click the domain for the group to which you want to assign roles.
    The domain Overview page is displayed.
  4. In the navigation pane, click Oracle Cloud Services.
    The Oracle Cloud Services page is displayed.
  5. In the Name column, click the Oracle Visual Builder instance for which you want to assign group roles.
    The instance details page is displayed.
  6. In the navigation pane, click Application roles.
  7. In the Application roles list, locate the role(s) you want to assign to the group. At the far right, click Task menu , and select Assign groups.
  8. On the Assign groups page, select the group to which to assign the service role, and click Assign.