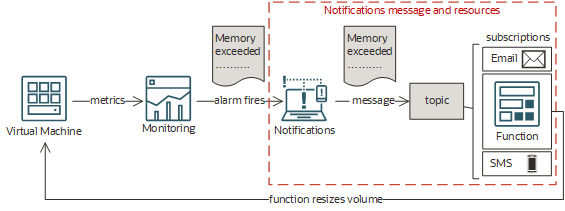
シナリオA: 仮想マシンの自動サイズ変更
通知、ファンクション、モニタリングの各サービスを使用して、メモリーを超える仮想マシン(VM)の自動サイズ変更を設定します。
このシナリオには、VMをサイズ変更するファンクションの作成と、その関数にメッセージを送信するアラームの作成が含まれます。アラームが起動すると、通知サービスがアラーム・メッセージを宛先トピックに送信し、さらにトピックのサブスクリプションに展開します。このシナリオでは、トピックのサブスクリプションには、ファンクションおよび電子メール・アドレスおよびSMS電話番号が含まれています。ファンクションは、アラーム・メッセージの受信時に呼び出されます。
通知サービスには、ファンクションが呼び出された後にそのファンクションに関する情報はありません。詳細は、ファンクションが呼出しまたは実行されない場合のトラブルシューティング情報を参照してください。
必須IAMポリシー
Oracle Cloud Infrastructureを使用するには、管理者が、テナンシ管理者がポリシーでセキュリティ・アクセス権を付与したグループのメンバーである必要があります。コンソールまたは(SDK、CLIまたはその他のツールを使用した) REST APIのどれを使用しているかにかかわらず、このアクセス権が必要です。権限がない、または認可されていないというメッセージが表示された場合は、テナンシ管理者に、どのタイプのアクセス権があり、どのコンパートメントでアクセスが作業する必要があるかを管理者に確認してください。
管理者グループのメンバーであれば、このシナリオを実行するために必要なアクセス権はすでに持っています。そうでない場合は、モニタリング、通知およびファンクションにアクセスする必要があります。ファンクションをトピックのサブスクリプションとして追加するには、そのファンクションに対してFN_INVOCATION権限を持っている必要があります。VMのサイズを変更するには、コンピュート・インスタンスを更新する機能が認可されている必要があります。コンピュート・インスタンスなどの他のOracle Cloud Infrastructureリソースへのアクセスをファンクションに認可するには、動的グループにファンクションを含め、それらのリソースへのアクセス権を動的グループに付与するポリシーを作成します。詳細は、実行しているファンクションからの他のOracle Cloud Infrastructureリソースへのアクセスを参照してください。
タスク1: 機能の作成および承認
ファンクションを作成して、優先SDKを使用してVMのサイズを変更し、ファンクションがVMにアクセスすることを認可したら(動的グループにファンクションを含めて、その動的グループ・アクセス権を付与します)、他のすべてのシナリオ・ステップをコンソールで完了できます。または、Oracle Cloud Infrastructure CLIまたはAPIを使用して、各操作を自分で実行することもできます。
ファンクションが他のOracle Cloud Infrastructureリソースにアクセスすることの認可の詳細は、実行しているファンクションからの他のOracle Cloud Infrastructureリソースへのアクセスを参照してください。
このコード例では、データベース経由で冪等性を処理することをお薦めします。
次のコード例は、VMのサイズを変更するファンクションを示しています。ファンクションの作成およびデプロイの手順は、ファンクションの作成およびデプロイを参照してください。
import io
import json
import oci

from fdk import response

def increase_compute_shape(instance_id, alarm_msg_shape):
    signer = oci.auth.signers.get_resource_principals_signer()
    compute_client = oci.core.ComputeClient(config={}, signer=signer)
    current_shape = compute_client.get_instance(instance_id).data.shape
    print("INFO: current shape for Instance {0}: {1}".format(instance_id,current_shape), flush=True)
    if current_shape != alarm_msg_shape:
        return "The shape of Instance {} differs from the Alarm message".format(instance_id)
    # improve the logic below to handle more scenarios, make sure the shapes you select are available in the region and AD
    if  current_shape == "VM.Standard1.1":
        new_shape = "VM.Standard2.1"
    elif current_shape == "VM.Standard2.1":
        new_shape = "VM.Standard2.2"
    else:
        return "Instance {0} cannot get a bigger shape than its current shape {1}".format(instance_id,current_shape)
    print("INFO: new shape for Instance {0}: {1}".format(instance_id,new_shape), flush=True)
    try:
        update_instance_details = oci.core.models.UpdateInstanceDetails(shape=new_shape)
        resp = compute_client.update_instance(instance_id=instance_id, update_instance_details=update_instance_details)
        print(resp, flush=True)
    except Exception as ex:
        print('ERROR: cannot update instance {}'.format(instance_id), flush=True)
        raise
    return "The shape of Instance {} is updated, the instance is rebooting...".format(instance_id)

def handler(ctx, data: io.BytesIO=None):
    alarm_msg = {}
    message_id = func_response = ""
    try:
        headers = ctx.Headers()
        message_id = headers["x-oci-ns-messageid"]
    except Exception as ex:
        print('ERROR: Missing Message ID in the header', ex, flush=True)
        raise
    print("INFO: Message ID = ", message_id, flush=True)
    # the Message Id can be stored in a database and be used to check for duplicate messages
    try:
        alarm_msg = json.loads(data.getvalue())
        print("INFO: Alarm message: ")
        print(alarm_msg, flush=True)
    except (Exception, ValueError) as ex:
        print(str(ex), flush=True)

    if alarm_msg["type"] == "OK_TO_FIRING":
        if alarm_msg["alarmMetaData"][0]["dimensions"]:
            alarm_metric_dimension = alarm_msg["alarmMetaData"][0]["dimensions"][0]   #assuming the first dimension matches the instance to resize
            print("INFO: Instance to resize: ", alarm_metric_dimension["resourceId"], flush=True)
            func_response = increase_compute_shape(alarm_metric_dimension["resourceId"], alarm_metric_dimension["shape"])
            print("INFO: ", func_response, flush=True)
        else:
            print('ERROR: There is no metric dimension in this alarm message', flush=True)
            func_response = "There is no metric dimension in this alarm message"
    else:
        print('INFO: Nothing to do, alarm is not FIRING', flush=True)
        func_response = "Nothing to do, alarm is not FIRING"

    return response.Response(
        ctx,
        response_data=func_response,
        headers={"Content-Type": "application/json"}
)ファンクションOCID (フォーマットはocid1.fnfunc.oc1.iad.exampleuniqueID)を見つけてノートにとり、関連する動的グループに次のルールを指定します:
resource.id = '<function-ocid>'次のポリシーを追加します:
allow dynamic-group <dynamic-group-name> to use instances in tenancyタスク2: トピックの作成
トラブルシューティングのヘルプは、通知のトラブルシューティングを参照してください。
- 「トピックの作成」パネルを開きます: 「トピック」リスト・ページで、「トピックの作成」を選択します。リスト・ページの検索に関するヘルプが必要な場合は、トピックのリストを参照してください。
- 「名前」に、「アラーム・トピック」と入力します。
- 「作成」を選択します。
oci ons topic createコマンドと必要なパラメータを使用して、トピックを作成します:
oci ons topic create --name <name> --compartment-id <compartment_OCID>例:
oci ons topic create --name "Alarm Topic" --compartment-id "<compartment_OCID>"CLIコマンドのパラメータおよび値の完全なリストは、通知のコマンドライン・リファレンスを参照してください。
CreateTopic操作を実行して、トピックを作成します。
例:
POST /20181201/topics
Host: notification.us-phoenix-1.oraclecloud.com
<authorization and other headers>
{
  "name": "Alarm Topic",
  "compartmentId": "<compartment_OCID>"
}
タスク3: サブスクリプションの作成
ファンクション・サブスクリプションを作成する前に、ファンクションをデプロイする必要があります。
トラブルシューティングのヘルプは、通知のトラブルシューティングを参照してください。
- 前に作成したトピックを選択します(例の名前は「アラーム・トピック」)。「トピック」リスト・ページで、作業するトピックを選択します。リスト・ページまたはトピックの検索に関するヘルプが必要な場合は、トピックのリストを参照してください。
-
ファンクション・サブスクリプションを作成します。
-
SMSサブスクリプションを作成します。
-
電子メール・サブスクリプションを作成します。
各サブスクリプションを作成するには、oci ons Subscription createコマンドおよび必須パラメータを使用します:
oci ons subscription create --protocol <subscription_type> --subscription-endpoint <endpoint> --compartment-id <compartment_OCID> --topic-id <topic_OCID>ファンクション・サブスクリプションの例:
oci ons subscription create --protocol "ORACLE_FUNCTIONS" --subscription-endpoint "<function-ocid>" --compartment-id "<compartment_OCID>" --topic-id "<topic_OCID>"SMSサブスクリプションの例:
oci ons subscription create --protocol "SMS" --subscription-endpoint "<sms-endpoint>" --compartment-id "<compartment_OCID>" --topic-id "<topic_OCID>"Eメール・サブスクリプションの例:
oci ons subscription create --protocol "EMAIL" --subscription-endpoint "john.smith@example.com" --compartment-id "<compartment_OCID>" --topic-id "<topic_OCID>"CLIコマンドのパラメータおよび値の完全なリストは、通知のコマンドライン・リファレンスを参照してください。
CreateSubscription操作を実行して、各サブスクリプションを作成します。
ファンクション・サブスクリプションの例:
POST /20181201/subscriptions
Host: notification.us-phoenix-1.oraclecloud.com
<authorization and other headers>
{
  "topicId": "<topic_OCID>",
  "compartmentId": "<compartment_OCID>",
  "protocol": "ORACLE_FUNCTIONS",
  "endpoint": "<function_OCID>"
}
SMSサブスクリプションの例:
POST /20181201/subscriptions
Host: notification.us-phoenix-1.oraclecloud.com
<authorization and other headers>
{
  "topicId": "<topic_OCID>",
  "compartmentId": "<compartment_OCID>",
  "protocol": "SMS",
  "endpoint": "<sms-endpoint>"
}
Eメール・サブスクリプションの例:
POST /20181201/subscriptions
Host: notification.us-phoenix-1.oraclecloud.com
<authorization and other headers>
{
  "topicId": "<topic_OCID>",
  "compartmentId": "<compartment_OCID>",
  "protocol": "EMAIL",
  "endpoint": "john.smith@example.com"
}
タスク4: アラームの作成
トラブルシューティングのヘルプは、通知のトラブルシューティングを参照してください。
- 「アラームの作成」ページを開きます
- ナビゲーション・メニューを開き、「監視および管理」を選択します。「モニタリング」で、「アラーム定義」を選択します。
-
「アラームの作成」を選択します。
- 「アラーム名」に、「VMメモリー・アラーム」と入力します。
-
「メトリックの説明」で、メトリック、間隔および統計を選択します。
フィールド このシナリオの値の例 コンパートメント 自動的にサイズ変更するVMを含むコンパートメントを選択します。 メトリック・ネームスペース oci_computeagent メトリック名 MemoryUtilization 間隔 1m 統計 最大 -
「トリガー・ルール」で、アラームしきい値を設定します。
フィールド このシナリオの値の例 演算子 次より大きい 値 90 トリガー遅延分数 1 - 「通知」の「宛先」で、前に作成したトピックを選択します。
フィールド このシナリオの値の例 宛先サービス 通知サービス コンパートメント Select the compartment that contains the topic that you created earlier. トピック 前に作成したトピックを選択します。 -
「アラームの保存」を選択します。
- 「アラームの作成」ページを開きます
アラームを作成するには、oci monitoring alarm createコマンドおよび必須パラメータを使用します:
oci monitoring alarm create --display-name <name> --compartment-id <compartment_OCID> --metric-compartment-id <compartment_OCID> --namespace <metric_namespace> --query-text <mql_expression> --severity <level> --destinations <file_or_text> --is-enabled <true_or_false>次に例を示します:
oci monitoring alarm create --display-name "VM Memory Alarm" --compartment-id "<compartment_OCID>" --metric-compartment-id "<compartment_OCID>" --namespace "oci_computeagent" --query-text "MemoryUtilization[1m].max() > 90" --severity "CRITICAL" --destinations "<topic-ocid>" --is-enabled trueCLIコマンドのパラメータおよび値の完全なリストは、モニタリングのコマンドライン・リファレンスを参照してください。
アラームを作成にするには、CreateAlarm操作を実行します。
次に例を示します:
POST /20180401/alarms
Host: telemetry.us-phoenix-1.oraclecloud.com
<authorization and other headers>
{
  "displayName": "VM Memory Alarm",
  "compartmentId": "<compartment_OCID>",
  "metricCompartmentId": "<compartment_OCID>",
  "namespace": "oci_computeagent",
  "query": "MemoryUtilization[1m].max() > 90",
  "severity": "CRITICAL",
  "destinations":
  [
    "<topic_OCID>"
  ],
  "isEnabled": true
}
