Managing Connections
Connections that are established from the Data Studio to the cloud, catalogs and shares are listed on this page.
The Connections page contains the Search for entities such as Cloud Storage Links, Data Catalog Links, and Share Providers, and a list of entity cards. You can enter the entity you are looking for in the field or click one of the entity card from the list. You can register the cloud store you want to use from this page. You can also register data catalogs and subscribe to a share provider.
- Entity Selector: You can Use the drop-down lists to select the entity from which the connection is created. You can select from Cloud Storage Links, Data Catalog Links, Share Provider or all.
- Search field: Searches for entities in the field by name. The search functionality is not case-sensitive, retrieves all matching entries, and does not require the use of wild card characters.
-
Create drop-down: The options available in the Create drop-down are:
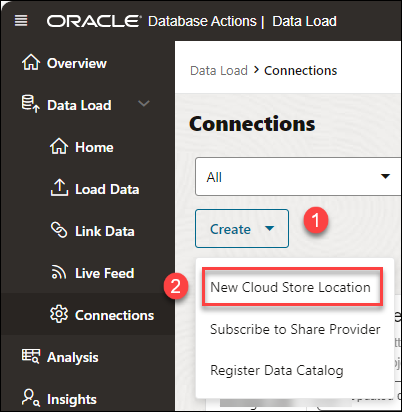
- New Cloud Store Location: Before you can load data from a cloud store, you must establish a connection to the cloud store you want to use. You can select cloud store location from the cloud store locations field. A cloud storage link is a connection to a bucket in a cloud store. You can view the existing cloud storage links and add new ones. Refer to the Create Credentials to add a cloud store location.
- Subscribe to a Share Provider: Upload the JSON profile file and create a share provider description To subscribe, you need to use the information contained in the uploaded JSON profile you received from the share provider. From the Consume Share feature of the Data Share tool, you upload the JSON profile and follow the subscribe wizard. Refer to the Consume Versioned Share for more details.
- Register Data Catalogs: You can create a connection by registering a data source as a data asset in your data catalog. You can view, delete and rename the data catalogs. Refer to the Register Data Catalog chapter.
-
The toolbar consists of the following buttons:
-
Sort By
To select sorting values, click the Sort By button to open the list of options. Then click the Ascending or Descending icon next to one or more of the sorting values. For example, if you select the Ascending icon next to Entity name and the Descending icon next to Entity type, the entities will be sorted in alphabetical order by entity name and then in reverse alphabetical order by entity type.
Click Reset in the list to clear the choices in the list.
-
Page size
By default, up to 25 entities are displayed on the page. If you want more entities on a page, select a number from this list.
-
Previous and Next
If the search results are displayed on multiple pages, click these buttons to navigate through the pages.
-
Refresh
Click to refresh the data load jobs shown on the page, based on the current search field.
-
-
The sorting values you choose are listed next to the Sort by label beneath the toolbar. Click the X icon on a sorting value to remove it.
- Display area: The area below the Create drop-down field displays the entity carts returned by a search.
-
To view details about the existing entities, click Actions.
-
For a Share Provider, refer to the View Share Provider Entity detail.
- For a Cloud Storage Link, click Actions to perform the following operations:
- Select View Details to view details about the table.
- Select Objects to view objects available in the selected storage link. You can click a file on the navigator pane to view it on the display area.
- Selecting Link Tables opens the Link Data page on the Data Load tool with the selected cloud storage link on the Cloud Location URL field. You can link data present in the cloud storage to the Autonomous AI Database. See Linking to Objects in Cloud Storage.
- Selecting Load Tables opens the Load Data page on the Data Load tool with the selected cloud storage link on the Cloud Location URL field. You can load data present in the cloud storage to the Autonomous AI Database. See Loading Data from Cloud Storage.
- Selecting Create Live Table Feed opens the Create Live Table feed wizard with he selected cloud storage link on the Cloud Location URL field. See Feeding Data to view more details.
- Select Edit to update any details on the cloud storage location. See Create Credentials to view details on creation of cloud storage location.
- Select Rename to rename the cloud store location to a different name.
- Select Delete to delete the cloud store location.
- Register Data Catalog
You can register data catalogs you want to use with registering the data catalog. - Create Credentials
The procedure for creating a credential varies depending on the cloud storage provider. If your source files reside in a cloud store provided by one of the following, see the example for that provider. - Create Oracle Cloud Infrastructure Native Credentials
To establish cloud storage connection from Data Studio to Oracle Cloud Infrastructure (OCI) Object storage service, you must configure the cloud storage location with your OCI authentication details. You can create Oracle Cloud Infrastructure (OCI) Native Credentials by using the CREATE_CREDENTIAL procedure of DBMS_CLOUD package. - Create Amazon Web Services (AWS) Credentials
To access AWS Glue Catalog you must have AWS credentials that you can create via the Create Credential wizard. This wizard stores cloud service credentials in the Autonomous AI Database. - Manage Resource Principal with DBMS_CLOUD
The Oracle Cloud Infrastructure (OCI) Resource Principal allows applications and services running within the OCI to access an Autonomous AI Database without the need for traditional database credentials (e.g., username and password).
Parent topic: The Data Load Page
Create Credentials
The procedure for creating a credential varies depending on the cloud storage provider. If your source files reside in a cloud store provided by one of the following, see the example for that provider.
- Oracle Cloud Infrastructure (OCI), see Create an OCI Cloud Store Location.
- Amazon S3, or you are calling an AWS API, see Create an Amazon S3 Cloud Store Location.
- Microsoft Azure Blob Storage or you are calling an Azure API, see Create a Microsoft Azure Cloud Store Location.
- Google Cloud Storage, see Create a Google Cloud Storage Location.
- Other (Swift compatible) cloud storage, see Create an Other (Swift Compatible) Cloud Store Location.
- OCI cloud storage by using native OCI credentials, see the subsequent section.
Note
This method is suggested if you need to use the OCI REST APIs. You need to use the Native OCI credentials if you want to use the OCI REST APIs. To create an OCI cloud storage location using Oracle Cloud Infrastructure Signing Keys, you must first Create Oracle Cloud Infrastructure Native Credentials.
- OCI Cloud Shell, see Create Credentials using OCI Cloud Shell.
Create an OCI Cloud Store Location
- On the Connections page, click Create and select Create New Cloud Store Location. This opens the Add Cloud Store Location wizard.
- In the Storage Settings tab of the Add Cloud Store Location box, enter a name for the cloud storage link. For example:
My_Cloud_Store - (Optional) In the Description field, enter a description for the link. For example:
My cloud storage link. - Click Select Credential and Create Credential to create a credential. This opens a Create Credential wizard.
In the Credentials section, select Cloud Username and Password.
- From the Cloud Store drop-down list, select Oracle.
- Enter a name in the Credential Name field. The name must conform to Oracle object naming conventions. For example:
my_credential - For an OCI cloud store, in the Oracle Cloud Infrastructure User Name field, enter your OCI user name. You must use Oracle Cloud Infrastructure User Name from your profile in the OCI console. For example:
oracleidentitycloudservice/foo@example.comor
default/foo@example.com - For an OCI cloud store, in the Auth Token field, enter your auth token. For example:
LPB>Ktk(1M1SD+a]+r - In the Bucket URI field, enter the URI and bucket for your OCI instance bucket.
- To get the URI and bucket, go to the bucket in the Object Storage compartment in your Oracle Cloud Instance.
- In the Objects group, click the Actions (three vertical dots) icon for a file in the bucket, then click View Object Details.
- Copy all of the URL Path (URI) except for the file name. Be sure to include the trailing slash. For example, for the file
https://objectstorage.us-phoenix-1.oraclecloud.com/n/myoci/b/my_bucket/o/MyFile.csv, select the following:https://objectstorage.us-phoenix-1.oraclecloud.com/n/myoci/b/my_bucket/o/ - Paste the string into the URI + Bucket field.
- Click Next.
The dialog box progresses to the Cloud Data tab. This tab lists the objects available on this cloud storage location in the display area.
Note
The display area is blank when we create a new cloud storage location. - Click Create create the cloud storage location.
Create an Amazon S3 Cloud Store Location
- On the Connections page, click Create and select Create New Cloud Store Location. This opens the Add Cloud Store Location wizard.
- In the Storage Settings tab of the Add Cloud Store Location box, enter a name for the cloud storage link. For example:
My_Cloud_Store - (Optional) In the Description field, enter a description for the link. For example:
My cloud storage link. - Click Select Credential and Create Credential to create a credential. This opens a Create Credential wizard.
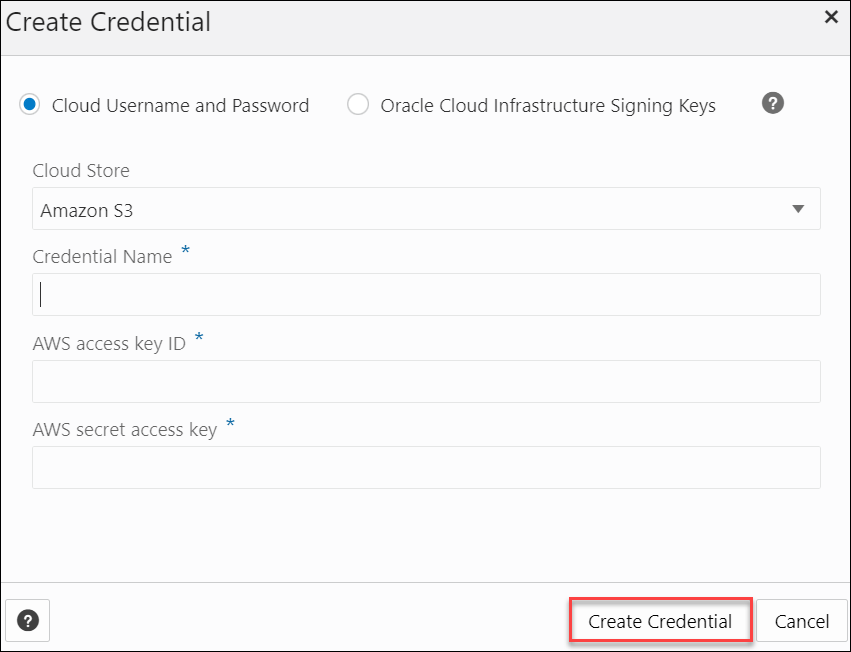
In the Credentials section, select Cloud Username and Password.
- From the Cloud Store drop-down list, select Oracle.
- Enter a name in the Credential Name field. The name must conform to Oracle object naming conventions. For example:
my_credential - From the Cloud Store drop-down list, select Amazon S3.
- Enter a name in the Credential Name field. The name must conform to Oracle object naming conventions. For example:
my_credential - In the AWS Access Key ID field, enter your AWS access key ID. For example:myAccessKeyID
- In the AWS Secret Access Key field, enter your AWS secret access key. For information on AWS access keys, see Managing access keys for IAM users.
- In the Bucket URI field, enter the URI and bucket for your Amazon S3 bucket. For example:
https://s3.us-west-2.amazonaws.com/my_bucket - Click Next.
The dialog box progresses to the Cloud Data tab. This tab lists the objects available on this cloud storage location in the display area.
Note
The display area is blank when we create a new cloud storage location. - Click Create create the cloud storage location.
Create an Microsoft Azure Cloud Store Location
- On the Connections page, click Create and select Create New Cloud Store Location. This opens the Add Cloud Store Location wizard.
- In the Storage Settings tab of the Add Cloud Store Location box, enter a name for the cloud storage link. For example:
My_Cloud_Store - (Optional) In the Description field, enter a description for the link. For example:
My cloud storage link. - Click Select Credential and Create Credential to create a credential. This opens a Create Credential wizard.
In the Credentials section, select Cloud Username and Password.
- From the Cloud Store drop-down list, select Microsoft Azure.
- Enter a name in the Credential Name field. The name must conform to Oracle object naming conventions. For example:
my_credential - In the Azure Storage Account Name field, enter the name of your Azure storage account. For example:
myaccount - In the Azure Storage Account Access Key field, enter your Azure access key.
For information on Azure storage accounts, see Create a storage account.
- In the Bucket URI field, enter the URI and bucket for your Microsoft Azure bucket. For example:
https://myaccount.blob.core.windows.net/mycontainer - Click Next.
The dialog box progresses to the Cloud Data tab. This tab lists the objects available on this cloud storage location in the display area.
Note
The display area is blank when we create a new cloud storage location. - Click Create to create the cloud storage location.
Create a Google Cloud Store Location
- On the Connections page, click Create and select Create New Cloud Store Location. This opens the Add Cloud Store Location wizard.
- In the Storage Settings tab of the Add Cloud Store Location box, enter a name for the cloud storage link. For example:
My_Cloud_Store - (Optional) In the Description field, enter a description for the link. For example:
My cloud storage link. - Click Select Credential and Create Credential to create a credential. This opens a Create Credential wizard.
In the Credentials section, select Cloud Username and Password.
- Enter a name in the Credential Name field. The name must conform to Oracle object naming conventions. For example:
my_credential - From the Cloud Store drop-down list, select Google.
- In the HMAC Access Key field, enter your HMAC access ID. For example:
GOOGTS1C3LPB3KTKSDMB2BFD - In the HMAC Access Secret field, enter your HMAC secret. For information on HMAC keys, see HMAC Keys.
- In the Storage Settings tab of the Add Cloud Store dialog box, enter a name for the cloud storage link. For example:
My_Cloud_Store - (Optional) In the Description field, enter a description for the link. For example:
My cloud storage link. - In the Bucket URI field, enter the bucket and URI for your Google bucket. For example:
https://my_bucket.storage.googleapis.com - Click Next.
The dialog box progresses to the Cloud Data tab. This tab lists the objects available on this cloud storage location in the display area.
Note
The display area is blank when we create a new cloud storage location. - Click Create to create the cloud storage location.
Create an Other (Swift Compatible) Cloud Store Location
- On the Connections page, click Create and select Create New Cloud Store Location. This opens the Add Cloud Store Location wizard.
- In the Storage Settings tab of the Add Cloud Store Location box, enter a name for the cloud storage link. For example:
My_Cloud_Store - (Optional) In the Description field, enter a description for the link. For example:
My cloud storage link. - Click Select Credential and Create Credential to create a credential. This opens a Create Credential wizard.
In the Credentials section, select Cloud Username and Password.
Note
If you have the user OCID, tenancy OCID, private key and fingerprint, select Oracle Cloud Infrastructure Signing Keys and refer to the Create an OCI Cloud storage location using Oracle Cloud Infrastructure Signing Keys section of this topic. - From the Cloud Store drop-down list, select Other (Swift Compatible).
- Enter a name in the Credential Name field. The name must conform to Oracle object naming conventions. For example:
my_credential - In the Access User Name field, enter your access user name. For example:
OTHER_KEY123... - In the Access Key field, enter your access key.
- In the Bucket URI field, enter the URI and bucket for your cloud store bucket. For example:
https://someswiftcompatibleprovider.com/my_bucket - Click Next.The dialog box progresses to the Cloud Data tab. This tab lists the objects available on this cloud storage location in the display area. The display area is blank when we create a new cloud storage location.
- Click Create to create the cloud storage location.
Create an OCI Cloud storage location using Oracle Cloud Infrastructure Signing Keys
To create an OCI Cloud storage location using Oracle Cloud Infrastructure Signing Keys:
- On the Connections page, click Create and select Create New Cloud Store Location. This opens the Add Cloud Store Location wizard.
- In the Storage Settings tab of the Add Cloud Store Location box, enter a name for the cloud storage link. For example:
My_Cloud_Store - (Optional) In the Description field, enter a description for the link. For example:
My cloud storage link. - Click Select Credential and Create Credential to create a credential. This opens a Create Credential wizard.
If you have the user OCID, tenancy OCID, private key and fingerprint, select Oracle Cloud Infrastructure Signing Keys.Note
If you only have a username and password select Cloud Username and Password in this step and refer to the Create an Other (Swift Compatible) Cloud Store Location section of this topic. -
Specify the following information about your OCI account:
Credential Name: Specify a name to identify the credentials. See Create an OCI Credential Object to enter the Credential name to specify the credential name.
-
Fingerprint: The fingerprint of the RSA key pair. See Create an OCI Credential Object to enter the Credential name to enter the fingerprint.
-
Private Key: The unencrypted private key in the RSA key pair. This should not be encrypted by using any passphrase. See Create an OCI Credential Object to enter the Credential name to enter the private key.
-
Oracle Cloud Infrastructure Tenancy: The OCID of the tenant. See Where to Get the Tenancy's OCID and User's OCID for details on obtaining the Tenancy's OCID.
-
Oracle Cloud Infrastructure User Name: The OCID of the user. See Where to Get the Tenancy's OCID and User's OCID for details on obtaining the User's OCID.
- Select Create Credential.
- In the Bucket URI field, enter the URI and bucket for your cloud store bucket. For example:
https://objectstorage.<region>.oraclecloud.com/n/<namespace>/b/<bucket>/ - Click Next.
-
The dialog box progresses to the Cloud Data tab. This tab lists the objects available on this cloud storage location in the display area.
Note
The display area is blank when we create a new cloud storage location. - Click Create.
You will receive a notification that the cloud storage location is created successfully.
Create Credentials using OCI Cloud Shell
You can create OCI native credentials using a Cloud Shell script.
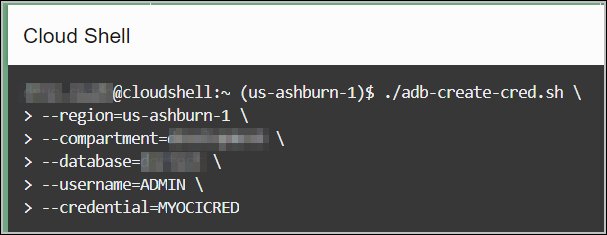
adb-create-cred.sh to generate credential scripts. The adb-create-cred.sh script searches for existing credentials, if found you are asked if you want to reuse them or if you want new credentials created. Depending on your decision, the generated credential scripts include new or existing credentials. Download the OCI Native Credential script or copy it to run it directly in your database using any SQL or JSON tool or utility.
For a list of arguments supported by the Create Credential script, enter
adb-create-cred.sh --help.
In this example, OCI Native Credential scripts are generated in the script area for your tenancy without running them in your database.
- On the Connections page, click Create and select New Cloud Store Location. You need to know the Name and Cloud Store Location of the Credential to create a new one.
- Select Create Credential.
- On the Create Credential wizard, select Create using OCI Cloud Shell. You will view a script in the script editor field.
Note
- If you are in your home region and the Autonomous AI Database is in your home region, run the script without the region argument. The script assumes the Autonomous AI Database is in your home region and will not prompt for an alternate region.
- If you are in your home region and your Autonomous AI Database is in an alternate region, then you must pass in the --region argument when running the script.
- Click Copy Script.
- Sign into your OCI Tenancy, select the Developer Tools icon and click Cloud Shell from the drop down list.
- Paste the
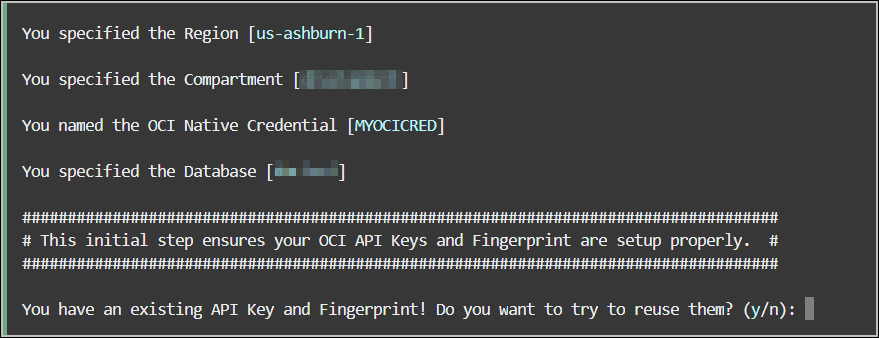
adb-create-cred.shscript you copied in the previous step that includes arguments the tool uses to locate the database, connect to the database and the credential name you provide in the Credential Name field. - The Cloud Shell script informs you of existing OCI API Keys and Fingerprint and if you want to reuse them. Enter
yto reuse the existing keys and fingerprint.If you choose to create new credentials, and decide after overwriting the credentials that you want to use the overwritten credentials, you can go back to the directory where the backup is and reuse them. The backup file name or folder has a suffix with this syntax:
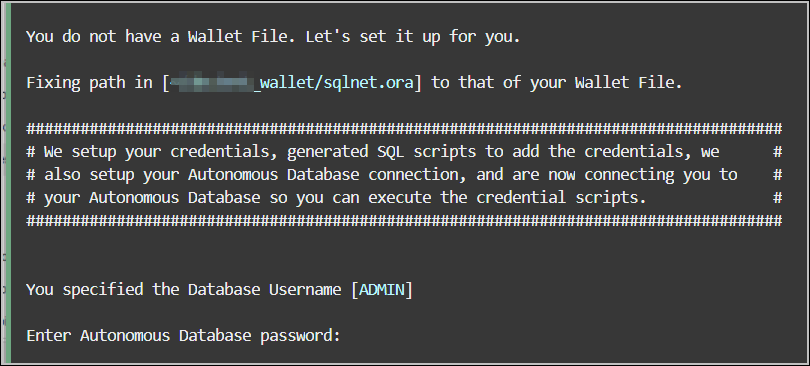
_bkp_YYYYMMDD_abc. For example, this backup file was created on June 06, 2024:_bkp_20240603_woT. - The Cloud Shell script window displays if you want to run the credential scripts on your Autonomous AI Database. Enter
yto run the credential script in the database with the region, compartment and database arguments. - You can view a notification that informs you that you do not have a wallet file. The script creates a wallet file. You must specify the ADMIN password you use to connect to the database. In case the script detects the wallet file, the script prompts you to either reuse it or set up a new one.
Note
If you have an Autonomous AI Database private endpoint in a Virtual Cloud Network, the
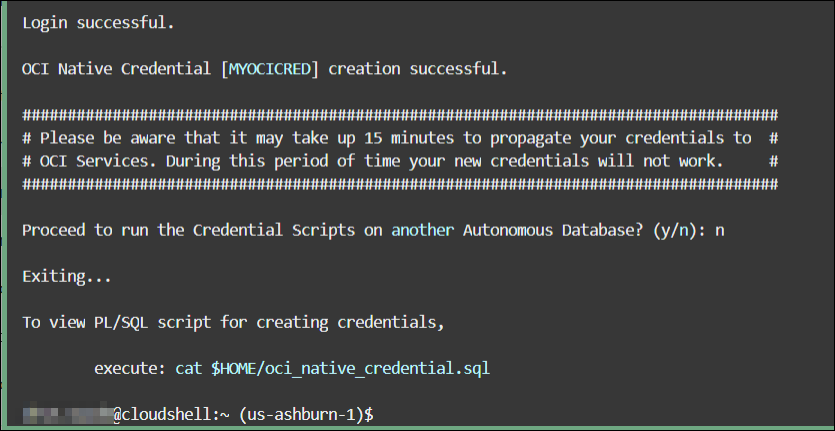
adb-create-cred.shscript generates the SQL and JSON scripts. However, it does not perform the steps required to access the Autonomous AI Database private end point. Instead, it prompts you to executecat ~/oci_native_credential.sqlto copy the SQL into whatever SQL tool you have access to via a Bastion or Jump Host. - The Cloud Shell script displays a notification of successful login and creation of credentials in the specific database.
The script prompts you if you want to run it on another database. Enter
nto not run credentials in another database.The script exits and displays the path to run the
oci_native_credential.sqlscript to create a credential.Note
If the connection to the Autonomous AI Database is unsuccessful, you can runcat ~/oci_native_credential.sql, and copy the SQL to run it directly in your database using any SQL tool.
Parent topic: Managing Connections
Create Oracle Cloud Infrastructure Native Credentials
To establish cloud storage connection from Data Studio to Oracle Cloud Infrastructure (OCI) Object storage service, you must configure the cloud storage location with your OCI authentication details. You can create Oracle Cloud Infrastructure (OCI) Native Credentials by using the CREATE_CREDENTIAL procedure of DBMS_CLOUD package.
Create an Oracle Cloud Infrastructure (OCI) Credential Object
To access Object Storage, you must have credentials that you can create via the CREATE_CREDENTIAL procedure of DBMS_CLOUD package. DBMS_CLOUD supports creation of credential objects that contains OCI native authentication. The DBMS_CLOUD procedure stores cloud service credentials in Autonomous Database.
The DBMS_CLOUD.CREATE_CREDENTIAL procedure is overloaded with the Oracle Cloud Infrastructure-related parameters, including: user_ocid, tenancy_ocid, private_key, and fingerprint. This is for using Oracle Cloud Infrastructure Signing Keys authentication.
Table 3-2 DBMS_CLOUD.CREATE_CREDENTIAL parameter descriptions
| Parameter | Description |
|---|---|
credential_name |
The |
user_ocid |
Specifies the user's OCID. See Where to Get the Tenancy's OCID and User's OCID for details on obtaining the User's OCID. |
tenancy_ocid |
Specifies the tenancy's OCID. See Where to Get the Tenancy's OCID and User's OCID for details on obtaining the Tenancy's OCID. |
private_key |
Specifies the generated private key. Private keys generated with a passphrase are not supported. You need to generate the private key without a passphrase. See How to Generate an API Signing Key for details on generating a key pair in PEM format. |
fingerprint |
Specifies a fingerprint. After a generated public key is uploaded to the user's account the fingerprint is displayed in the console. Use the displayed fingerprint for this argument. See How to Get the Key's Fingerprint and How to Generate an API Signing Key for more details. |
Here is the syntax of the DBMS_CLOUD.CREATE_CREDENTIAL procedure:
DBMS_CLOUD.CREATE_CREDENTIAL (
	credential_name IN VARCHAR2,
	user_ocid       IN VARCHAR2,
	tenancy_ocid    IN VARCHAR2,
	private_key     IN VARCHAR2,
	fingerprint     IN VARCHAR2);
Once you obtain all the necessary inputs and generate your private key, here is a sample of your CREATE_CREDENTIAL procedure:
BEGIN  DBMS_CLOUD.CREATE_CREDENTIAL (    credential_name =>
      'OCI_NATIVE_CRED',    user_ocid              =>
      'ocid1.user.oc1..aaaaaaaatfn77fe3fxux3o5lego7glqjejrzjsqsrs64f4jsjrhbsk5qzndq',    tenancy_ocid           =>
      'ocid1.tenancy.oc1..aaaaaaaapwkfqz3upqklvmelbm3j77nn3y7uqmlsod75rea5zmtmbl574ve6a',    private_key            =>
      'MIIEogIBAAKCAQEAsbNPOYEkxM5h0DF+qXmie6ddo95BhlSMSIxRRSO1JEMPeSta0C7WEg7g8SOSzhIroCkgOqDzkcyXnk4BlOdn5Wm/BYpdAtTXk0sln2DH/GCH7l9P8xC9cvFtacXkQPMAXIBDv/zwG1kZQ7Hvl7Vet2UwwuhCsesFgZZrAHkv4cqqE3uF5p/qHfzZHoevdq4EAV6dZK4Iv9upACgQH5zf9IvGt2PgQnuEFrOm0ctzW0v9JVRjKnaAYgAbqa23j8tKapgPuREkfSZv2UMgF7Z7ojYMJEuzGseNULsXn6N8qcvr4fhuKtOD4t6vbIonMPIm7Z/a6tPaISUFv5ASYzYEUwIDAQABAoIBACaHnIv5ZoGNxkOgF7ijeQmatoELdeWse2ZXll+JaINeTwKU1fIB1cTAmSFv9yrbYb4ubKCJuYZJeC6I92rT6gEiNpr670Pn5n43cwblszcTryWOYQVxAcLkejbPA7jZd6CW5xm/vEgRv5qgADVCzDCzrij0t1Fghicc+EJ4BFvOetnzEuSidnFoO7K3tHGbPgA+DPN5qrO/8NmrBebqezGkOuOVkOA64mp467DQUhpAvsy23RjBQ9iTuRktDB4g9cOdOVFouTZTnevN6JmDxufu9Lov2yvVMkUC2YKd+RrTAE8cvRrn1A7XKkH+323hNC59726jT57JvZ+ricRixSECgYEA508e/alxHUIAU9J/uq98nJY/6+GpI9OCZDkEdBexNpKeDq2dfAo9pEjFKYjH8ERj9quA7vhHEwFL33wk2D24XdZl6vq0tZADNSzOtTrtSqHykvzcnc7nXv2fBWAPIN59s9/oEKIOdkMis9fps1mFPFiN8ro4ydUWuR7B2nM2FWkCgYEAxKs/zOIbrzVLhEVgSH2NJVjQs24S8W+99uLQK2Y06R59L0Sa90QHNCDjB1MaKLanAahP30l0am0SB450kEiUD6BtuNHH8EIxGL4vX/SYeE/AF6tw3DqcOYbLPpN4CxIITF0PLCRoHKxARMZLCJBTMGpxdmTNGyQAPWXNSrYEKFsCgYBp0sHr7TxJ1WtO7gvvvd91yCugYBJAyMBr18YY0soJnJRhRL67A/hlk8FYGjLW0oMlVBtduQrTQBGVQjedEsepbrAcC+zm7+b3yfMb6MStE2BmLPdF32XtCH1bOTJSqFe8FmEWUv3ozxguTUam/fq9vAndFaNre2i08sRfi7wfmQKBgBrzcNHN5odTIV8l9rTYZ8BHdIoyOmxVqM2tdWONJREROYyBtU7PRsFxBEubqskLhsVmYFO0CD0RZ1gbwIOJPqkJjh+2t9SH7Zx7a5iV7QZJS5WeFLMUEv+YbYAjnXK+dOnPQtkhOblQwCEY3Hsblj7Xz7o=',    fingerprint            =>
      '4f:0c:d6:b7:f2:43:3c:08:df:62:e3:b2:27:2e:3c:7a');END;/
    PL/SQL procedure successfully completed.
You can now retrieve the new credentials with the following query:
SELECT owner, credential_name FROM dba_credentials WHERE credential_name LIKE '%NATIVE%';  OWNER CREDENTIAL_NAME----- ---------------
    ADMIN OCI_NATIVE_CRED
Parent topic: Managing Connections
Create Amazon Web Services (AWS) Credentials
To access AWS Glue Catalog you must have AWS credentials that you can create via the Create Credential wizard. This wizard stores cloud service credentials in the Autonomous AI Database.
CREATE CREDENTIAL wizard depending on where your source files reside. To create AWS credentials:
-
On the Connections page, click Create and select New Cloud Store Location.
- Select Create Credential from Add Cloud Store Location wizard.
- Select Cloud Username and Password.
- Select Amazon S3 from the Cloud Store drop-down.
- Enter a name in the Credential Name field. The name must conform to Oracle object naming conventions. For example,
MY_AWS_CRED. - In the AWS Access Key ID field, enter your AWS access key ID. For example:
myAccessKeyID, see Managing access keys for IAM users. - In the AWS Secret Access Key field, enter your AWS secret access key. For information on AWS access keys, see Managing access keys for IAM users.
- Click Create Credential to create AWS credentials.
Parent topic: Managing Connections
Manage Resource Principal with DBMS_CLOUD
The Oracle Cloud Infrastructure (OCI) Resource Principal allows applications and services running within the OCI to access an Autonomous AI Database without the need for traditional database credentials (e.g., username and password).
You do not need to create a credential object when you use a resource principal. The Autonomous AI Database creates and secures the resource principal credentials you use to access the specified Oracle Cloud Infrastructure resources. A resource principal consists of a temporary session token and secure credentials that enable the database to authenticate itself to other Oracle Cloud Infrastructure services.
- There are several steps required to set up a resource principal on an Autonomous AI Database: You must create and define Oracle Cloud Infrastructure Identity and Access Management (IAM) policies. See Perform Prerequisites to Use Resource Principal with Autonomous AI Database for more information.
- Enable the resource principal for the ADMIN user, and optionally enable the resource principal for a database user. See Enable Resource Principal to Access Oracle Cloud Infrastructure Resources to access OCI Resources.
When you authenticate using a resource principal, you do not need to create and manage credentials to access OCI resources. The Autonomous AI Database makes the resource principal available to you and secures the resource principal for you.
Manage Resource Principal using Data Studio
You can also enable Resource Principal using Data Studio.
- From the Database Actions Launchpad, select the Data Load tile.
-
Click Connections This opens the Connections page.
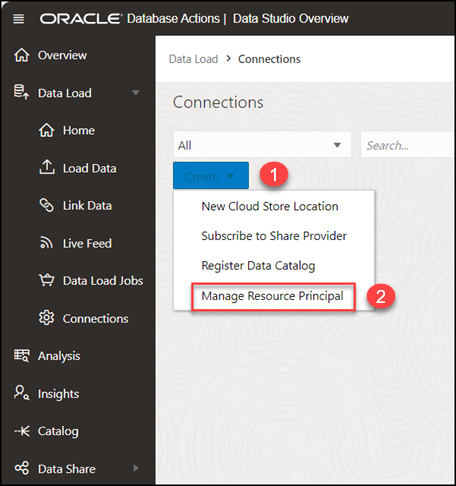
- On the Connections page, click Create and select Manage Resource Principal.
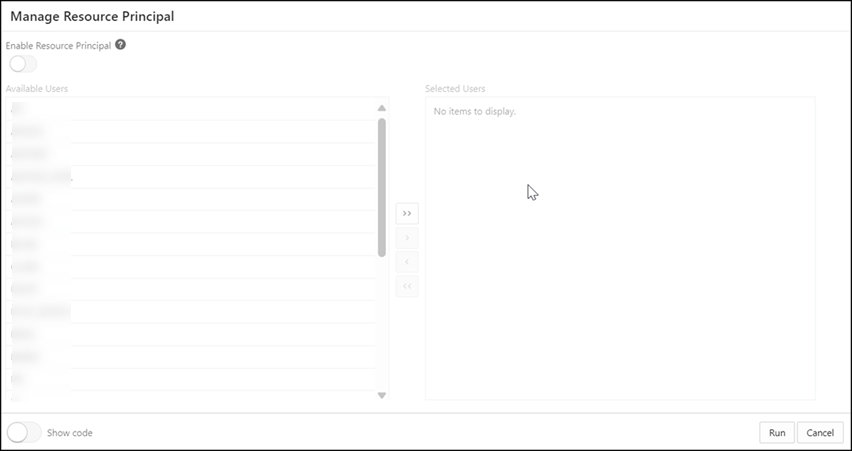
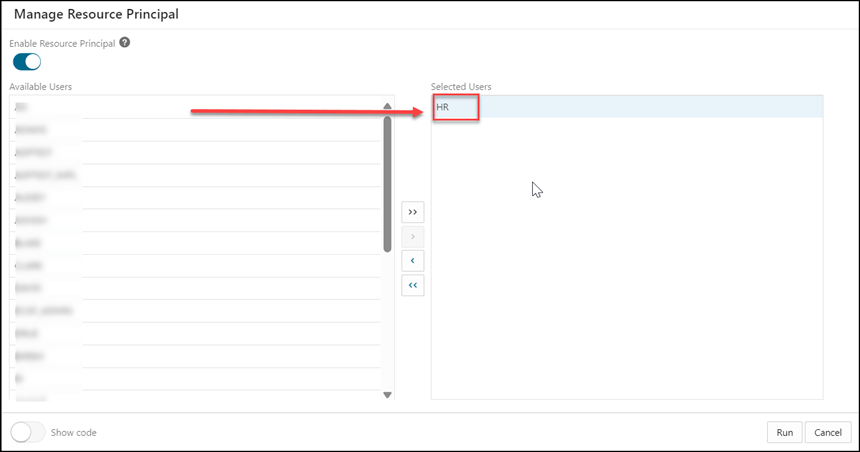
This opens the Manage Resource Principal dialog.
- Select the user or users you want to add from the Available Users list to the Selected Users list to enable their resource principal.
Choose any of the available options:
-
>: This option enables you to move the user to Selected Users.
<: To remove the selected user from Selected Users, select this option.
>>: This option allows you to move all the tables to the Selected Users list.
<<: To remove all the selected users from Selected Users, select this option.
Note
You can grant access to the resource principal credential to a database user only if the ADMIN user has enabled the resource principal credential.
-
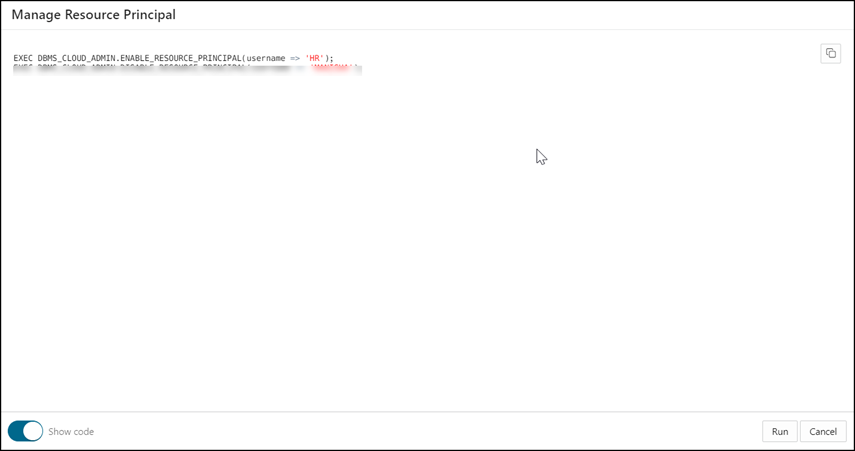
- Select the Show Code option to view the PL/SQL code equivalent of the Manage Resource Principal dialog box. You can copy and execute this PL/SQL code in the worksheet to perform the same action that occurs when you click Enable Resource Principal in the Manage Resource Principal dialog box.
- Click Run to complete the process of enabling the resource principal of the selected users.
A confirmation notification is displayed that confirms that the resource principal of selected users is enabled.
- Select a user from Selected Users to Available Users to disable the resource principal for the selected user. This removes the credential
OCI$RESOURCE_PRINCIPAL. Refer to Disable Resource Principal on Autonomous AI Database on Autonomous AI Database for more information on this topic.
Parent topic: Managing Connections


