Task 1: Build a DA-as-Agent Digital Assistant
Build the skills that you need for the DA-as-agent digital assistant, optionally publish them, and then add them to the digital assistant that will act as a digital-assistant agent. Typically, you'll need just one skill, but you can have more.
You can build your digital assistant from scratch, or you can clone the CX Service template as described in the Oracle Digital Assistant CXS Overview Power Point slides.
When you build your digital assistant, consider these scenarios:
-
The customer isn't sure what they can do with an automated assistant: Create a help skill or add a help state to an existing skill. Then, do one of the following:
-
Single-Skill Digital Assistant: In the skill, go to Settings > Digital Assistant and set Help State to the name of the skill's help state. Note that the automated agent conversation sample sets this to welcome.
-
Multiple-Skill Digital Assistant: In the digital assistant, go to Settings > Configurations and set these conversation parameters to point to the appropriate state in the help skill.
-
Digital Assistant Custom Help Skill
-
Digital Assistant Custom Help State
-
-
-
The customer wants something that a digital assistant isn't set up to handle: Do one of the following:
-
Single-Skill Digital Assistant: Add an intent and action that transfers to an Agent Transfer dialog flow state. If you are using a clone of an automated agent conversation skill, then the dialog flow does this already.
Note
If your skill is developed in YAML dialog flow mode, also add anunresolvedIntentaction transition to the skill'sSystem.Intentstate to handle requests that are out of scope for the skill. -
Multiple-Skill Digital Assistant: In the digital assistant, go to Settings > Configurations and set these conversation parameters to point to the state that starts the flow for handling out-of-scope requests.
-
Digital Assistant Custom UnresolvedIntent Skill
-
Digital Assistant Custom UnresolvedIntent State
-
-
Build the Skill
To build a DA-as-Agent skill you can clone the DA-as-Agent Template or create one from scratch, as described here. Then you'll configure the skill, add intents and entities as required, and make any necessary changes to the dialog flow. Last, you'll train and, optionally, publish the skill.
Create and Configure the Skill
Here are the steps for creating a skill for use in a DA-as-Agent digital assistant.
Add Intents and Entities
Add the necessary intents and entities for your skill.
Tip:
If you would like your digital-assistant agent to be able to handle "small talk", then pull the Digital Assistant Template from the skill store, and take a look at its skill named Common Skill Template. It has intents and a dialog flow that handles questions like "Are you a bot?", "Can I ask you out?", "Do you know the time?", "Are you into football?", and "Do you tell jokes".If your DA-as-agent skill is a basic question-and-answer skill, then you can use answer intents to handle the questions and answers. For Oracle B2C Service, you also can use Knowledge Search dialog flow components to address questions and answers. For knowledge search examples, see Use the Knowledge Search Component. Note that you must create a knowledge search integration to use this component.
After you create your intents click Train. You can't test or publish a skill if it hasn't been trained.
To test your intents, click Test Utterances, and then enter test utterances in the Quick Test section to verify that the model is resolving to the desired intents. You should enter utterances from the intents as well as utterances that are not in any intents. The dialog shows the confidence level for each matched intent. If the resolution isn't what you intended, consider adding the utterance to the desired intent or revising the intent that was incorrectly matched. You also can click Go to Test Cases to create or import batch tests. To learn more see Intent Training and Testing.
Access Contact and Chat Launch Page Information
When users are signed into the service or have provided their first name,
last name, and email address on the chat launch page, then the
profile.firstName, profile.lastName, and
profile.email variables will contain the user information. For Oracle B2C
Service, the profile.locale variable is set to the interface language code.
For Oracle Fusion
Service the locale is based on language that the user selected on the chat launch site, or, if none
was selected, the browser's locale.
In addition, the profile.contactInfo variable contains some chat-request info, such as the customer's question (subject) and the product ID and category ID, if applicable. Also, if the chat launch page contains any custom fields, then the values that the customer enters into those fields are passed to the digital assistant in the profile.contactInfo.customFields array. To learn about customizing the fields that are on the Oracle B2C
Service chat launch page, see Overview of Chat on the Customer Portal in Using Oracle B2C
Service.
Here's the structure of the profile.contactInfo for Oracle B2C
Service:
{
  "question": <string>,
  "productId": <number>,
  "orgId": <number>,
  "categoryId": <number>,
  "browser": <string>,
  "ipAddress": <string>,
  "userAgent": <string>,
  "sessionId": <string>,
  "operatingSystem": <string>,
  "customFields": [
    {
      "name": <string-name-of-custom-field>,
      "id": <ID-of-custom-field>,
      "value": <field-value>
    },
    ...
  ]
}
Here's some example data:
{
   "question":"Do you deliver",
   "productId":7,
   "customFields":[
      {
         "name":"ODA Text",
         "id":44,
         "value":"N/A"

},
      {
         "name":"ODA YN",
         "id":45,
         "value":"1"

},
      {
         "name":"ODA Nbr",
         "id":46,
         "value":"1"

},
      {
         "name":"ODA Date",
         "id":47,
         "value":"2020,2,17"

},
      {
         "name":"ODA Menu",
         "id":48,
         "value":"12"

},
      {
         "name":"ODA DateTime",
         "id":49,
         "value":"2004,11,18,17,18"

}

],
   "browser":"FireFox 68.0",
   "ipAddress":"123.45.67.89",
   "userAgent":"Mozilla/5.0 (Windows NT 10.0; WOW64; rv:68.0) Gecko/20100101 Firefox/68.0",
   "sessionId":"HI6unnBo",
   "operatingSystem":"Windows 10",
   "orgId":-1,
   "categoryId":-1
}
Here's the FreeMarker expression for accessing the value of
profile.contactInfo:
${profile.contactInfo.value}Here are FreeMarker expressions for accessing specific parts of
profile.contactInfo:
${profile.contactInfo.value.question}${profile.contactInfo.value.customFields}Here's the structure of the profile.contactInfo for Oracle Fusion
Service:
{
  "question": <string>,
  "productId": <number>,
  "orgId": <number>,
  "categoryId": <number>,
  "browser": <string>,
  "ipAddress": <string>,
  "userAgent": <string>,
  "sessionId": <string>,
  "operatingSystem": <string>,
  "customFields": [
    {
      "name": "<custom-field-name>",
      "type": "<data-type>",
      "value": "<field-value>",
      "menuItemLabel": "<label-string>"
    },
    ...
  ]
}
Enable Transfer to a Human Agent
If you want the skill to transfer the chat session to a human agent, such as when the user wants something that the skill isn't built to handle, add a state that uses the Agent Transfer dialog flow component.
In the Agent Transfer component, you can specify things like maximum wait time and conditions
under which the skill should transfer back to a human agent. This component has the built-in
transition actions accepted, rejected, and
error. You should map each of these actions to a state or a flow to handle
that action. For example:
acceptedcould be mapped to a Show Message component that outputs the message:I'm transferring you to a human agent. Hold tight.rejectedcould be mapped to a Show Message component that outputs the message:I wasn't able to transfer you to a human agent. Please try again later. Meanwhile, let me know if there's anything else I can help you with.errorcould be mapped to a Show Message component that outputs the message:We're unable to transfer you to a human agent because there was a system error. You can ask me another question if there's something else that I can help you with.
Be careful about how you transfer to the agent transfer state so that the flow doesn't end up in an endless loop. For example, don't map the Dialog Error system event or flow transition go to an Agent Transfer state.
See Agent Transfer for details about the component's properties and actions. If your dialog flow is in YAML mode, see System.AgentTransfer.
Tip:
If you would like the skill to track how many times an agent was needed and why, see Creating Dimensions that Track Skill Usage.Pass Information to the Service
When you transfer a conversation from a digital assistant to a live agent, you'll most likely want to pass some information to the service, such as values for an escalation rule. You use custom properties in the Agent Transfer component to pass this information.
For Oracle B2C
Service, the name can be FIRST_NAME, LAST_NAME,
EMAIL, QUESTION, PRODUCT_ID,
CATEGORY_ID, CONTACT_ID, INCIDENT_ID, and
any custom field of type Incident that has Chat Display enabled in the
Visibility settings.
For custom fields, use the field's column name (lower case) preceded by c$. The type can be BOOLEAN, DATE, DATETIME, INTEGER, LONG, STRING, and DECIMAL. The default is STRING. For DATE and DATETIME, use the format yyyy-MM-dd'T'HH:mm:ssXXX. For BOOLEAN, use 1 for true, and 0 for false.
For Oracle Fusion
Service, the name can be FIRST_NAME, LAST_NAME,
EMAIL, QUESTION, PRODUCT_ID,
CATEGORY_ID, CONTACT_ID, INCIDENT_ID, and
any field from an Oracle
Fusion Cloud Applications (Fusion) object. Note that when you add a custom field to a Oracle Fusion
Service object using Application Composer, the _c suffix is added to the name
automatically.
Tip:
For Oracle Fusion Service, the rules evaluation stops at the first rule where all conditions are met. When you configure your rules, ensure that the transferred conversation isn't routed back to the digital assistant agent. (For Oracle B2C Service, the Transition State and stop configuration determines the routing.)To learn about Oracle B2C Service custom fields, see Overview of Custom Fields in Using Oracle B2C Service. For information about Oracle Fusion Service custom property fields, see "Fields" in Configuring Applications Using Application Composer.
Configure When to Attempt Agent Transfer
The Agent Transfer dialog flow component has two properties that let you configure when to attempt transferring to an agent – Maximum Engagements In Queue and Allow Transfer If.
The Maximum Engagements In Queue property lets you set the
maximum number allowed for engagements waiting in
the destination queue. When the chat request is
sent, the service responds with the current number
of engagements waiting in the queue. If this value
exceeds the Maximum Engagements In
Queue value, the
rejected action occurs. If you
don't include this property, there's no engagement
limit.
You use the Allow Transfer If property to specify when to transfer based on available agents. The options are:
- Agents Are Requesting New Engagements: (default) For Oracle B2C Service agents who must pull chats (request new engagements), this is the most restrictive set of conditions, and the user doesn't have to wait too long before they speak to an agent. The skill attempts to transfer the conversation only if there are agents who have requested new engagements. In all other cases, this option has the same behavior as Agent Sessions Are Available.
- Agent Sessions Are Available: The skill attempts to transfer the conversation if any of the available agents have not reached the maximum number of chats that they are allowed to have at one time. The user may have to wait if the agents are involved in long-running conversations or are doing some post-chat follow-up.
- Agents Are Available: The skill attempts to transfer the conversation if there are any agents online regardless of whether they have reached their maximum number of chats or are requesting new engagements. With this option, the users may have long waits.
If the specified conditions aren't met, then the rejected action occurs.
Get Agent Availability and Wait Time
You can use the Agent Transfer Condition dialog flow component to find out the estimated wait time, display that time, and give the user the opportunity to cancel their request for transfer.
This component addresses the situation when all available agents are busy when a user wants to speak to an agent and there might be a long wait.
You use the component's properties to specify the transfer conditions and the name
of the variable to put the status information in. The component returns an action that
indicates whether the conditions were met. The built-in transition actions are
conditionsMet, conditionsNotMet, and
error. You map each of these actions to a state or a flow to handle that
action.
For example:
- For
conditionsNotMet, you could map it to a Send Message state that has text like:Unfortunately, none of my colleagues are currently available to assist with this. Still, we’d love to see this through for you. Please feel free to contact us at email@example.com. - For
error, you could map it to a Show Message component that outputs a message like:We're unable to transfer you to a human agent because there was a system error. You can ask me another question if there's something else that I can help you with. - For
conditionsMet, you could map it to a flow that asks the user if they are willing to wait and, if they do, then transitions to an Agent Transfer state to perform the actual transfer. That flow could include the following:- A Common Response component that asks the user if they want to wait. Here is how the
Metadata property for that component might
look:
responseItems: - type: "text" text: "${rb('promptTextForTransferDecision','minutes,seconds',agentStatus.value.expectedWaitMinutes,agentStatus.value.expectedWaitSeconds)}" separateBubbles: true actions: - label: "Yes, I'll wait" type: "postback" keyword: "yes" payload: action: "yes" name: "Yes" - label: "No, nevermind" keyword: "no" type: "postback" payload: action: "no" name: "No" -
A resource bundle entry for the text response item above to form the wait time message so that the message makes sense whether the time is more or less than a minute and whether the number is zero, one, or more. Here's what that might look like:
There are some experts online. But it might take {minutes, plural, =-1 {} =0 {} =1 {1 minute and } other {# minutes and } }{seconds, plural, =-1 {a while} =0 {{minutes, plural, =0 {a very short wait time} other {0 seconds} }} =1 {1 second} other {# seconds} } for one to join. Are you willing to wait? - An Agent Transfer state to perform the transfer if the user is willing to wait for an agent.
- A state with a response when the user doesn't want to wait.
- A Common Response component that asks the user if they want to wait. Here is how the
Metadata property for that component might
look:
See Agent Transfer Condition for details about the status information and the actions.
If your dialog flow is in YAML mode, see System.AgentTransferCondition.
Enable Attachments
DA as Agent channels support the ability of both Oracle Fusion Service agents and users to attach images, audio, video, and files to the conversation.
For this to work, you must use Web Chat for Service, or another messaging platform that supports attachments.
Create an Incident Report
You can create an incident report (or service request) for Oracle B2C Service or Oracle Fusion Service from any skill.
To create an incident report from your skill:
-
Go to Settings > Additional Services > Customer Service Integration and create an integration with the needed service.
You only need to do this once per instance.
-
Add the incident creation component to your flow. For the Visual Flow Designer, see Incident Creation. For YAML, see System.IncidentCreation.
If you have created a Oracle Fusion Service integration and have selected Allow only signed-in users to create service request as the authentication type, you also need to do the following:
- Set the Incident Creation component's Requires
Authentication setting to
True. - Add an OAuth Account Link component to the dialog flow to handle user authentication. For the Visual Flow Designer, see OAuth Account Link. For YAML, see System.OAuthAccountLink.
- Set the Incident Creation component's Requires
Authentication setting to
Tip:
After creating and configuring the Incident Creation component, click Validate in the page's banner to validate the skill. Among other things, this validation will ensure that you have entered a service name in the Incident Creation component that matches the name you have given to the customer service integration that you created.How the UI Components Display in the Service Chat
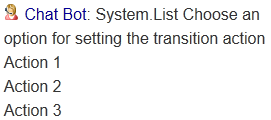
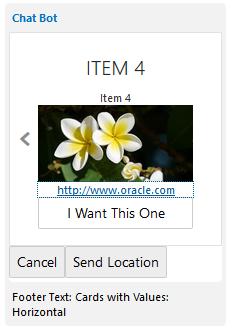
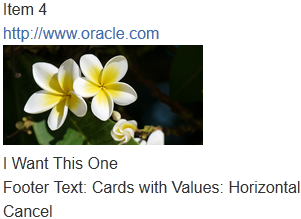
The default chat that's accessed through the service's customer portal is limited to text and images. For example, instead of cards and buttons, it just displays text, and the user has to type the choice or button label instead of just clicking on it.
To display more than just text for the UI components that are in the dialog flow, you can use one of the following options:
- Web Chat for Service (WCFS). This feature enables you to customize the chat widget by using features present in the SDK for Oracle Web user channels. To configure WCFS, see the Web Chat for Service (WCFS) section of Administering Oracle Engagement Engine.
- Oracle Inlay Toolkit Inlays. To learn about Inlays, see the Oracle Inlay Toolkit documentation.
If your chat client is the default chat that's accessed through the service's
customer portal, then ensure that you set the Enable Auto Numbering on Postback
Actions to true on the Settings >
Configuration page for the digital assistant so that the user can respond to the
UI component by typing in a number instead of the exact text. If you don't set it to
true, then use keywords for response items to minimize what the user has to
enter. In this example, autonumbering is set to true whenever the client is
Twilio or Oracle B2C
Service chat.
${(system.channelType=='twilio'||system.channelType=='osvc' )?then('true','false')}Tip:
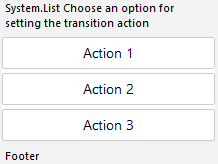
When you use the digital assistant preview or the skill preview, if you set the channel to Twilio SMS, it will render the conversation similar to the default chat.Here's a comparison of how the UI components are displayed for the different clients.
| Component/Property | Web Chat for Service | Inlay | Default Chat |
|---|---|---|---|
| HTML tags | Supported | Supported | Supported |
| Postback actions | Supported | Displayed as clickable buttons. The share action is
ignored.
|
Displayed as non-clickable text. The location,
call and share actions are ignored.
|
Common Response (in YAML dialogs
System.CommonResponse)
|
Supported | Supported, except that users can't upload attachments. | Supported, but the items and action labels always display vertically.
Choices and buttons are displayed as non-clickable text.
For a response
item of type |
System.List (available in YAML dialogs only, but
deprecated)
|
Supported | Supported | Supported, but the options display as non-clickable text and the
footerText value doesn't display.
|
This table illustrates how different component configurations display in the default chat and Inlays.
| Example Component Configuration | Inlay | Default Chat |
|---|---|---|
Note: This example uses a |
 Description of the illustration rich-text-list-inlay.png |
 Description of the illustration rich-text-list-default.png |
|
 Description of the illustration rich-text-card-inlay.png |
 Description of the illustration rich-text-card-default.png |
|
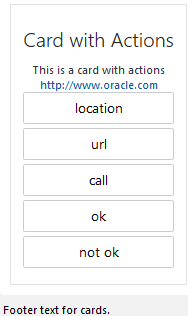 Description of the illustration rich-text-actions-inlay.png |
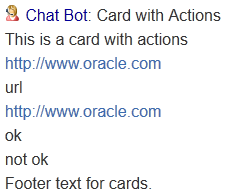 Description of the illustration rich-text-actions-default.png Note that you can wrap the payload URLs in HTML tags. For example |
Configure the DA-as-Agent Digital Assistant
If you aren't using the CX Service template, follow these steps to create a digital assistant that acts as an automated Oracle B2C Service or Oracle Fusion Service agent:
-
Click
 to open the side menu, and then click Development > Digital Assistants.
-
Click New Digital Assistant.
-
Complete the dialog and click Create.
-
When the digital assistant opens, it displays the Skills
 page.
page.
-
Click + Add Skill, select the skill that you built for this digital assistant, and then click Close.
-
Click Settings
 , and then click General.
-
Switch Enable Insights to On.
-
Set the digital assistant's Training Model to Trainer Tm.
-
(Optional) Make these changes to your digital assistant in the Settings > Configurations tab.
-
Flow Information in Selection:
${system.routingToIntent} -
Nothing to Exit Prompt:
Goodbye. Let me know if there's anything else I can help you with.
-
-
(Optional) If the digital assistant has more than one skill, then you can customize the digital-assistant behavior when user utterances match the digital assistant's
helpandunresolvedIntentintents. Go to the Configuration tab on the Settings page, and then specify the custom skill and state to navigate to for help or unresolvedIntent (or both). See Specify States for a Digital Assistant's System Intents. - Click Train to train the digital assistant.
-
(Optional) To test the digital assistant, click Preview
 .
.
Note that when the dialog flow transitions to a state that transfers from a skill to an agent, Preview stops responding. Click Reset when that happens.
After you put your digital assistant into production, you'll want to periodically run Retrainer reports to see if you need to improve intent resolution for any intents. See Apply the Retrainer.