Setting Up RADIUS Proxy

Remote Authentication Dial In User Service (RADIUS) is a network protocol that defines rules and conventions for communication between network devices. RADIUS Proxy authenticates and authorizes users or devices and also tracks the usage of those services.

Required Policy or Role

To set up and validate RADIUS Proxy, you must have one of the following access grants:
  • Be a member of the Administrators group
  • Be granted the Identity Domain Administrator role or the Security Administrator role
  • Be a member of a group granted manage domains

To understand more about policies and roles, see The Administrators Group, Policy, and Administrator Roles, Understanding Administrator Roles, and Understanding Policies.

Setting up RADIUS Proxy

Install, setup, and test RADIUS Proxy.

Before You Begin:
  • Ensure that your RADIUS Proxy is available for your identity domain. RADIUS Proxy is available only for Oracle Apps Premium and Premium Identity Domain Types. To learn about identity domain types and the features and limits associated with each, see IAM Identity Domain Types.
  • Install the latest Postman client.
  • Download the RADIUS Proxy Postman collection.
  • Review the RADIUS Proxy mapping instructions. See RADIUS Proxy Mapping.
  • Review these checkpoints. As you're setting up RADIUS Proxy, use the following checkpoints to verify that your configuration is correct at each step of the process.
    1. Check that the RADIUS Proxy and the RADIUS Proxy Client App are activated in the identity domain.
    2. Check the IP address of Database and port number of RADIUS Proxy are correctly configured in the RADIUS App.
    3. Check that the RADIUS Agent is up and running.
    4. Check that the proxy server is up and running.
    5. Check that the database is up.
  1. Download the latest RADIUS Proxy Installer from the Downloads page in the Console.
    1. Open the navigation menu and click Identity & Security. Under Identity, click Domains.Click the name of the identity domain that you want to work in. You might need to change the compartment to find the domain that you want. Then, click Settings and then Downloads.
    2. Choose Oracle Identity Cloud Service RADIUS Proxy for Linux, and then click Download.
  2. Create the RADIUS App from the RADIUS App Template. Note: For REST go to RADIUS Proxy, RADIUS App, Search, and then Search all apps (with search criteria).
    1. In the Console, click Applications, Add, and then App Catalog.
    2. Search for the Oracle Database Radius App Template and click Add.
    3. Complete the App details similar to the following example.
      • Name: dbserver
      • Description: App representing the Oracle database server as a RADIUS client
      • IP Address of Oracle Database server: 10.242.230.122 (This IP address is where the database is installed.)
      • Port of RADIUS Proxy: 1812 (The port number on which RADIUS Proxy listens for requests from this Oracle database. The same port number must be configured in the RADIUS settings of Oracle Database.)
      • Secret key: testing123 (The secret key used to secure communication between RADIUS Proxy and the Oracle Database server. The same key must be configured in the RADIUS settings of Oracle Database.)
    4. Click Add, Activate, and then click the Users tab.
      Note

      Assign the users who are allowed to sign in to Oracle Database, to this Radius App by clicking Assign Users. Instead of assigning individual users, a Group which contains those users, can also be assigned. Click the Groups tab, and then Assign Groups.

      Note : Create the group name in the identity domain according to the following format defined in Step 3C: Configure the RADIUS Server in Configuring RADIUS Authentication: ORA_databaseSID_rolename[_[A]|[D]].

      For every role in Oracle database to be identified by IAM, create a corresponding group using the format above. Assign a user to this group in IAM so that the respective database user is associated with the respective database role.

  3. Create a RADIUS Proxy in IAM.
    1. Register a Client Application. See Register a Client Application.
    2. Open Postman and import the RADIUS Proxy.postman_collection.json collection to make the REST requests in this section.
    3. Import the RADIUS Proxy Example Environment with Variables.postman_environment.json environment file which contains the environment variables used in the collection.
    4. Set the following environment variables.

      For HOST, use the IAM address, for example, https://yourtenant.identity.oraclecloud.com/.

      For CLIENT_ID and CLIENT_SECRET, use the values that you copied above.

      Note

      Other environment variables are automatically set when REST requests are made. Ensure that following REST requests are made in the same order.
    5. Obtain an access token. To make API calls to IAM, you must authenticate your client against IAM, and then obtain an OAuth access token. The access token provides a session between a client (in this case, Postman) and IAM. By default, the access token has a timeout interval of 60 minutes, and then you must request a new access token to perform additional REST API calls. To obtain an OAuth access token, make the request in the Postman collection under RADIUS Proxy, OAuth Token, and then Obtain access_token (client credentials).
    6. Create the RADIUS Proxy by using a POST Operation. Go to RADIUS Proxy, Create, and then Create a RADIUS Proxy.

      End point: admin/v1/RadiusProxies/ {{RPid}}

      { 
      "displayName": "Acme RADIUS Proxy", 
      "description": "This is a RADIUS Proxy used for authentication of database users", 
      "type":
      "proxy", 
      "timeout": 20, 
      "noOfWorkerThreads": 10, 
      "schemas" :
      ["urn:ietf:params:scim:schemas:oracle:idcs:RadiusProxy"] 
      }
    7. Use this Patch Operation to activate the RADIUS Proxy. Go to RADIUS Proxy, Lifecycle, and then Activate a RADIUS Proxy.

      End point: /admin/v1/RadiusProxies/{{RPid}}

      { 
      "Operations":[ 
      { 
      "op": "replace",
      "path": "active", 
      "value": true 
      } ],
      "schemas": [
      "urn:ietf:params:scim:api:messages:2.0:PatchOp" ] }
    8. Create the RADIUS Proxy Listener using a POST Operation. Go to RADIUS Proxy, RADIUS Proxy Listeners, Create, and then Create a RADIUS Proxy Listener.

      End point: {{HOST}}/admin/v1/RadiusProxyListeners

      { 
      "description": "Brief description for this RADIUS Proxy Listener.",
      "displayName": "RP1_L1", 
      "hostName": "<HostName of the machine in which RADIUS Proxy will be installed.>", 
      "radiusProxySettings":"{\"key1\": \"value1\", \"key2\": \"value2\"}", 
      "radiusProxy":
      { "value" : "<ID of RadiusProxy which is created above.>" 
      }, 
      "schemas" : ["urn:ietf:params:scim:schemas:oracle:idcs:RadiusProxyListener"]
      
      }
    9. Get the dbserver App ID. Perform a GET call on admin/v1/Apps?filter=displayName eq "dbserver". Fetch the App ID from the response of this GET call. Go to RADIUS Proxy, RADIUS App, Search, and then Search all apps (with search criteria).
      You can also get the App ID from the URL of the dbserver.
    10. Create a RADIUS Proxy Mapping using a POST Operation. Go to RADIUS Proxy, RADIUS Proxy Mappings, Create, and then Create a RADIUS Proxy Mapping.

      End point: {{HOST}}/admin/v1/RadiusProxyMappings/

      Note

      For "value" below, the ID is the ID of Radius Proxy which you created above.
      {
      "description": "RADIUS Proxy mapping for Database server",
      "radiusProxy": {
      "value" : "<RadiusProxyID>"
      },
      "radiusApp": {
      "value": "<<ID of RADIUS App obtained above.>"
      },
      "schemas" : ["urn:ietf:params:scim:schemas:oracle:idcs:RadiusProxyMapping"]
      }
      

      For RADIUS Proxy mapping instructions, see RADIUS Proxy Mapping.

    11. GET client_id and clientSecret of the RADIUS Proxy. The client_id and clientSecret are required during RADIUS Proxy installation. RADIUS Proxy uses these credentials to authenticate with IAM. Go to RADIUS Proxy, Search, Create, Get client ID, and client secret of the App corresponding to RADIUS Proxy.

      End point: {{HOST}}/admin/v1/Apps/{{RPOAuthClientAppId}}?attributes=clientSecret,name

      RPOAuthClientAppId: is the ID of the App corresponding to RADIUS Proxy. You can find it in the response [response.oauthClient.value] in step 3f, Create a RADIUS Proxy Mapping using a POST Operation.

      Response:
      {
      "isAliasApp": false,
      "basedOnTemplate": {
      "value": "RadiusProxyAppTemplateId"
      },
      "displayName": "Acme RADIUS Proxy",
      "name": "<client id>",
      "id": "75d525ce49ee469ba4dcac00bdfe6446",
      "clientSecret": "<client secret>"
      }
      
  4. Run the Installer.
    1. Unzip the downloaded idcs_radius_proxy-xxxx.zip file into a folder.
    2. Name the folder <radius bin location-xxxx>. Where xxxx is the version number (for example, 20.1.3).
      Three files are extracted: FileInfo.json, idcs_radius_proxy_installer.bin, and InstallerValidation.jar. The InstallerValidation.jar file and the idcs_radius_proxy_installer.bin file are located in the same directory post extraction. They must remain in the same directory.
    3. Login as root user or run the following command as sudo: ./idcs_radius_proxy_installer.bin
      Note

      The installer supports only Graphical User Interface mode. It does not support console mode. So, if you see the error: "Graphical installers are not supported by the VM.", then ensure X server is configured properly. Then, run this command as non root user : xhost +si:localuser:root and run installer again.
  5. Install RADIUS Proxy.
    1. Read the Welcome screen, and then click Next.
    2. Read the Information screen, and then click Next.
    3. Select the Destination Folder (default is /root/oracle_radius_proxy), where the RADIUS Proxy installer will be installed. Click Next.
    4. On the HTTP Proxy screen, select Use HTTP Proxy if RADIUS Proxy needs to use HTTP proxy to connect to IAM. If not, then leave this checkbox unchecked. Click Next.
    5. On the IAM screen, enter the Cloud Service URL in the following format: https://yourtenant.identity.oraclecloud.com. Provide the Client ID and Client Secret of the RADIUS Proxy created in IAM. (This is the RADIUS Proxy you created using the POST Operation above.) Click Next.
    6. On the RADIUS User and Group Information screen, provide the Username and user Group information, for example:
      • Username: <client>
      • Group: <dba>

      IAM RADIUS Proxy daemon will run under the specified username and group.

    7. Click Next.
    8. On the preinstall screen, verify that all the information is correct. If the information is correct, click Install.
    9. When the installation is complete, click Done.
  6. Check that the RADIUS Agent and RADIUS Proxy are running. The RADIUS Agent obtains configuration data from IAM at regular intervals. Then, it updates the configuration files used by RADIUS Proxy.
    1. Use the following RADIUS Agent commands to check whether the agent is running:
      • python <RADIUS_PROXY_INSTALLER_LOCATION>/oracle_radius_proxy/radius_agent/scripts/src/radius_agent.py status
      • You can also use stop, start and restart if needed.
    2. Use the following command to run RADIUS Proxy: /sbin/service idcs_radiusd start
    3. Run these RADIUS server commands to verify that the RADIUS service isRADIUS running.
      • /sbin/service idcs_radiusd status
      • You can also use stop, start, and restart if needed.
  7. (Optional) 
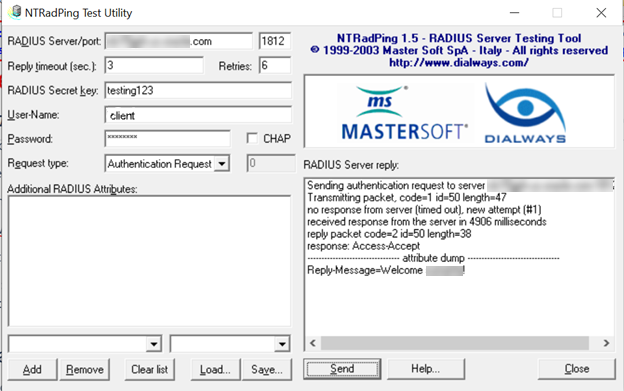
Use the NTRadPing Test Utility to validate that RADIUS proxy is working.
    1. Install the NTRadPing Test Utility in Windows, and then create a User in IAM.
    2. Use the below screenshot as an example. In the below screenshot client is the user created in IAM and testing123 is the secret key given in RADIUS Settings, Secret key of App Details page.

      The following image shows the NTRadPing test utility in Windows:

      Screenshot of NTRadPing Test Utility in Windows

  8. Set up and Configure Oracle Database 12c. Follow the instructions at Configuring Authentication and then use the following commands to create a user/role in the database.
  9. Set up and Configure Oracle Database 12c. For more information, see Configuring RADIUS Authentication. Follow the instructions in the Configuring RADIUS Authentication section to create a user and role in the database.
  10. You can't add an IP address in CIDR format using the IAM user interface. If the IP address of the Oracle Database is in CIDR format, use the following request from the Postman collection. See Change an IP Address from CIDR Format.
  11. Set up MFA. To set up MFA follow these instructions, see Managing Multifactor Authentication.

RADIUS Proxy Log Files and Configuration Information

Note the following RADIUS Proxy file locations for log and configuration information. This information can be useful for troubleshooting.

Installer Logs <radius_proxy_installer_location>/oracle_radius_proxy/_Oracle/ Identity/ Cloud/ Service/ RADIUS/ Proxy_installation/Logs/
Agent Logs <radius_proxy_installer_location>/oracle_radius_proxy/radius_agent/logs/agent.log
Proxy logs <radius_proxy_installer_location>/oracle_radius_proxy/radius_proxy/log/radius_proxy.log
Proxy Configuration <radius_proxy_installer_location>/radius_proxy/conf/radius_proxy.conf
Agent Configuration <radius_proxy_installer_location>/radius_agent/conf/radius_agent.conf
Client Configuration <radius_proxy_installer_location>/radius_proxy/conf/radius_clients.conf

RADIUS Proxy Mapping

RADIUS Proxy and RADIUS Proxy Listener has a 1-1 mapping, for example for each RADIUS Proxy there is one RADIUS Proxy Listener. Multiple Oracle DB RADIUS clients can be mapped to one RADIUS Proxy, that is, a RADIUS Proxy has a 1-n mapping with Oracle DB RADIUS clients.

If an administrator configures multiple Oracle DB RADIUS clients, then that many Oracle Database RADIUS apps need to be created in IAM identity domains-one for each Oracle DB RADIUS client. For example, if an administrator has configured four Oracle DB RADIUS clients to one RADIUS Proxy, then in IAM identity domains there must be four Oracle Database RADIUS apps configured-one for each Oracle DB client.