Provide Share
Use the Provide Share page to view the number of shares of the database, and the number of share recipients, search for a share entity, search for a recipient, create a new share, and create a new recipient.
The Provide Share page consists of widgets Shares and Recipients and icons to create Shares and Recipients. The page is described in the following sections:
- Provide Share Overview
The Provide Share page enables you to view, create, edit, and access information on the shares and recipients you create from this page. - Provide Versioned Share
You can share data as a set of distinct versions, such as at the end of each day. The recipient will only see changes to the data when you publish a new version. As a versioned share Provider, you must create an OCI native credential and associate the bucket's URL with the credential. - Provide Live Share
You can share data as of the latest database commit with Autonomous Databases in the same region. The recipient will always see the latest data. - View Share Entity Details
To view details about an entity, click the Actions icon at the right of the Share entity entry, then click View Details. - Create Share Recipient
On the Provide Shares page, click the Recipients widget and select + Create Recipient to create a new Share Recipient. - View Share Recipient Entity Details
Click the Actions icon at the right of the Share Recipient entity entry, then click View Details.
Parent topic: The Data Share Tool
Provide Share Overview
The Provide Share page enables you to view, create, edit, and access information on the shares and recipients you create from this page.
Click the Provide Share menu under Data Share in the Data Studio menu to reach the Provide Share page. You can switch the display of the Provide Share screen based on the widget you select from the Shares and Recipients section.
The search field and the display area of the Provide Share page varies when you switch between the SHARES and RECIPIENTS widgets.
Shares Page
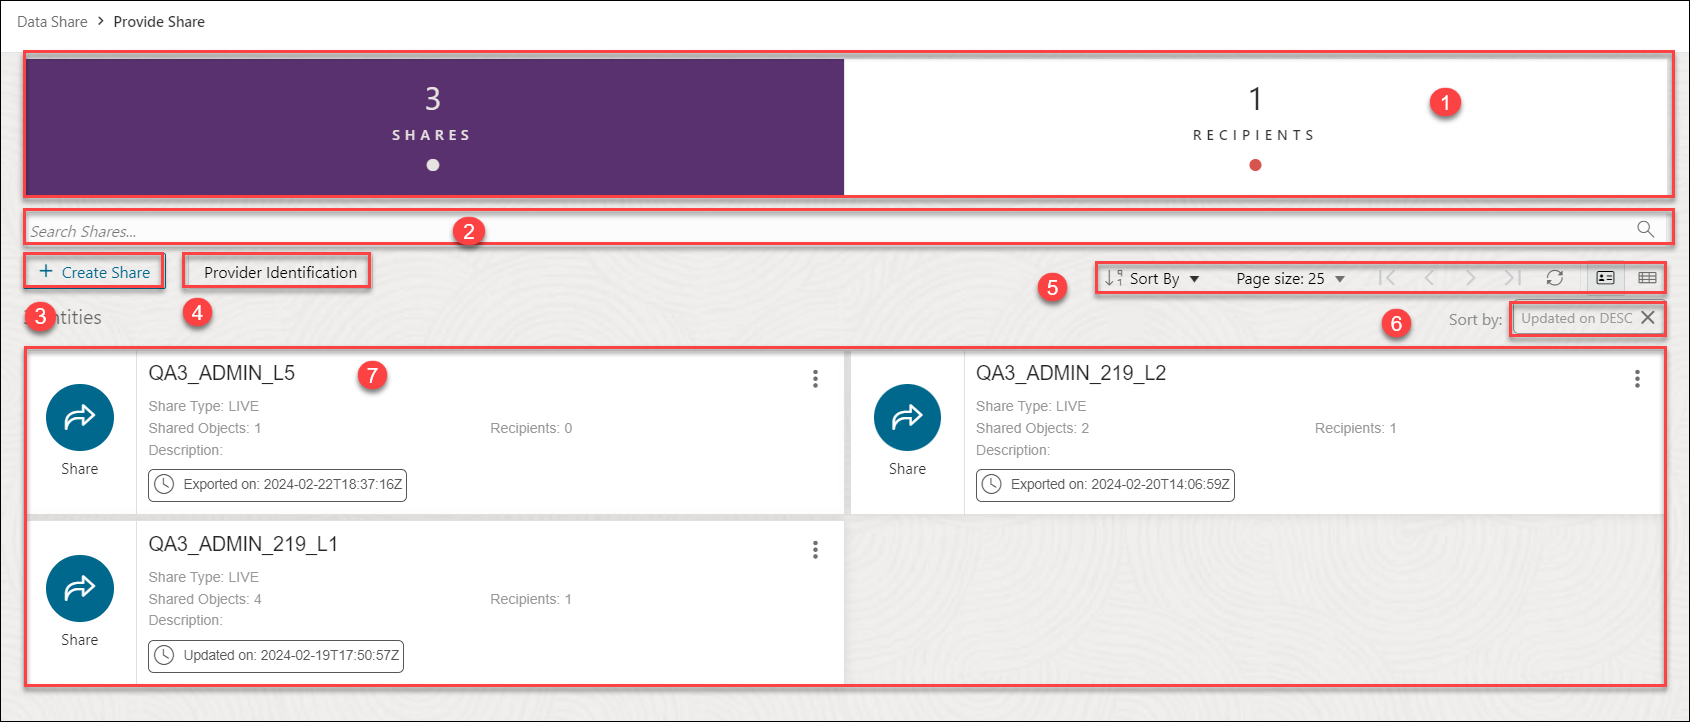
The following image displays the Provide Share page when you select the SHARES widget.
Description of the illustration provide-share-smtp.png
- The top section of the Provide Share page displays Shares and Recipients section with two widgets. The widgets are defined in the following sections:
- SHARES- Select this widget to view, search and perform actions on the Shares you create.
- RECIPIENTS- Select this widget to view, search and perform actions on the Share Recipients you create.
- Search Shares field
Selecting Shares widget enables you to search for the share you create. You can click the field and type or paste the name of the share or the recipient you are looking for. Click the magnifier icon to return the search input. Click X to clear your searches in the Search Shares field.
- + Create Share button
You can use the Create Share wizard to define data shares based on object storage data and associate them with recipients. A single data share can consist of multiple shared objects that are shared with one or multiple recipients.
You can create a new share and a new recipient from this button. Refer to the Provide Live Share, Provide Versioned Share and Create Share Recipients section to explore more on what each button does.
- Provider Identification button : See Access and Enable the Data Share tool to view more about this icon for a first time user. If you have already configured SMTP, you can edit the Provider ID or set SMTP using this button.
- Toolbar
The toolbar consists of the following buttons:
- Sort By
To select sorting values, click the Sort By button to open the list of options. Then click the Ascending or Descending icon next to one or more of the sorting values.
For example, if you select the Ascending icon next to Entity name and the Descending icon next to Entity type, the entities will be sorted in alphabetical order by entity name and then in reverse alphabetical order by entity type.
Click Reset in the list to clear the choices in the list.
The sorting values you choose are listed next to the Sort by label beneath the toolbar. Click the X icon on a sorting value to remove it.
- Page size
By default, up to 25 entities are displayed on the page. If you want more entities on a page, select a number from this list.
- Previous and Next
If the search results are displayed on multiple pages, click these buttons to navigate through the pages.
- Refresh
Click to refresh the entities shown on the page, based on the current search string.
- Entity view options
Choose one of these three options to set how entities are displayed on the page.
Click Open Card view to display entities as card arranged into one or two columns; click Open Grid View to display entities as rows in a table; or click Open List View to display entities in a single column of panels.
- Sort By
- Sort by settings
When you set sorting values by using the Sort By control in the toolbar, the settings are displayed in small boxes beneath the toolbar. You can delete a setting by clicking the X icon in the box. Or you can change the settings by returning to the Sort By control in the toolbar.
- Display area
The area below the Search field displays the entities returned by a search. If you select the Shares widget, you will view the Share entities in the display area. If you select the Recipient widget, you will view the Share Recipient entities in the display area. This area shows all providers you are subscribed to.
Recipients Page
The following image displays the Provide Share page when you select the RECIPIENTS widget and there is no RECIPIENT created
Click + Create Share Recipient to create a share recipient. See Create Share Recipient for more details.
Click Provider Identification to specify the name and description to identify how the recipients will view you. You can also configure SMTP settings.
The following image displays the Provide Share page when you select the RECIPIENTS widget and there is minimum one RECIPIENT already created

Description of the illustration provide-share-recipients-new1.png
- The top section of the Provide Share page displays Shares and Recipients section with two widgets. The widgets are defined in the following sections:
- SHARES- Select this widget to view, search and perform actions on the Shares you create.
- RECIPIENTS- Select this widget to view, search and perform actions on the Share Recipients you create.
- Search Recipients field
Searching for a share or recipient depends on the widget you select from the Shares and Recipients section. If you select the Recipients widget, you can search for the recipients you create. You can click the field and type or paste the name of the share or the recipient you are looking for. Click the magnifier icon to return the search input. Click X to clear your searches in the Search Shares or Search Recipients field.
- + Create Recipient button
You can create a new share and a new recipient from this button. Refer to the Provide Live Share, Provide Versioned Share and Create Share Recipients section to explore more on what each button does.
- Provider Identification button: See Access and Enable the Data Share tool to view more about this icon for a first time user. If you have already configured SMTP, you can edit the Provider ID or set SMTP using this button.
- Toolbar
The toolbar consists of the following buttons:
- Sort By
To select sorting values, click the Sort By button to open the list of options. Then click the Ascending or Descending icon next to one or more of the sorting values.
For example, if you select the Ascending icon next to Entity name and the Descending icon next to Entity type, the entities will be sorted in alphabetical order by entity name and then in reverse alphabetical order by entity type.
Click Reset in the list to clear the choices in the list.
The sorting values you choose are listed next to the Sort by label beneath the toolbar. Click the X icon on a sorting value to remove it.
- Page size
By default, up to 25 entities are displayed on the page. If you want more entities on a page, select a number from this list.
- Previous and Next
If the search results are displayed on multiple pages, click these buttons to navigate through the pages.
- Refresh
Click to refresh the entities shown on the page, based on the current search string.
- Entity view options
Choose one of these three options to set how entities are displayed on the page.
Click Open Card view to display entities as card arranged into one or two columns; click Open Grid View to display entities as rows in a table; or click Open List View to display entities in a single column of panels.
- Sort By
- Sort by settings
When you set sorting values by using the Sort By control in the toolbar, the settings are displayed in small boxes beneath the toolbar. You can delete a setting by clicking the X icon in the box. Or you can change the settings by returning to the Sort By control in the toolbar.
- Display area
The area below the Search field displays the entities returned by a search. If you select the Shares widget, you will view the Share entities in the display area. If you select the Recipient widget, you will view the Share Recipient entities in the display area.
Parent topic: Provide Share
Provide Versioned Share
You can share data as a set of distinct versions, such as at the end of each day. The recipient will only see changes to the data when you publish a new version. As a versioned share Provider, you must create an OCI native credential and associate the bucket's URL with the credential.
On the Provide Share page, select + Create Share from the Create menu. This brings up the Create Share wizard.
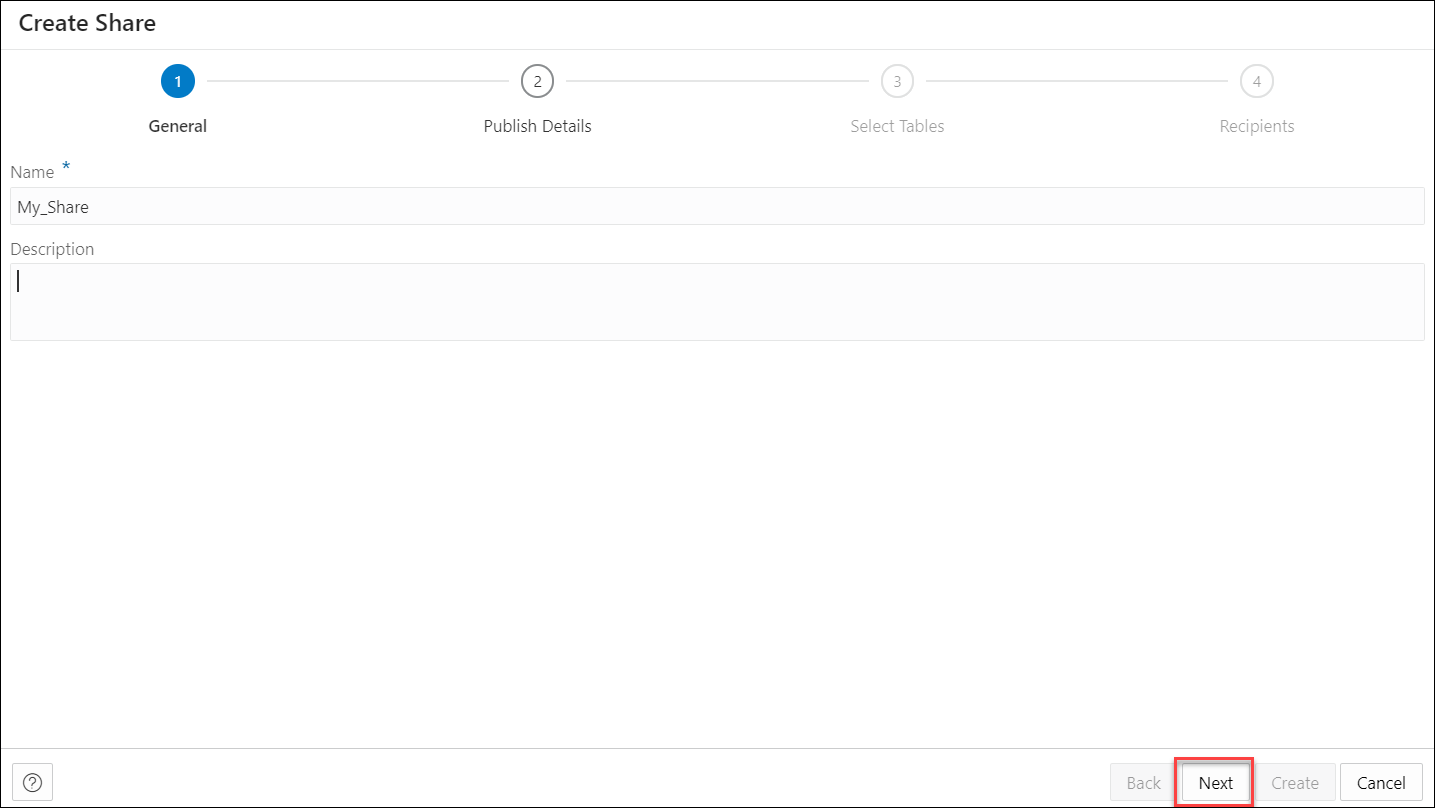
- On the Create Share wizard, in the Name field of the General tab, enter a name for the Share. For example: My_Share.
In the Description field, enter a description for the link. For example: Weekly Sales report.
Select Next to progress to the Publish Details tab of the Create Share wizard. You can alternatively click on the Publish Details tab to progress to the Publish Details screen of the wizard.
Description of the illustration create-share-general.png - In the Publish Details Tables tab of the wizard, select SHARE VERSIONS USING OBJECT STORAGE.
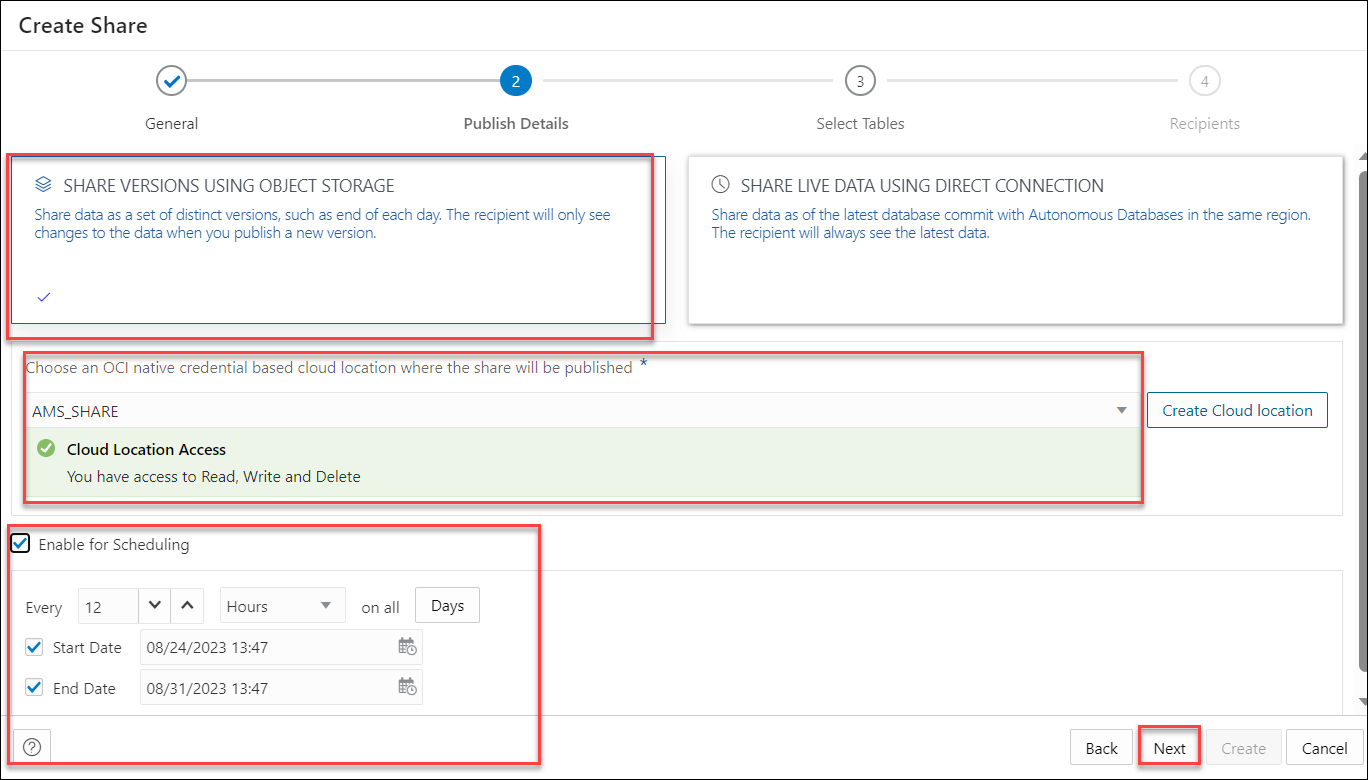
Description of the illustration publish-details-version.pngSelect a cloud location where you want the share to be published. If you already have an OCI cloud storage location available, use the Select Cloud location drop-down and select any available Cloud location from the drop-down. You will view a successful message if you have access to read, write, or delete in that cloud location.Note
Select Create Cloud location and follow the steps described in the Create Oracle Cloud Infrastructure Native Credentials if you do not have a cloud location available.For sharing versioned data, you can enable the schedule for share. Select Enable For Scheduling option to set up a schedule for sharing. In the time interval fields, enter a number, and select a time type and the days on which to poll the bucket for new or changed files. For example, to poll every two hours on Monday, Wednesday, and Friday, enter 2, select Hours, and then select Monday, Wednesday, Friday in the appropriate fields. You can select All Days, Monday to Friday, Sunday to Thursday, or Custom from the Week Days drop-down. The Custom field enables you to select Monday, Tuesday, Wednesday, Thursday and Friday in the appropriate fields.
Select a start and end date. If you don't select a start date, the current time and date are used as the start date. The end date is optional. However, without an end date, the share will continue to poll. This is an optional step.
Click Next to progress to the Select Tables tab of the Create Share wizard.
- On the Select Tables tab of the wizard, select the schema from the drop-down menu and click the table you wish to share from the Available Tables. Choose any of the available options:
- >: This option enables you to move the table to Shared Tables.
- <: To remove the selected table from Shared Tables select this option.
- >>: This option allows you to move all the tables to the Shared Tables screen.
- <<: To remove all the selected tables from Shared Tables select this option.
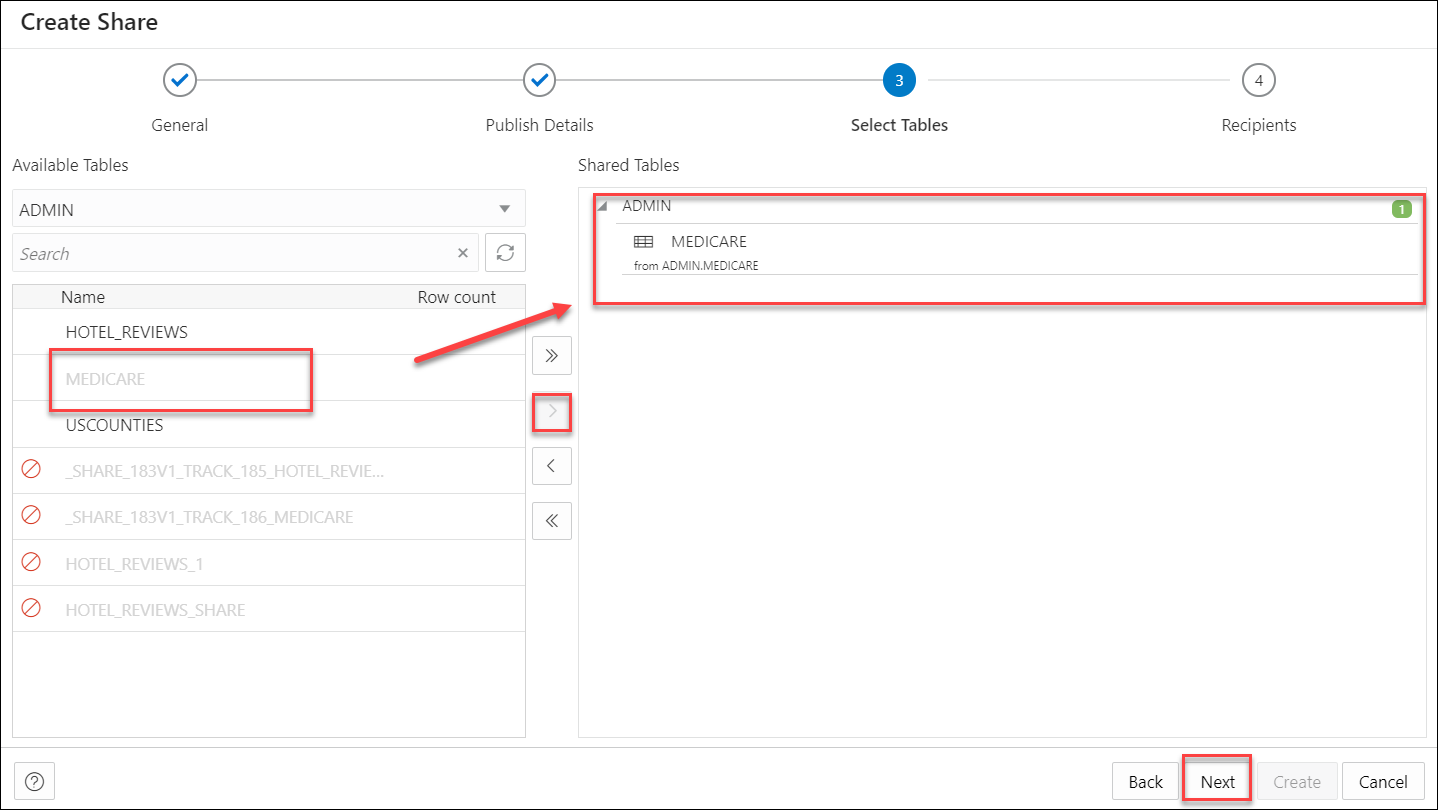
Description of the illustration create-share-select-tables.pngClick Next to proceed to the Recipients tab of the Create Share wizard.Note
You may find it convenient to click on the specific tab to move back and forth. You can update changes on any screen this way. - On the Recipients tab of the Create Share wizard, select available Recipient from the drop-down.
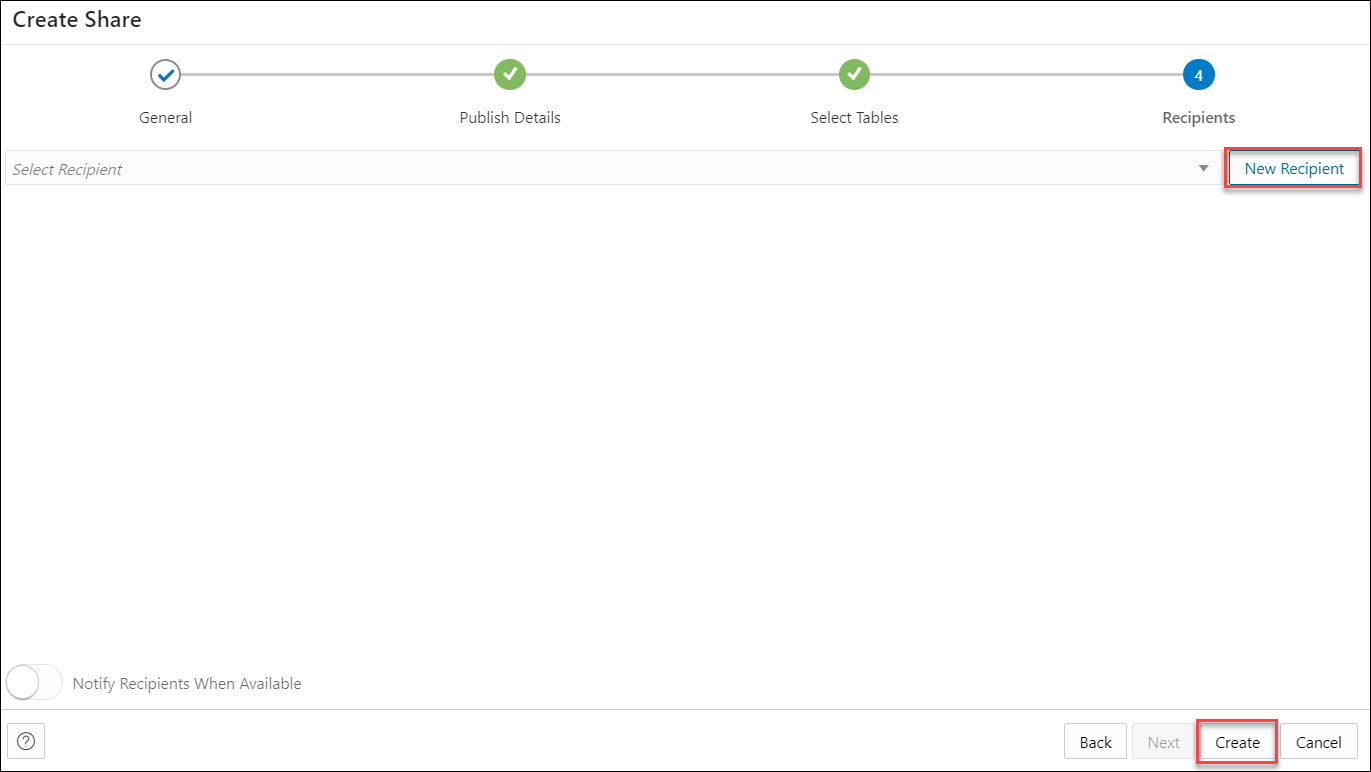
Description of the illustration recipients-version.pngSelect Notify Recipients When Available when you want to notify the recipients when they are available. This can be enabled when SMTP is configured to send an email notification to the recipient.
- In case you want to create a new recipient, select New Recipient. Selecting New Recipient opens a Create Share Recipient wizard. See Create Share Recipient.
Note
Ensure there are no spaces in the name of the recipient. This field does not support duplicate recipient names. If you try creating a recipient with a duplicate name, the creation of the share fails with the "Name is already used by an existing object" error.Click Create to finish creating the share recipient. The newly added recipient is displayed in the list of recipients. Click Cancel to cancel the ongoing process of recipient creation.
- After you create a new share recipient, in the granted recipient's list you can:
- Select copy profile activation link to clipboard icon to copy the activation link.
- Select Email recipient profile download link icon to mail the profile link to the recipient you select in this step. Once you select it, the Share tool triggers an activation mail with the profile link to the recipient’s email address. Click Send to share the profile link with the recipient. See About the Consume Share Page to know more about the activation mail and how to proceed as a recipient once you receive the activation mail.
- Click deselect Recipient icon to remove the selected recipient.
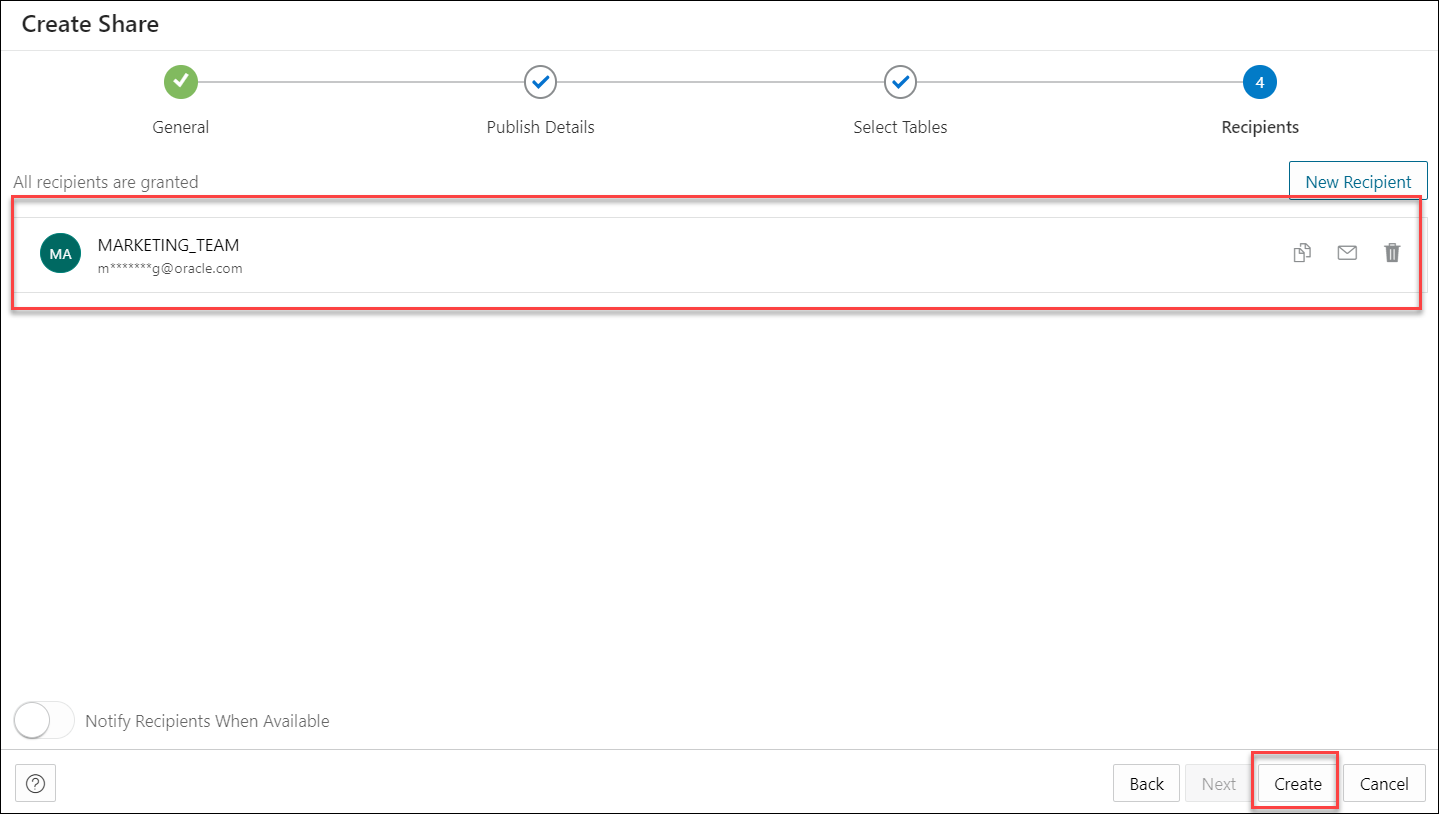
Description of the illustration new-recipient.png
Select Create to create the share. Note that the status of the share changes from unpublished to published depending on the size of the table in the share. You will receive a successful share notification message at the top right of the display that says the share is successful. The Provide Share page displays the share along with its details such as the entity type, owner, shared objects and the recipients.
Note
The Data Share tool can create only two delta share profiles for the same recipient. If you try to create a third profile, the tool invalidates the first profile, and the newly created profile becomes active.
A versioned share will show different colors and states depending upon what state the share is in.
Parent topic: Provide Share
Provide Live Share
You can share data as of the latest database commit with Autonomous Databases in the same region. The recipient will always see the latest data.
To provide access to live shared data, you must define data shares and grant recipients access to consume them. Use the Create Share wizard to create and publish shares for live data.
- On the Create Share wizard, in the Name field of the General tab, enter a name for the Share. For example: My_Share.
In the Description field, enter a description for the data you are sharing. For example: Weekly Sales report.
Select Next to progress to the Publish Details tab of the Create Share wizard. You can alternatively click on the Publish Details tab to progress to the Publish Details screen of the wizard.
- In the Publish Details Tables tab of the wizard, select SHARE LIVE DATA USING DIRECT CONNECTION.
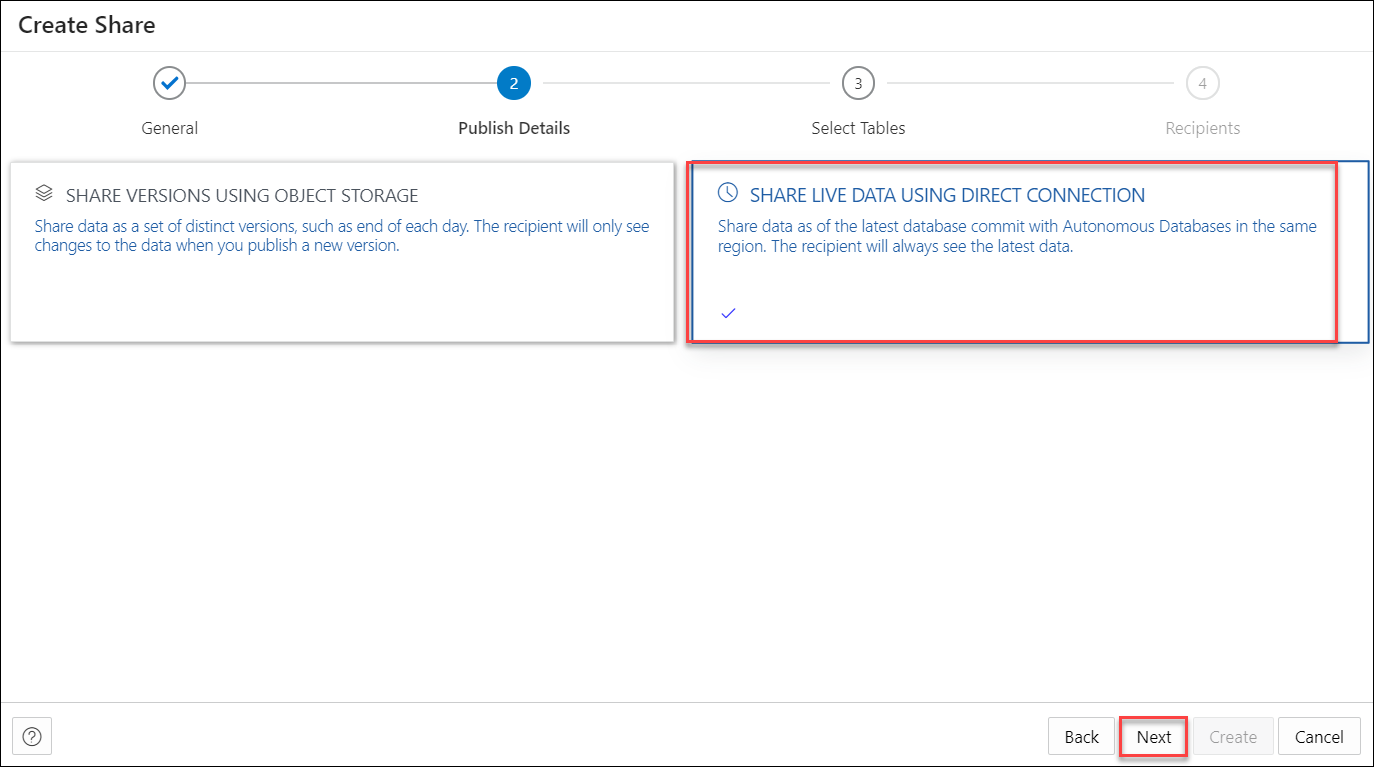
Description of the illustration publish-details-live.pngClick Next to progress to the Select Tables tab of the Create Share wizard.
- On the Select Tables tab of the wizard, select the schema from the drop-down menu and click the table you wish to share from the Available Tables. Choose any of the available options:
- >: This option enables you to move the table to Shared Tables.
- <: To remove the selected table from Shared Tables select this option.
- >>: This option allows you to move all the tables to the Shared Tables screen.
- <<: To remove all the selected tables from Shared Tables select this option.
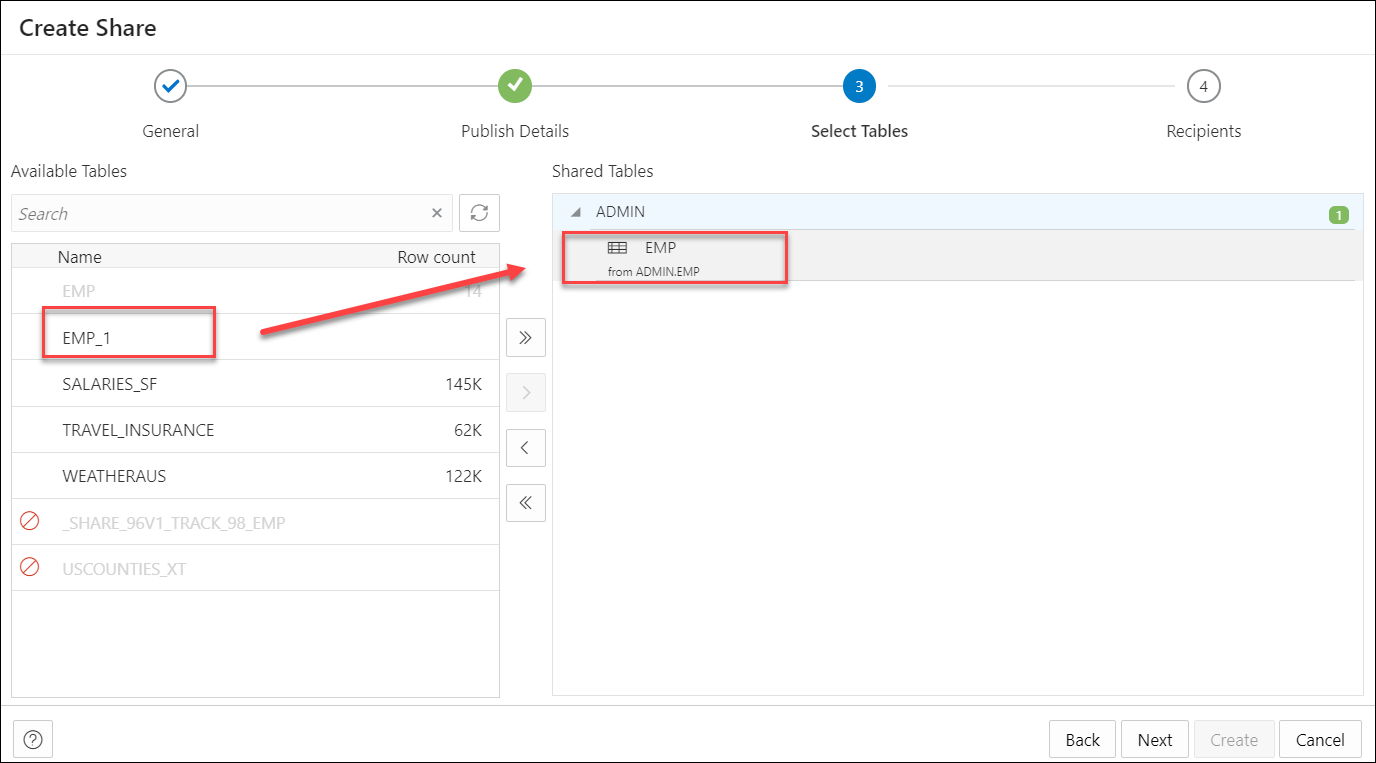
Description of the illustration select-tables-live.pngNote
If a live share data provider is sharing multiple tables which would normally be joined together, it is recommended that the producer create a view that performs the joins and then only shares the view.Click Next to proceed to the Recipients tab of the Create Share wizard.Note
You may find it convenient to click on the specific tab to move back and forth. You can update changes on any screen this way. - On the Recipients tab of the Create Share wizard, select available Recipients from the drop-down. The list of recipients available in the drop-down depends on the scope of the share. You can select any or all the following values depending on with whom you intend to share the data:
- MY_REGION: Access to the data share is allowed for databases in the same region as the data share provider.
- MY_TENANCY: Access to the data share is allowed for databases in the same tenancy as the data share provider.
- MY_COMPARTMENT: Access to the data share is allowed for databases in the same compartment as the data share provider.
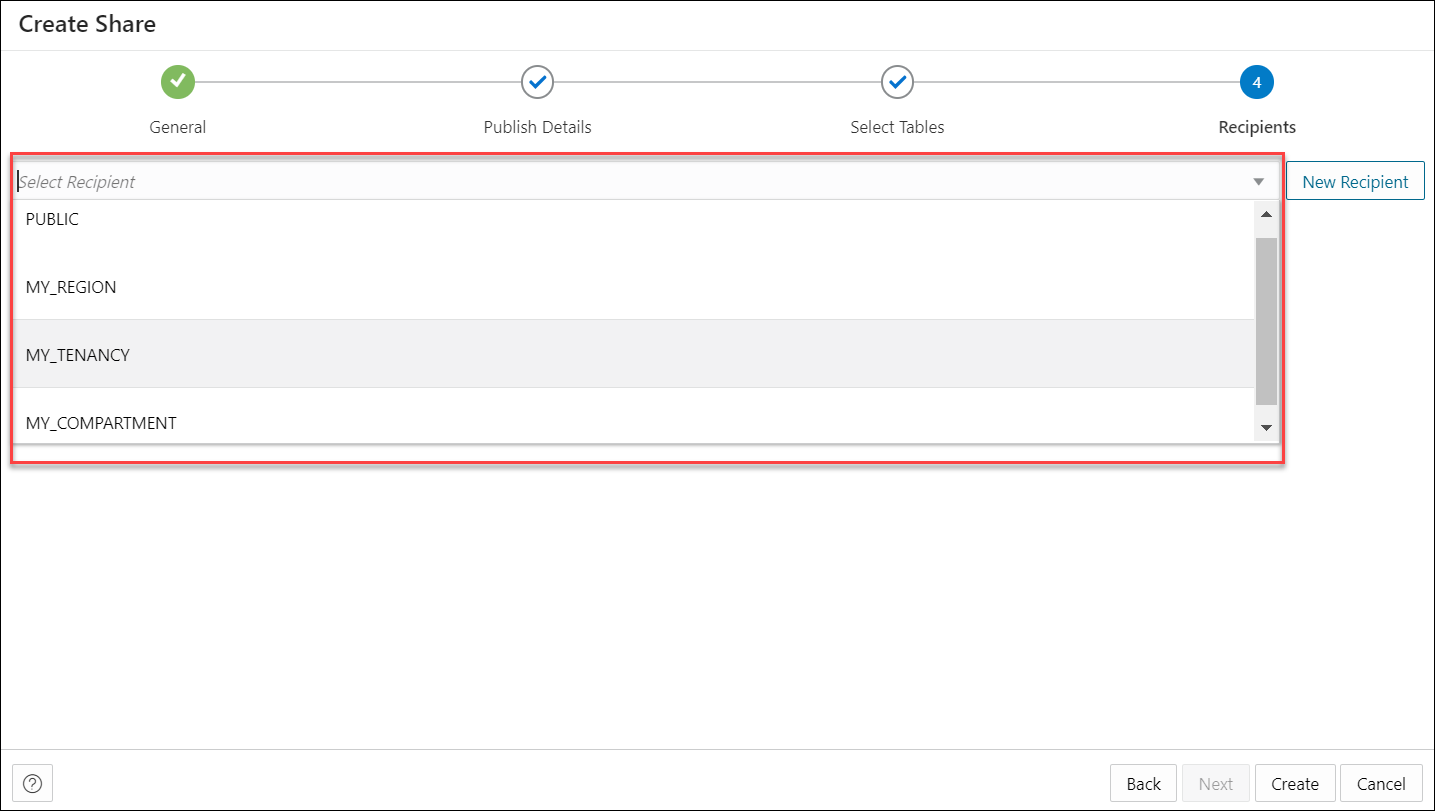
Description of the illustration recipients-tab.png - In case you want to create a new recipient, select New Recipient. Selecting New Recipient opens a Create Share Recipient wizard. Enter the recipient's Name, Description (optional), Sharing ID, Email in their respective fields.
Note
- Ensure there are no spaces in the name of the recipient. This field does not support duplicate recipient names. If you try creating a recipient with a duplicate name, the creation of the share fails with the "Name is already used by an existing object" error.
- A Sharing ID is a unique provider for your Autonomous Database. The Data Share tool uses it to share data with you. Copy the Sharing ID from the Consume Share page to the clipboard and paste it in the Sharing ID field of the Create Share Recipient wizard.
Click Create to finish creating the share recipient. The newly added recipient is displayed in the list of recipients. Click Cancel to cancel the ongoing process of recipient creation.
-
Select Create to create the share. You will receive a successful share notification message at the top right of the display that says the share is successful. The Provide Share page displays the share along with its details such as the entity type, owner, shared objects and the recipients.

Description of the illustration new-share.png
Click the name of the entity or click Action to view details about the share entity. See View Share Entity Details.
After share is created, you can view the new Share entity in the Provide Share page.
Parent topic: Provide Share
View Share Entity Details
To view details about an entity, click the Actions icon at the right of the Share entity entry, then click View Details.
For all entities, the details include General, Selected Tables, Publishing details, Recipients, Versions, Log Details, Lineage and Impact sections.
General
The General tab displays the Name and description of the share.
Selected Tables
The Selected Tables tab displays the list of tables you wish to share.
Publishing
This tab displays the publishing details you configure during creation of the share. It displays whether you select live data share or share versioned data.
Recipients
You can review the list of recipients with whom you intend to share objects. It displays the name of the recipient with their mail address.
Jobs
See the Jobs option below to view information about it.
Log Details
You can view the detailed status of the share in this tab. It provides information such as, the time, Status, Log Level, and Details of each activity that takes place during the running of the job, i.e., creation of the share. It also displays if any errors are encountered during the creation of the share.
Lineage
Lineage displays all known information about the dependencies of the entity, and therefore how the entity was created and how it is linked to other entities.
For example, for a share you create in the database, the lineage is just the cloud location. For a share that you create by adding files from cloud storage, the lineage includes the cloud location of the file you share.
Pointing to the name of an item in the lineage displays the share name, the application that creates it, the type of entity, the path to it, and the schema it is in.
Arrows point from an entity to the entity that it derives from. For example, for a share you create, an arrow points from the cloud location to the share. If you point to an arrow, then a Links Information box appears that shows information about the relationship between the two entities.
To view more details about an item, click the Actions icon for the item, then click Expand. For a cloud location, the files in the location are displayed. Pointing to the name of the file displays the name, application, type, path, and schema of the file. To collapse the display, click the Actions icon, then click Collapse.
Impact
Impact shows all known information about the downstream use of an entity, and therefore how a change in the definition of an entity may affect other entities that depend on it.
For a specific share entity, you can perform the following actions using the Actions context menu:
- View Details: See View Share Entity Details.
- Objects: Opens Select Tables dialog of the specific share where you can remove tables from the list of Shared Tables list or add tables from the list of Available Tables list to the list of Shared Tables.
- Recipients and Profiles: Opens the Recipients and Profiles dialog which enables you to create a new share recipient. You can also revoke the recipient right from the share by clicking X next to the recipient name. The Recipients and Profiles dialog enables you to update the list of recipients, copy profile activation link, send an activation mail to the selected recipient.
- Jobs: Opens the Jobs table and displays information related to it. A job is created whenever something needs to happen to a share. This includes the following:
- PUBLISH VERSIONED SHARE
- PUBLISH LIVE SHARE
- DROP SHARE VERSIONS
Only one job can run at a time on a single share. E.g. if the user calls
publish_sharewhile aPUBLISHjob is already running, then the second job will have to wait. TheSTATUScolumn reflects the same.The
JOB TYPEcolumn displays the method of parquet files generation (only for a versioned share). It's values can beODIorDBMS_CLOUD. - Publish: Select Publish to publish the updated share.
- Unpublish: Select Unpublish to unpublish the share. This option prevents all recipients from accessing a single share, but lets them continue to access any other shares. You can restore access by publishing share again.
- Delete: Deletes the Share Provider Entity.
Parent topic: Provide Share
Create Share Recipient
On the Provide Shares page, click the Recipients widget and select + Create Recipient to create a new Share Recipient.
Share Recipients are those with whom we intend to share objects with. You can share objects securely with users outside of Oracle workspace. Apart from creating recipients from the Create Share wizard, you can also create a share recipient from the Create Recipient icon on the Provide Share page and verify the details you configure while its creation.
- On clicking the + Create Recipient icon, a Create Share Recipient dialog box appears.
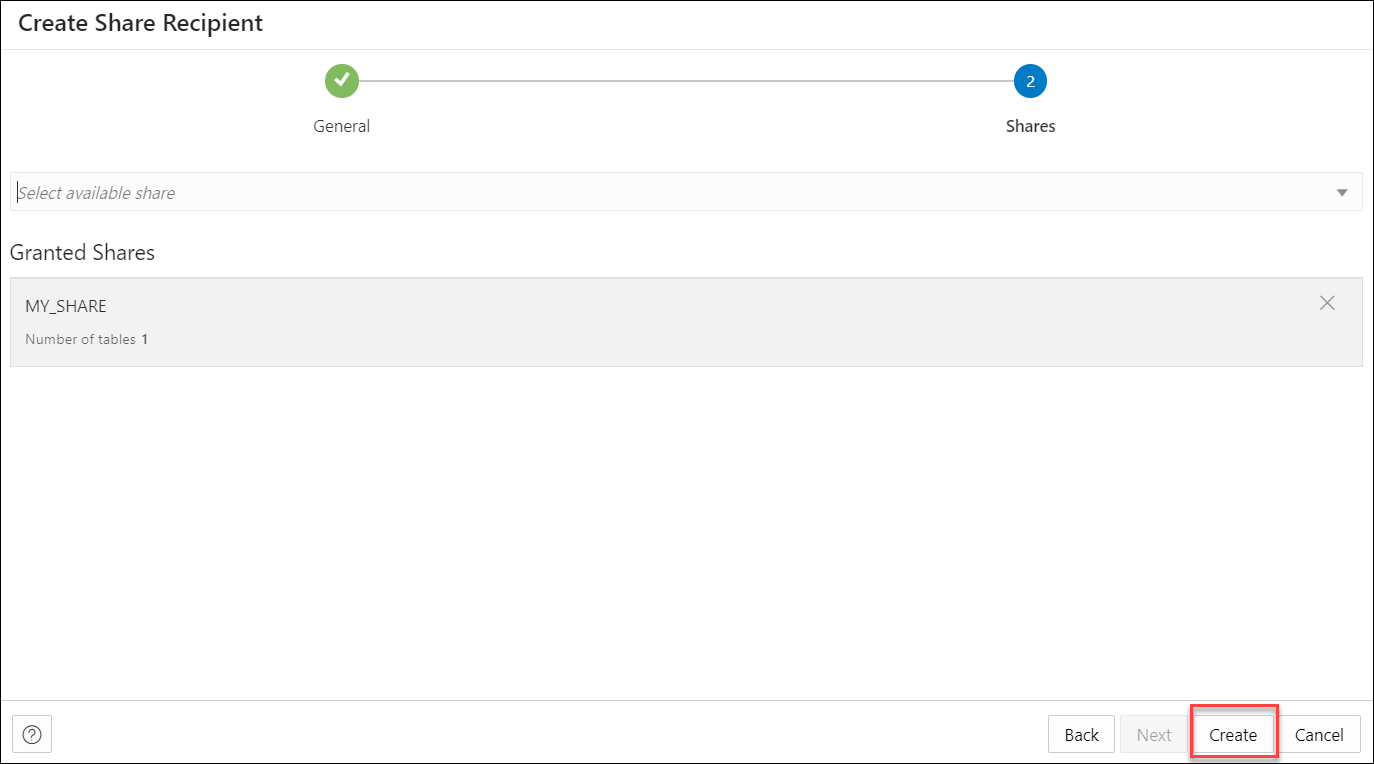
Description of the illustration create-share-recipients-new.png - On the General tab, specify the following fields:
- Name: Enter the name of the Share Recipient. For example, Marketing_team.Note
Ensure there are no spaces in the name of the recipient. This field does not support duplicate recipient names. If you try creating a recipient with a duplicate name, the creation of the share fails with the "Name is already used by an existing object" error. - Email: Enter the email ID of the recipient. For example, marketing@oracle.com.
- Description: Add a description. This is optional.
- Sharing ID: An intended Recipient should copy this ID from the consumer page and send it to the Producer to be used here. The Share Provider wont have access to the consumer page. This field is required for Live Share Recipients only.
On the User token lifetime section, enter any value in the
TOKEN_LIFETIMEfield for the share recipient. This property specifies for how long the generated token will be valid after which the recipient loses access to the data share and must request a new token. Enter 60 in the first text field. Select Minutes from the drop-down menu.
Click Next to progress to the Shares tab of the Create Share Recipient dialog box.
- Name: Enter the name of the Share Recipient. For example, Marketing_team.
- On the Shares tab, select an available share from the drop-down. As you select the share, it lists under the Granted Shares section. You have the choice to share multiple shares to the recipient.
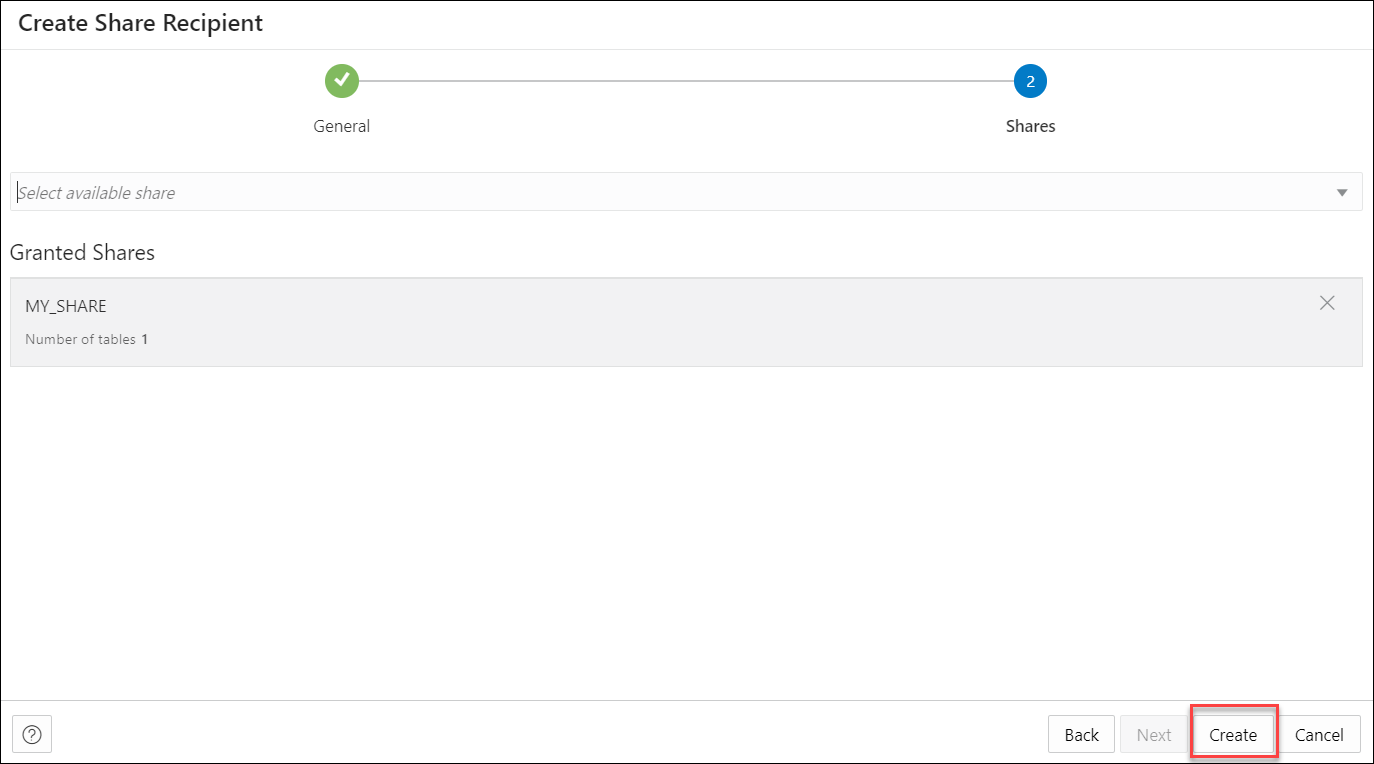
Description of the illustration create-share-recipients-shares-new.pngSelect Create to create the Share recipient.
Once you have created the Share recipient, you will be able to view the newly created Share Recipient entity in the display area of the Provide Share page. The new recipient card displays details such as the entity type and the owner.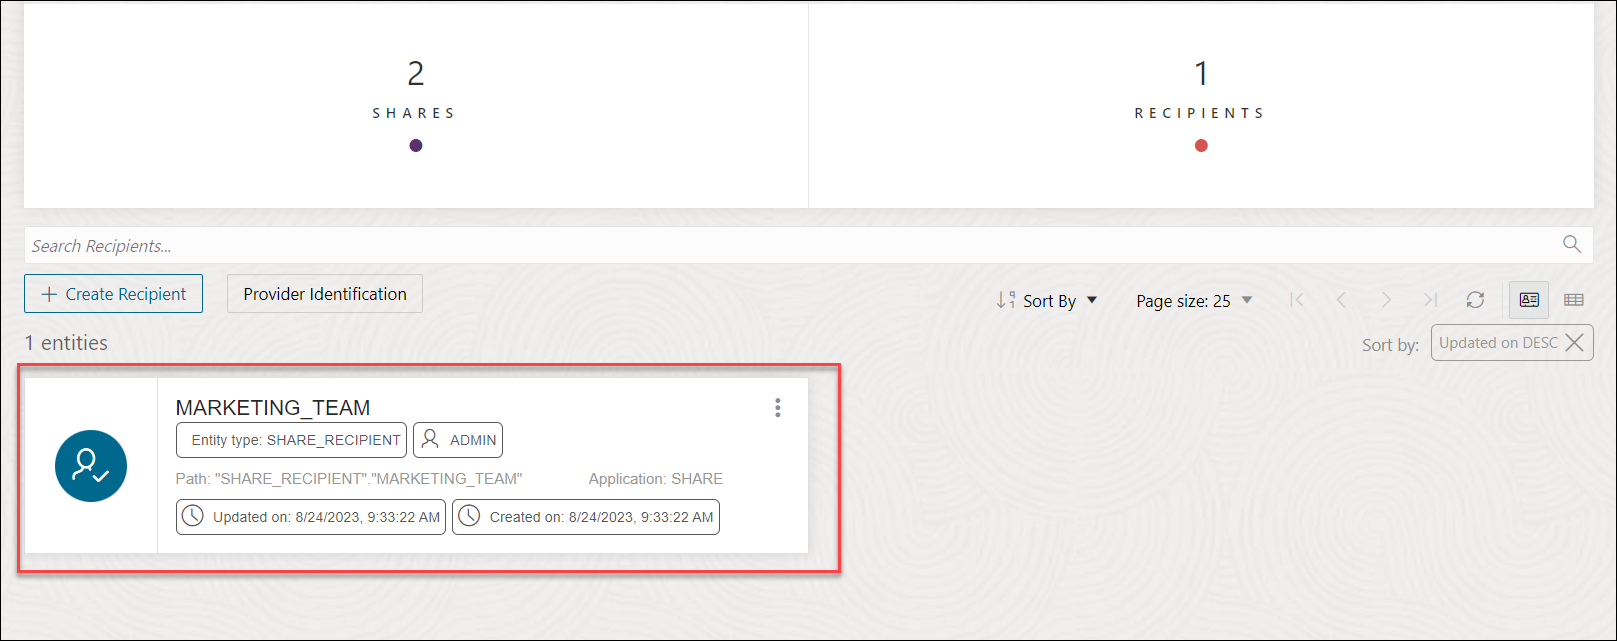
Description of the illustration new-share-recipient.png
Click the name of the entity or click Action to view details about the share recipient entity. See View Share Recipient Entity Details.
Parent topic: Provide Share
View Share Recipient Entity Details
Click the Actions icon at the right of the Share Recipient entity entry, then click View Details.
For all entities, the details include general details, Log details, Granted Shares, Lineage and Impact.
General
The General tab displays the Name and Email address of the Share Recipient.
Granted Shares
The Granted Shares tab displays the list of shares granted to the recipient.
Log Details
The Log details tab displays the Time, Status, Log Level, Share Name, Request, End Point, Remote address, User Agent and Details of the Recipient.
Lineage
Lineage displays all known information about the dependencies of the entity, and therefore how the entity was created and how it is linked to other entities.
For example, for a share you publish, the lineage includes the files in cloud storage along with the cloud location of the files you share.
To view more details about an item, click the Actions icon for the item, then click Expand. For a cloud location, the files in the location are displayed. Pointing to the name of the file displays the name, application, type, path, and schema of the file. To collapse the display, click the Actions icon, then click Collapse.
Impact
Impact shows all known information about the downstream use of an entity, and therefore how a change in the definition of an entity may affect other entities that depend on it.
- View Details: See View Share Recipient Entity Details.
- Granted Share: Opens Manage Granted Shares dialog where you can grant access to a share from list of available shares or you can revoke access from the current selection of share.
- Get Bearer Token: Opens an Auth Token dialog to authenticate the recipient. Use this option when your token expires. This enables you to generate a new token. A Bearer Token is part of the JSON file.
- Send Activation Mail: Opens the mail with the profile link.
- Copy Profile Activation Link to Clipboard: Copies the JSON profile activation link to clipboard.
- Rename: Select this option to rename the Recipient.
- Delete: Select this option to delete the recipient you created entirely. By doing so, access to all shares will end instantly and any existing delta credentials will become invalid.
Parent topic: Provide Share

