Free Tier: Install Node Express on an Oracle Linux Instance
In this tutorial, you use an Oracle Cloud Infrastructure Free Tier account to set up an Oracle Linux compute instance. Then, you install a Node Express application and access your new app from the internet. Finally, this tutorial covers all the steps necessary to set up a virtual network for your host and connect the host to the internet.
Key tasks include how to:
- Set up a compartment for your development work.
- Install your Oracle Linux instance and connect it to your Virtual Cloud Network
(VCN).
- Set up an Oracle Cloud Infrastructure virtual cloud network and related network services required for your host to connect to the internet.
- Set up
sshencryption keys to access your Oracle Linux Server.
- Configure ingress rules for your VCN.
- Configure NodeJS with an Express framework on your instance.
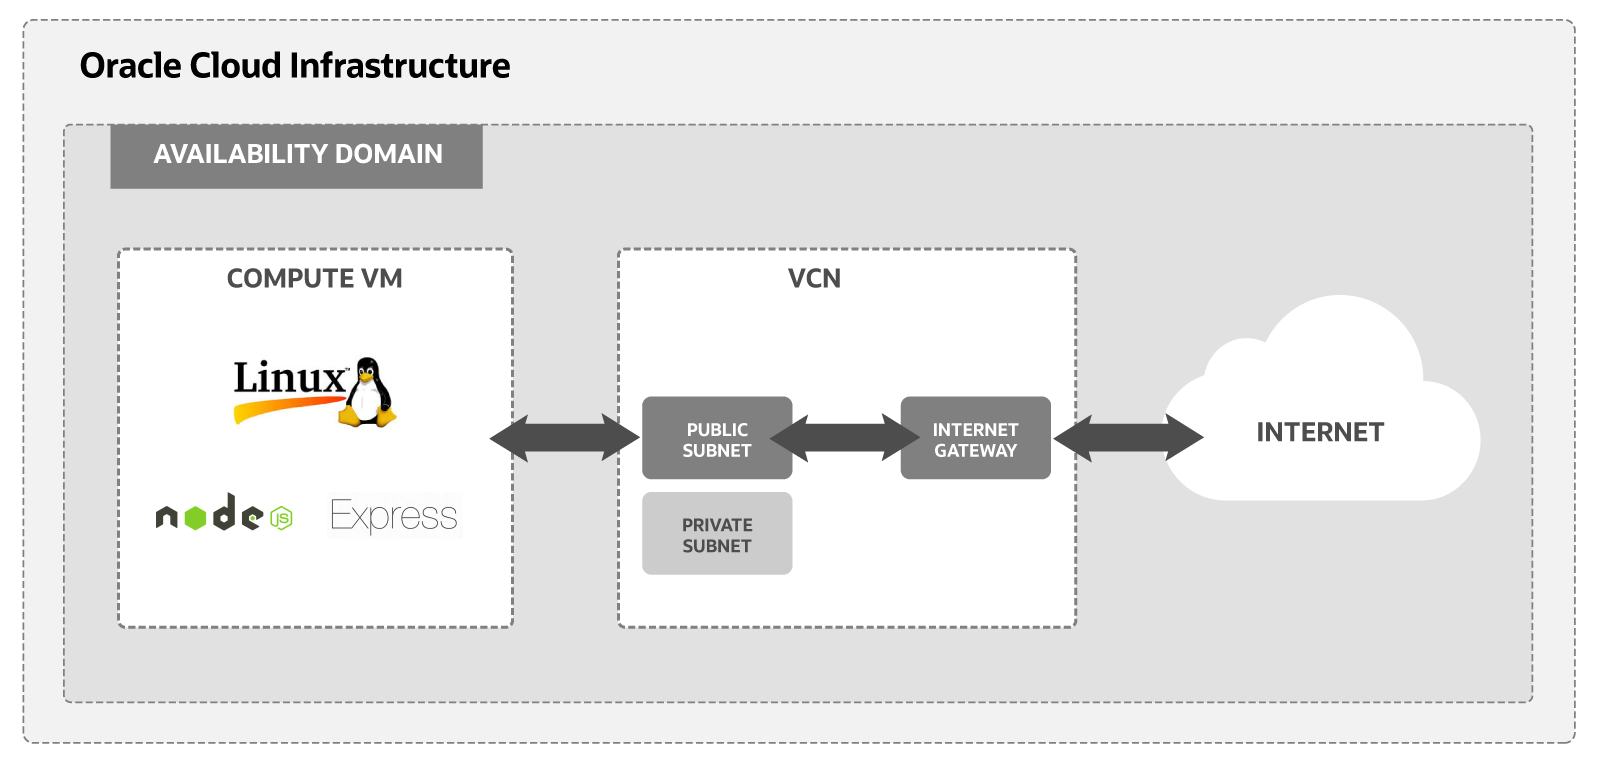
Here is a simplified diagram of the setup for your Linux instance.
For additional information, see:
Before You Begin
To successfully complete this tutorial, you must have the following:
Requirements
- An Oracle Cloud Infrastructure Free Tier account. Oracle Cloud Infrastructure Free Tier.
- A MacOS, Linux, or Windows computer with
sshsupport installed.
1. Set up a Compartment for Development
Configure a compartment for your development.
Create a compartment for the resources that you create in this tutorial.
- Sign in to the Oracle Cloud Infrastructure Console.
- Open the navigation menu and click Identity & Security. Under Identity, click Compartments.
- Click Create Compartment.
- Fill in the following information:
- Name:
<your-compartment-name> - Description:
Compartment for <your-description>. - Parent Compartment:
<your-tenancy>(root)
- Name:
- Click Create Compartment.
Reference: Create a compartment
2. Install a Virtual Cloud Network
Use the Start VCN Wizard workflow to create a new Virtual Cloud Network (VCN).
The workflow does several things when installing the VCN:
- Creates a VCN.
- Adds an Internet Gateway which enables internet connections.
- Creates and configures public and private subnets for the VCN.
- Sets up route tables and security lists for the subnets.
For more information on VCNs, see: VCN and Subnet Management.
To create a VCN, follow these steps:
The steps provided are for a Free Tier account. If you are using a paid account, the steps might differ from those shown here.
- Open the navigation menu , select Networking, and then select Virtual cloud networks.
- If needed, select your compartment from the Compartment control in the left navigation.
- Click Start VCN Wizard.
- Select Create VCN with Internet Connectivity.
- Click Start VCN Wizard.
- Configure the VCN. The configure dialog contains the following sections.
Basic Information
Enter the VCN Name and select a Compartment.
- Name:
<name-for-the-vcn>Enter a name for your VCN. Avoid entering confidential information.
- Compartment:
<your-compartment-name>Select your compartment.
Configure VCN
- Keep the default values for VCN IPv4 CIDR block and DNS resolution.
Configure public subnet
- Keep the default values for IP address type and IPv4 CIDR block.
Configure private subnet
- Keep the default values for IP address type and IPv4 CIDR block.
- Name:
- Click Next.
- Review you selections. Click Previous to go back and make changes.
- Click Create to create the VCN.
The system creates the VCN and all its resources. This might take a moment.
Once the creation is complete, click View VCN to see your new VCN.
3. Install an Oracle Linux Instance
Use the Create a VM Instance workflow to create a new compute instance.
The workflow does several things when installing the instance:
- Creates and installs a compute instance running Oracle Linux.
- Select your VCN and public subnet to connect the Oracle Linux instance to the internet.
- Creates an
sshkey pair you use to connect to the instance.
To get started installing an instance with the Create a VM instance workflow, follow these steps:
The steps provided are for a Free Tier account. If you are using a paid account, the steps might differ from those shown here.
- Open the navigation menu and select Compute. Under Compute, select Instances.
- Click Create Instance.
The Create compute instance page is displayed.
- Choose the Name and Compartment.
Initial Options
- Name:
<name-for-the-instance>Enter a name for your instance. Avoid entering confidential information.
- Create in compartment:
<your-compartment-name>Select your compartment. Use the compartment created in the preceding step.
- Name:
- Review the Placement settings.
- Take the default values. An availability domain is assigned to you.
The default values are similar to the following:
- Availability domain: AD-1
- Capacity type: On-demand capacity
- Fault domain: Let Oracle choose the best fault domain
Note
For Free Tier, use the Always Free Eligible option for availability domain. - Review the Security settings.
- Take the default settings.
The default values are similar to the following:
- Shielded instance: Disabled
- Confidential computing: Disabled
- Review the Image and shape settings. Click Edit.
Note
The following is sample data for an Ampere A1 virtual machine. The actual values might differ.- Keep the default Oracle Linux 8 image.
- Click Change Shape.
- Select Virtual Machine.
- For shape series select Ampere.
- Select VM.Standard.A1.Flex the "Always Free" shape.
- Select 1 OCPUs.
- Click Select Shape.
Selected values are similar to the following:
- Image: Oracle Linux 8
- Image build:
<current-build-date> - Shape: VM.Standard.A1.Flex
- OCPU: 1
- Memory (GB): 6
- Network bandwidth (Gbps): 1
Note
For Free Tier, use Always Free Eligible shape options. - Review the Networking settings. Select the VCN you created in the preceding step. The networking values are similar to the following:
- Virtual cloud network: <your-vcn>
- Subnet: <pubic-subnet-for-your-vcn>
- Launch options: -
- DNS record: Yes
- Use network security groups to control traffic: No
- Assign a public IPv4 address: Yes
- Private IPv4 address: Automatically assigned on creation
- IPv6 address: Not available
- Review the Add SSH keys settings. Take the default values provided by the workflow.
- Select the Generate a key pair for me option.
- Click Save Private Key and Save Public Key to save the private and public SSH keys for this compute instance.
If you want to use your own SSH keys, select one of the options to provide your public key.
Note
Put your private and public key files in a safe location. You can't retrieve keys again after the compute instance has been created. - Review the Boot volume settings.
Select the Use in-transit encryption setting. Leave the other two settings blank.
- Review the Block Volume settings. Take the default values provided by the workflow which does not select any block volumes. You can add block volumes later.
- Click Create to create the instance. Provisioning the system might take several minutes.
You have successfully created an Oracle Linux instance to run an Apache Web Server.
4. Enable Internet Access
The Create a VM Instance wizard automatically creates a VCN for your instance. You add an ingress rule to your subnet to allow internet connections on port 3000.
Follow these steps to select your VCN's public subnet and add the ingress rule.
5. Create a Node Express Application
Next, set up an Express framework on your Oracle Linux instance and then create and run a NodeJS application.
Follow these steps to set up your instance and build your application:
You have successfully created a local NodeJS application in an Express framework, on an Oracle Cloud Infrastructure instance.
References:
For more information on Express, see:
What's Next
You have successfully installed and deployed a Node Express app on Oracle Cloud Infrastructure using a Linux instance.
To explore more information about development with Oracle products: