View and Manage the Visual Builder Instance

After creating the Visual Builder instance, you can view its details and manage it from the OCI Console.

  1. Open the OCI Console.
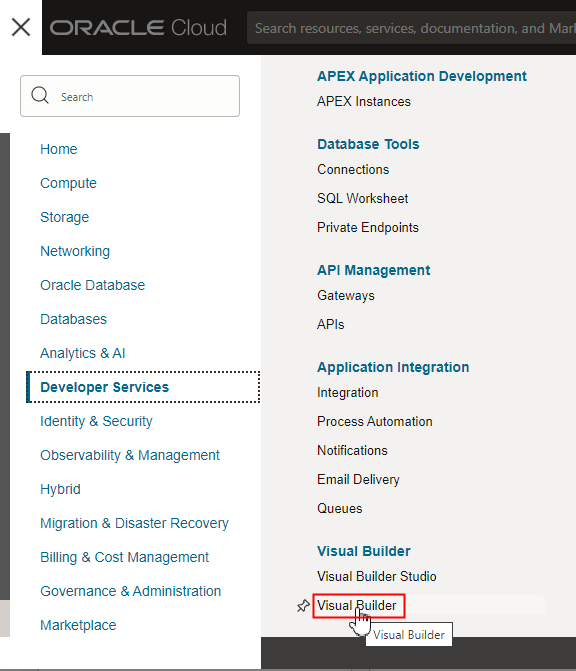
  2. In the upper-left corner, click Navigation Menu the Menu icon.
  3. Select Developer Services in the menu, then select Visual Builder in the list of services.
    Description of admin-console-visualbuilder.png follows

    If you want to change the region, you can use the dropdown list at the top of the page to select a different region.


    Description of admin-console-select-region.png follows

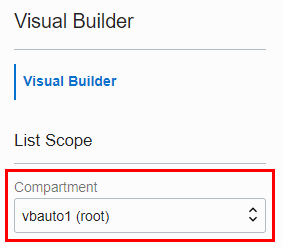
  4. From the Compartment drop-down list, select the Visual Builder instance's compartment.
    Description of admin-console-compartment.png follows

  5. Click the Visual Builder instance.

You can perform these actions from the instances page:

To do this ... Do this:
Open the Visual Builder homepage Click Service Homepage.
Start or stop an instance Start or Stop a Visual Builder Instance
Change the node count Scale a Visual Builder Instance
Configure a custom endpoint with the instance Map Your Custom Endpoint with Your Visual Builder Instance.
Add or edit tags Manage Tags
Download activity logs In the Activities section, click Action Three vertical dots and select Download Logs.
Download activity error logs In the Activities section, click Action Three vertical dots and select Download Errors.
Terminate an instance Terminate a Visual Builder Instance

Access Visual Builder from the OCI Console

If you haven't bookmarked the Visual Builder home page in your browser, you can access it from the OCI Console.

  1. Open the OCI Console.
  2. In the upper-left corner, click Navigation Menu the Menu icon.
  3. Select Developer Services and then select Visual Builder.
  4. From the Compartment drop-down list, select the compartment.
  5. In the table, click the name of the Visual Builder instance to open its Visual Builder Instance Details page.

    Description of admin-vbinstance-information.png follows

    The Visual Builder Instance Details page contains buttons to:

    • Open the Service Homepage,
    • Edit the instance details,
    • Start and stop the instance, and
    • Display a menu to access more actions.

    The Visual Builder Instance Information tab displays information about your instance, including:

    • Instance creation and last edit date,
    • Instance OCID,
    • Number of nodes,
    • Compartment,
    • NAT gateway IP for the VB service (and VB management, if needed), and
    • VCN OCID for the VB service (and VB management, if needed).
  6. Click Service Homepage.
    If prompted, enter your user credentials and click Sign In.
You land on the Visual Builder home page. For quick access, bookmark the home page in your browser.

Start or Stop a Visual Builder Instance

To save your billing cost, you can stop a Visual Builder instance. Billing is stopped for the duration that the instance is stopped and resumes when you start it. In the duration an instance is stopped, your organization's members can't access its applications.

Note

If the instance has more than one node, you'll need to edit the instance's details to set the number of nodes to '1' before you can stop the instance.
  1. Open the VB instance's details page.
  2. Click Start or Stop to start or stop an instance.
  3. Click Yes when prompted to confirm your selection.

Move a Visual Builder Instance to Another Compartment

You can move a Visual Builder instance to a different compartment. Before you move the instance, remember that moving an instance can potentially change who has access to the instance. Make sure that users who have access to the current Visual Builder instance's compartment can access the instance in the new compartment as well.

  1. Open the VB instance's details page.
  2. From the More Actions drop-down menu, select Move Resource.
  3. In the Move Resource to a Different Compartment dialog box, select the compartment and click Move Resource.

Editing the Visual Builder Instance

You can edit your Visual Builder instance to scale the number of nodes in your instance and to add (or update) a custom endpoint. You cannot rename an instance.

Note

You cannot split a single instance into two parts (for example, into test and development parts). Instead, you must create separate instances for each part.
  1. In the Name column, click the instance to edit.
  2. On the Visual Builder Instance Details page, click Edit.

    The Edit Visual Builder Instance dialog is displayed. The dialog displays a Nodes field and an Advanced Options pane for adding or updating a custom endpoint. The Advanced Options pane is collapsed by default.

  3. Click Show Advanced Options to map a custom endpoint.

    The Advanced Options pane contains a Custom Endpoint tab with fields for adding or updating a custom endpoint for the instance. The custom hostname you want to map to the instance must already be registered on a DNS provider and its SSL certificate stored as a secret in an OCI Vault. See Create and Configure a Custom Endpoint for Your Visual Builder Instance.


    Description of admin-instancedetails-edit.png follows

  4. Click Save Changes.

Scale a Visual Builder Instance

To meet your changing workload requirements, increase performance or to reduce your costs, you can increase or decrease the Visual Builder instance’s node count. By default, a Visual Builder has one node.

  1. Open the Visual Builder instance's details page.
  2. Click Edit.
  3. In the Nodes field, enter the number of nodes. Click Save Changes.

Create and Configure a Custom Endpoint for Your Visual Builder Instance

You can map a custom endpoint to a Visual Builder instance and use it to access the instance instead of the original URL generated in the OCI Console.

You can create a custom hostname with your chosen domain (for example, mycustom.example.org) for your Visual Builder instance. Associating a custom endpoint with your Visual Builder instance doesn't affect the original instance URL. You'll be able to access your instance using the custom endpoint URL as well as the original instance URL.

These instructions assume you have direct access to a Visual Builder instance. If you are using the instance behind a WAF or an API Gateway, skip the certificate-related instructions provided here (from Step 3 onwards) and follow the WAF or API gateway certificate instructions instead. See WAF Certificates or Setting Up Custom Domains and TLS Certificates for API Gateways

  1. Choose a custom hostname for your instance and register it at a DNS provider.
  2. Obtain an SSL certificate from a certificate authority (CA) for your hostname.
  3. In your OCI tenancy, select a compartment and create an OCI Vault to store the certificate. See Working with Compartments, Overview of Vault, and Create a New Vault.
  4. Store the certificate as a secret in the OCI Vault. See Create a New Secret.
    Use the following certificate format:
    {
      "key": "-----BEGIN PRIVATE KEY-----\n…..-----END PRIVATE KEY-----\n",
      "cert": "-----BEGIN CERTIFICATE-----\n….-----END CERTIFICATE-----\n",
      "intermediates": [
        "-----BEGIN CERTIFICATE-----\n….-----END CERTIFICATE-----\n",
        "-----BEGIN CERTIFICATE-----\n….-----END CERTIFICATE-----\n"
      ],
      "passphrase": "<private key password if encrypted key is provided>"
    }
    Note

    • To avoid manual errors, you can also convert your PEM certificate into a single line containing "\n", as expected, with the following awk commands.

      For the leaf certificate:

      awk -v RS= '{gsub(/\n+/, "\\n")}1' <cert_pem_file>

      For each intermediate/root certificate:

      awk -v RS= '{gsub(/\n+/, "\\n")}1' <each_intermediate_cert_pem_file>

      For the private key:

      awk -v RS= '{gsub(/\n+/, "\\n")}1' <private_key_pem_file>
    • The latest version of the secret is used when you associate a custom endpoint with your instance either through the create instance or edit instance operation. For information on secret versions, see Secret Versions and Rotation States.
    • If you use a hostname certificate whose certificate authority (CA) is not in the Visual Builder trust store, you must also upload the certificate to your Visual Builder instance; otherwise, an exception is thrown in the scenarios the instance calls itself.
    Note the following certificate requirements:
    • If the certificate has more than one root/intermediate certificate, each certificate must be specified as a separate element in an intermediates array.
    • Always ensure that the final root CA is specified as the last element in the array. For example, if there are three intermediate certificates for the leaf certificate, the certificate that issued the leaf certificate should go as the intermediates[0] element, the certificate that issued the intermediates[0] certificate should go in the intermediates[1] element, and the certificate that issued the intermediates[1] certificate should go in the intermediates[2] element.
    • The passphrase attribute is optional and does not need to be specified if the private key is not encrypted.
    • If using an encrypted private key, the following format is required (PKCS1 is supported):
      -----BEGIN RSA PRIVATE KEY-----
      Proc-Type: 4,ENCRYPTED
      -----END RSA PRIVATE KEY-----
      

      A JSON file with an encrypted private key looks as follows:

      {
        "key": "-----BEGIN RSA PRIVATE KEY-----\nProc-Type: 4,ENCRYPTED\n....\n-----END RSA PRIVATE KEY-----",
      ..
      ..
        "passphrase": "<passphrase to decrypt the key>"
      }
      

      A JSON file with an unencrypted private key looks as follows:

      {
        "key": "-----BEGIN RSA PRIVATE KEY-----\nvRXUK08v31bw2rnDLw+vjuX2i8ujHWs\n....\n-----END RSA PRIVATE KEY-----",
      ..
      ..
      }
      
    • If your private key is in PKCS8 format, you must convert it to PKCS1 format:
      openssl rsa -in <input_pkcs8_encrypted_private_key> -out <converted_encrypted_private_key_file_name> -aes256
  5. Create an Identity and Access Management (IAM) policy to:
    1. Allow the Visual Builder service to read the version and contents of the secret.

      Here's the policy syntax:

      allow service <service-name> to {SECRET_VERSION_READ, SECRET_READ, SECRET_BUNDLE_READ} in compartment <secrets-compartment>

      and here's an example:

      allow service vb-vbprod to {SECRET_VERSION_READ, SECRET_READ, SECRET_BUNDLE_READ} in compartment MySecretCompartment
    2. Allow the admin group to access the secret (or create a new secret), while creating or updating a Visual Builder instance with a custom endpoint.

      Here's the policy syntax:

      allow group <group-name> to manage secrets in compartment <secrets-compartment>

      and here's an example:

      Allow group VBInstanceAdmins to manage secrets in compartment MySecretCompartment

    Note that you should specify the resource to return in <resource-type>, as described in Details for the Vault Service.

    For the policy statement syntax, see Table 3-1 above, and CreatePolicy API Request.

  6. Create a Visual Builder instance and map the custom endpoint details to it. See Create the Visual Builder Instance and Map Your Custom Endpoint with Your Visual Builder Instance.
  7. Finally, update the custom endpoint DNS record to the original instance hostname. As a best practice, update the CNAME of the DNS record with the hostname of the original instance endpoint.

Map Your Custom Endpoint with Your Visual Builder Instance

To map a custom endpoint to a Visual Builder instance, get the custom hostname for the Visual Builder instance and the OCI vault's compartment name, vault's name, and the secret key where you've uploaded the SSL certificate.

Before you begin, create a custom hostname and upload its SSL certificate to an OCI Vault, as described in Create and Configure a Custom Endpoint for Your Visual Builder Instance.
  1. Open the VB instance's details page.
  2. On the Visual Builder Instance Details page, click Edit.

    The Edit Visual Builder Instance dialog is displayed. The dialog displays a Nodes field and an Advanced Options pane for adding or updating a custom endpoint. The Advanced Options pane is collapsed by default.

  3. Click Show Advanced Options.

    The Advanced Options pane contains a Custom Endpoint tab with fields for adding or updating a custom endpoint for the instance.


    Description of admin-instancedetails-edit.png follows

  4. Supply the custom endpoint details.
    Field Description
    Hostname

    Enter the custom hostname chosen for the instance.

    The custom hostname you want to map to the instance must already be registered on a DNS provider and its SSL certificate stored as a secret in an OCI Vault.

    Certificate

    Provide the location of the hostname's certificate in your OCI tenancy.

    • Compartment: Select the OCI compartment that contains your certificate vault.
    • Vault: Select the vault that contains the hostname’s certificate.
    • Secret: Select the secret corresponding to the hostname’s certificate.
    Note

    You can also update or replace a custom endpoint that was previously associated with the instance. You can modify the hostname as well as the certificate details. However, to update the certificate details, you must have access permissions to the vault containing the required certificate.

After you've mapped the instance, update the custom endpoint DNS record to the original instance hostname. As a best practice, update the CNAME of the DNS record with the hostname of the original instance endpoint.

Manage Tags

OCI tags enable you to tag your OCI resources, such as your instance, and help you organize resources based on your business needs. You can manage tags from the Instance Details page.

If you're new to OCI tags, see Tagging Overview.

Action How To
Add a tag
  1. On the Instance Details page, click Add Tags in the More Actions menu.
  2. In the Add One Or More Tags To This Resource dialog box, enter the tag's namespace, key, and value.
  3. Click Add Tags.
Edit a tag
  1. On the Instance Details page, click the Tags tab.
  2. To edit a tag, click its Edit Pencil icon.
  3. In the Edit Tag dialog box, edit the tag and click Save.
Remove a tag
  1. On the Instance Details page, click the Tags tab.
  2. To edit a tag, click its Edit Pencil icon.
  3. In the Edit Tag dialog box, click Remove Tag.

You can see the Add Tags item in the More Actions menu in this image.


Description of admin-instancedetails-addtags.png follows

Terminate a Visual Builder Instance

Terminating a Visual Builder instance removes its applications and data. You can't undo the terminate action.

  1. Open the Visual Builder instance's details page.
  2. From the More Actions drop-down menu, select Terminate to open the Terminate Instance dialog box.

    Description of admin-console-terminate.png follows

  3. Optional: In the Terminate Instance dialog box, review the instance's published applications.

    You'll need to provide an Oracle Identity Cloud Service (IDCS) Access token if you want to review the applications deployed to the instance. For details, see Generate Tokens for Confidential Applications in Administering Oracle Identity Cloud Service.

    1. In IDCS, open the details page for your instance and click Generate Access Token.
    2. In the Generate Token dialog box, select Available Scope, and then click Download Token to download a file containing the access token to your local system.
    3. On your local system, open the downloaded file and copy the access token.
    4. In the Terminate Instance dialog box in the OCI Console, paste the access token into the IDCS Access token field, and then click Fetch to retrieve and display a list of applications deployed to the instance.
    5. Confirm that you want to permanently delete all the listed applications.
      If there are any applications you don't want to permanently delete, click Cancel to close the Terminate Instance dialog box.
  4. Click Terminate to permanently terminate the instance.

View Instance Metrics

You can use the Metrics pane in the OCI Console to view data about your instance's resource consumption and the number of logged-in users.

To view instance metrics during a specific period of time.

  1. Open the Visual Builder Instance Details page of your instance.
  2. Click Metrics under Resources in the left navigation pane.
  3. In the Metrics pane, select the Start Time and End Time of the period you want to examine.

    You can also select a period in the Quick Selects dropdown list.

The Metrics pane contains three charts that display details about your instance: OCPU Consumption, Concurrent Users and Database Usage. Each chart contains Interval and Statistic dropdown menus for modifying how the metrics are displayed. When you hover over a chart, a tooltip is displayed with more detailed metrics.


Description of admin-instancedetails-metrics.png follows

OCPU Consumption

The OCPU Consumption chart displays the percentage of each of the instance's CPUs that is being used at a given time.


Description of admin-instancedetails-ocpu.png follows

Concurrent Users

The Concurrent Users chart displays the number of users that are logged in to the instance at a given time.


Description of admin-instancedetails-users.png follows

Database Usage

The Database Usage chart displays how much data is stored in the database at a given time. To see the usage, you need to define a period of time, either by using the Start Time and End Time fields to select dates, or the Quick Select to select a period (for example, "Last 12 hours").


Description of admin-instancedetails-dbusage.png follows

View Services Associated With Your Instance

You can use the Associated Services table in the OCI Console to see a list of the services that are attached to your VB instance.

When a VB instance is created by a service other than Visual Builder, for example, if an instance is created by enabling Visual Builder in Oracle Integration Cloud (OIC) service, the service and the VB instance are then "attached" to each other. If a VB instance is attached to a service, the attached service is listed in the Associated Services table in the OCI Console.

To open the Associated Services table:

  • Open the Visual Builder Instance Details page, and then click Associated services under the Resources menu.

You can open the home page of the attached service using the Service console URL in the table.


Description of admin-console-visualbuilder-associatedservice.png follows

In some cases, an attachment can be via another service. For example, an Oracle Cloud Application service might trigger an OIC service to create a Visual Builder instance. In this case, the Associated Services table would show this relationship using "parent" and "child" labels: the Oracle Cloud Application service's role would be "Parent", and the OIC service's role would be "Child".