Adding Oracle Cloud Console Users
Give users access to work with your Applications environments in the Oracle Cloud Console.
This topic explains how you can set up additional users to view and work with application subscriptions in the Console.
The user entered when the Oracle Cloud Account was created is the default administrator of the tenancy. The default administrator can perform all tasks in Oracle Cloud Infrastructure, including view all applications subscriptions.
If you need to add users to work in your application, see your application documentation.
Applications environment management integrates with the Identity and Access Management Service (IAM) service for authentication and authorization. IAM uses policies to grant permissions to groups. Users have access to resources (such as environments) based on the groups that they belong to. The default administrator can create groups, policies, and users to give access to the resources.
Management Tasks Vary for Different Applications Services
Management tasks, and therefore access options, differ for different applications services. Applications services can be divided into two management categories:
- Applications services for which Oracle creates the environments. Because you don't create the environments, management tasks include only viewing details of the environments and your subscriptions. To create limited access users for these services, use the procedure described below in this topic.
- Applications services for which you create and manage the environments. Because you
create the environments, management tasks include create, delete, and update of the
environments. To create limited access users for these services, see:
- For Fusion Applications: Managing Oracle Cloud Users with Specific Job Functions
- For other applications: Managing User Access to Applications Environments
Add a Tenancy Administrator
This procedure describes how to add another user to your tenancy Administrators group. Members of the Administrators group have access to all features and services in the Oracle Cloud Console.
This procedure does not give the user access to sign in to the application service console. To add users to your application, see your application documentation.
To add an administrator:
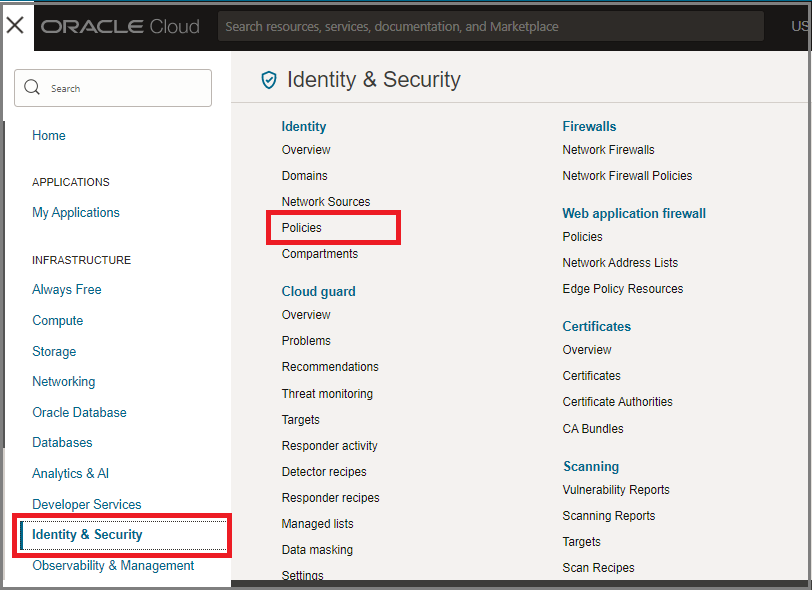
- Open the navigation menu and select Identity & Security. Under Identity, select Domains.
- Select the name of the identity domain that you want to work in. You might need to change the compartment to find the domain that you want. Then, select Users.
- Select Create user.
- Enter the user's First name and Last name.
- To have the user log in with their email address:
- Leave the Use the email address as the username check box selected.
- In the Username / Email field, enter the email address for the user account.
or
To have the user log in with their user name:- Clear the Use the email address as the username check box.
- In the Username field, enter the user name that the user is to use to log in to the Console.
- In the Email field, enter the email address for the user account.
- Under Select groups to assign this user to, select the check box for Administrators.
- Click Create.
A welcome email is sent to the address provided for the new user. The new user can follow the account activation instructions in the email to sign in and start using the tenancy.
Add a Non-Admin User
This procedure describes how to create a group that has access to view applications in the Oracle Cloud Console, but can't perform other administrative tasks.
To give users permissions to view your applications in the Oracle Cloud Console, you need to:
- Create a group.
- Create a policy that grants the group access to view environment resources.
- Create a user and add them to the group.
The following tasks walk you through creating a group, policy, and user in the IAM service. The default administrator can perform these tasks, or another user that has been granted access to administer IAM.
-
Open the navigation menu in the upper left corner of the page. Under Infrastructure, select Identity & Security to expand the menu, and then under Identity, select Domains. On the Domains page, select the domain.
- Under the list of Identity domain resources on the left, click Groups.
- Click Create group.
- Enter the following:
- Name: A unique name for the group, for example, "environment-viewers". The name must be unique across all groups in your tenancy. You can't change this later.
- Description: A friendly description. You can change this later if you want to.
- Advanced options - Tags: Optionally, you can apply tags. If you have permissions to create a resource, you also have permissions to apply free-form tags to that resource. To apply a defined tag, you must have permissions to use the tag namespace. For more information about tagging, see Resource Tags. If you are not sure if you should apply tags, skip this option (you can apply tags later) or ask your administrator.
- Click Create.
Before you create the policy, you'll need to know the correct value for your application's resource-type. The resource-type is what the policy grants access to. See Application Policy Reference to find the correct resource-type for your application.
- Navigate to the policies page of the identity domain:
- If you are still on the Groups page from the preceding step, click Domains in the breadcrumb links at the top of the page. On the Domains page, click Policies on the left side of the page.
- Otherwise, open the navigation menu, under Infrastructure, click Identity & Security to expand the menu, and then under Identity, click Policies. The list of policies is displayed.

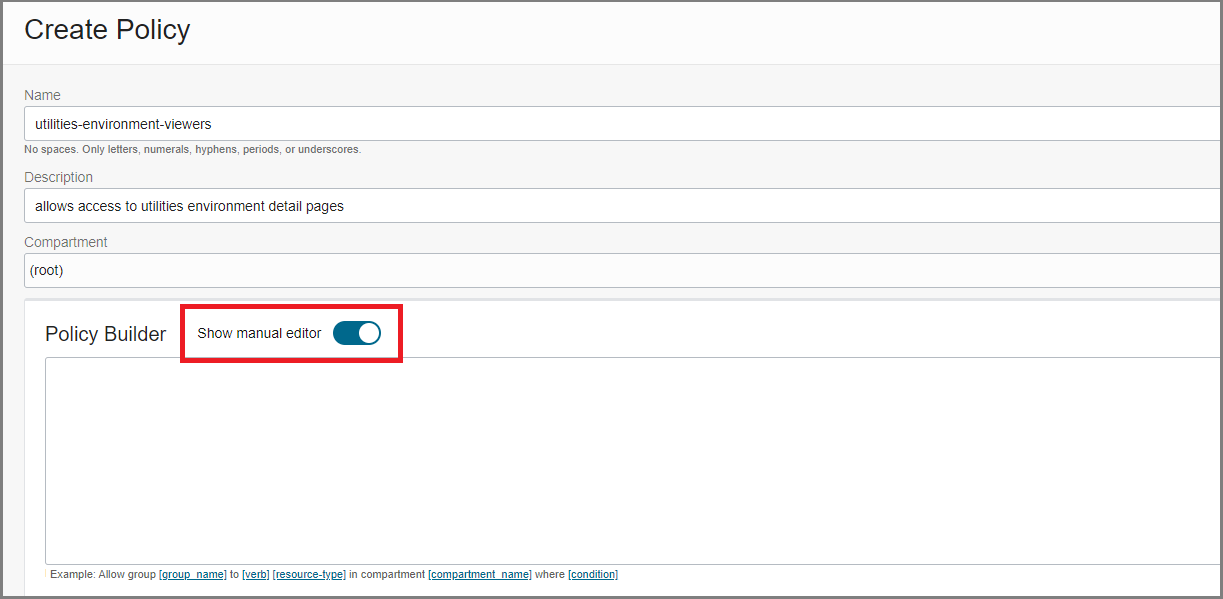
- Click Create Policy.
- Enter the following:
- Name: A unique name for the policy. The name must be unique across all policies in your tenancy. You cannot change this later.
- Description: A friendly description. You can change this later if you want to.
- Compartment: Ensure that the tenancy (root compartment) is selected.
- On the Policy Builder, toggle on Show manual editor to
display the text box for free-form text entry.

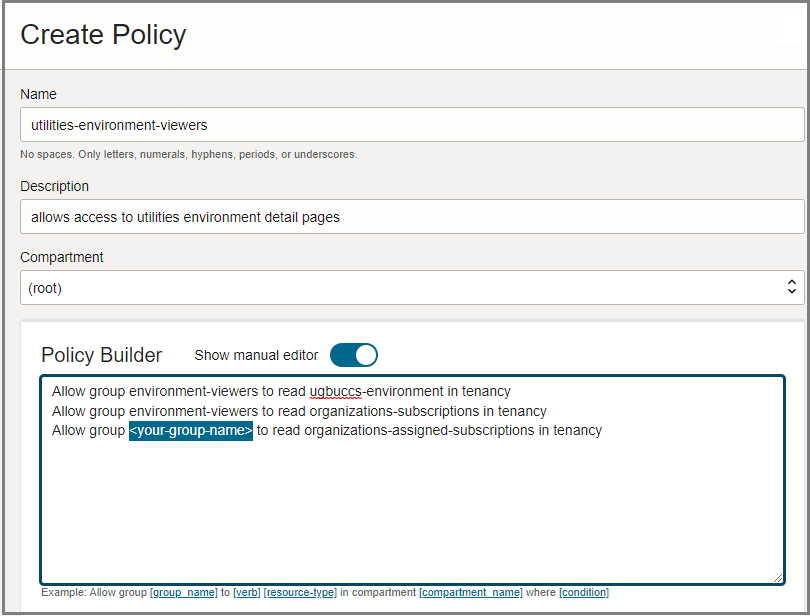
- Enter the appropriate statements for the service you want to grant access to. See
Application Policy Reference for the statements required for your
application. The policy statements take the form
of:
Allow group <your-group-name> to read <application-environment> in tenancy
Allow group <your-group-name> to read organizations-subscriptions in tenancy
Allow group <your-group-name> to read organizations-assigned-subscriptions in tenancy
where
<your-group-name> is the group you created in a previous step and
<application-environment> is the resource-type for your application. For a list of the resource-types, see Application Policy Reference.
- Click Create.
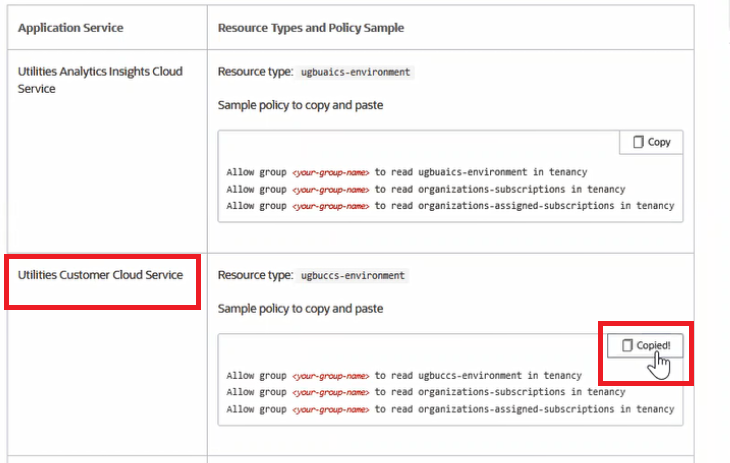
You can use the Copy option in the policy sample shown in the Application Policy Reference to copy the set of policy statements. You can then paste the statements into the Policy Builder text box so that you only need to update the value for <your-group-name>. See Example: How to Copy and Paste a Policy.
- On the Oracle Cloud Console Applications home page, select the main menu in the upper left corner of the page. Select Identity & Security, and then select Domains.
- On the Domains page, select Default, or the name of your identity domain.
- Select Users.
- Click Create User.
- Enter the user's First name and Last name.
- To have the user log in with their email address:
- Leave the Use the email address as the username check box selected.
- In the Username / Email field, enter the email address for the user account.
or
To have the user log in with their user name:- Clear the Use the email address as the username check box.
- In the Username field, enter the user name that the user is to use to log in to the Console.
- In the Email field, enter the email address for the user account.
- To assign the user to a group, select the check box for each group that you want to assign to the user account.
- Click Create.
Application Policy Reference
The following sections list the resource-type names for each of the applications services. Find your application in the table and use the provided statements in your policies.
The applications services shown here don't support self-service environment provisioning. For help writing policies for applications services that do support self-service provisioning, see Managing User Access to Applications Environments.
When you subscribe to one of the Oracle Communications applications, Oracle creates the application service environment for you. You can view details about your subscriptions and your application URLs from the Oracle Cloud Console.
To give another user access to interact with your Oracle Communications application services in the Oracle Cloud Console, you use one of the following verbs in your policy statements:
-
read- allows the user to view all information about the environment. -
inspect- allows the user to list the environments only; user can't view the details pages.
The following table lists the resource type names and sample policy statements you can
copy and paste to create the policy to give access to a group. The samples all use the
readverb. If you want to grant inspect access
only, replace read with inspect when you create your
policy.
| Application Service | Resource Types and Policy Sample |
|---|---|
| Security Shield |
Resource type: Sample policy to copy and paste:
|
| Session Delivery Management Cloud |
Resource type: Sample policy to copy and paste:
|
| SD-WAN Orchestration Cloud Service |
Resource type: Sample policy to copy and paste:
|
When you subscribe to one of the Oracle Financial Services applications, Oracle creates the application service environment for you. You can view details about your subscriptions and your application URLs from the Oracle Cloud Console.
To give another user access to interact with your Oracle Financial Services application services in the Oracle Cloud Console, you use one of the following verbs in your policy statements:
-
read- allows the user to view all information about the environment. -
inspect- allows the user to list the environments only; user can't view the details pages.
The following table lists the resource type names and sample policy statements you can
copy and paste to create the policy to give access to a group. The samples all use the
readverb. If you want to grant inspect access
only, replace read with inspect when you create your
policy.
| Application Service | Resource Types and Policy Sample |
|---|---|
| Oracle Banking Virtual Account Management Cloud Service |
Resource type: Sample policy to copy and paste:
|
| Oracle Banking Credit Facilities Process Management Cloud Service |
Resource type: Sample policy to copy and
paste:
|
| Oracle Banking Corporate Lending Process Management Cloud Service |
Resource type: Sample policy to copy and paste:
|
| Oracle Banking Digital Experience Cloud Service |
Resource type: Sample policy to copy and
paste:
|
| Oracle Banking Liquidity Management Cloud Service |
Resource type: Sample policy to copy and
paste:
|
| Oracle Banking Payments Cloud Service |
Resource type: Sample policy to copy and paste: |
| Oracle Banking Supply Chain Finance Cloud Service |
Resource type: Sample policy to copy and paste: |
| Oracle Banking Trade Finance Process Management Cloud Service |
Resource type: Sample policy to copy and paste: |
| Financial Revenue Management and Billing Cloud Service |
Resource type: Sample policy to copy and paste: |
| Financial Service Cloud |
Resource type: Sample policy to copy and paste: |
| Health Insurance |
Resource type: Sample policy to copy and paste: |
| Oracle Financial Services Lending & Leasing Cloud Service |
Resource type: Sample policy to copy and paste: |
| Oracle Financial Services Crime and Compliance Management Anti Money Laundering Cloud Service - Transaction Monitoring |
Resource type: Sample policy to copy and paste: |
| Oracle Financial Services Performance Analytics Cloud Service |
Resource type: Sample policy to copy and paste: |
| Oracle Financial Services Price Creation and Discovery Cloud Service |
Resource type: Sample policy to copy and paste: |
When you subscribe to one of the Oracle Utilities applications, Oracle creates the application service environment for you. You can view details about your subscriptions and your application URLs from the Oracle Cloud Console.
To give another user access to interact with your Oracle Utilities application services in the Oracle Cloud Console, you use one of the following verbs in your policy statements:
-
read- allows the user to view all information about the environment. -
inspect- allows the user to list the environments only; user can't view the details pages.
The following table lists the resource type names and sample policy statements you can
copy and paste to create the policy to give access to a group. The samples all use the
readverb. If you want to grant inspect access
only, replace read with inspect when you create your
policy.
| Application Service | Resource Types and Policy Sample |
|---|---|
| Utilities Analytics Insights Cloud Service |
Resource type: Sample policy to copy and
paste:
|
| Utilities Customer Cloud Service |
Resource type: Sample policy to copy and paste:
|
| Utilities Customer Care and Billing |
Resource type: Sample policy to copy and paste:
|
| Utilities Generation Asset Manager |
Resource type: Sample policy to copy and
paste:
|
| Utilities Meter Solution Cloud Service |
Resource type: Sample policy to copy and paste:
|
| Utilities Rate Cloud Service |
Resource type: Sample policy to copy and
paste:
|
| Utilities Billing Cloud Service |
Resource type: Sample policy to copy and paste:
|
| Utilities Work and Asset Cloud Service |
Resource type: Sample policy to copy and paste:
|
| Utilities Digital Self Service Transaction |
Resource type: Sample policy to copy and paste:
|
Example: How to Copy and Paste a Policy
Assume you have a group called "environment-viewers". You want this group to be limited in the Oracle Cloud Console to viewing only Oracle Utilities Customer Cloud Service environments.
- Go to the Oracle Utilities Policies in the documentation.
- Find Utilities Customer Cloud Service in the table. Click Copy to copy the
policy statements.
- In the Policy Editor, paste the statements from the documentation table and
then update the value for <your-group-name> in each of the
statements with the group name you created.

For More Information About Using IAM
This topic provides the basic procedures for creating specific user types in your account to get you started with application environment management. For full details on managing users who need to access this and other services, see:
