How Do I Write Dialog Flows in OBotML?
OBotML uses a simple syntax for setting variables and defining states. Because it’s a variant of YAML, keep the YAML spacing conventions in mind when you define the dialog flow. You don’t need to start from scratch. Instead, you can use the default dialog flow definition as a basic template.
context and states
nodes, so you can just delete the existing boilerplate and add your own content. To help
you build state definitions that are syntactically sound, use the component templates in
the + Component menu. See Dialog Flow Syntax for tips on setting variables and
defining states.
Tip:
Click Validate as you write your dialog flow to check for syntax errors and to apply best practices.Dialog Flow Syntax
| How Do I? | Use this |
|---|---|
| Set variables that persist the context across the entire dialog flow? |
Within the
context node, use the following syntax:
variablename: "variableType" For example:
You can define variables as entities (like
|
| Define an error handler for your skill? |
Define the
defaultTransitions node that points to a
state that handles errors. Typically, you'd add this state at the end of your
dialog flow definition. For
example: |
| Define a variable that holds the value for the resolved intent? |
Within the
context node, define a variable that
names the nlpresult entity. As its name implies ("nlp" stands for
Natural Language Processing), this entity extracts the intent resolved by the
Intent Engine. Nearly all of the reference bots declare nlpresult
variables. For
example: |
| Control the dialog flow based on the user input? |
Typically (though not always), you’d define an
As described in The Dialog Flow Structure in YAML Mode, you can declare an
|
| Equip my skill to handle unresolved intents? |
Define a state for the Example:
|
| Enable components to access variable values? |
Use the
.value property in your expressions
(${crust.value} ). To substitute a default value, use
${variable.value!\"default value\"} . For example,
thick is the default value in
${crust.value!\"thick\"}. For
example:Use the Apache FreeMarker default operator
( |
| Save user values for return visits? |
Within a state definition, add a variable definition with a
user. prefix. See Built-In YAML Components for Setting User Values. For
example:To find out more about user variables, see the dialog flow for the PizzaBotWithMemory reference bot. |
| Exit a dialog flow and end the user session. |
Use a Example:
|
Flow Navigation and Transitions
You can set the dialog engine on a specific path within the dialog flow by setting the transitions property for a state. Transitions describe how the dialog forks when variable values are either set or not set. They allow you to plot the typical route through the conversation (the “happy” flow) and set alternate routes that accommodate missing values or unpredictable user behavior.
| To do this... | ...Use this transition |
|---|---|
| Specify the next state to be executed. | Set a next transition (next: "statename"), to instruct the Dialog Engine to jump to the state named by the next key. As noted in next Transition, you can add a next transtion to any state except for the ones that have a return transition.
|
| Reset the conversation. | Use a return transition to clear any values set for the context variables and resets the dialog flow. You can give this transition any string value.return: "done" transition terminates the user session and positions the Dialog Engine at the beginning of the flow.
|
| Trigger conditional actions. | Define actions keys to trigger the navigation to a specific state. When a component completes its processing, it returns an action string that instructs the Dialog Engine where to go next. If you don’t define any action keys, then the Dialog Engine relies on the default transition or a next transition (if one exists). You can define as many actions as needed. Some built-in components have specific actions. For example, a component like System.MatchEntity that evaluates an Apache FreeMarker expression, uses match and nomatch actions. System.OAuthAccountLink has textReceived, pass, and fail actions, and the user interface components use their own actions (described in Transitions for Common Response Components ). Use the component templates as a guide. You can define an actions transition on any state except for ones that have a return transition.
|
| Handle errors. | Components sometimes throw errors. This often happens because of a system-related problem or failure (invalid passwords, invalid hostnames, or communications errors). Setting an error transition that names an error-handling state allows your skill to gracefully handle problems:error transition, then the skill outputs the Unexpected Error Prompt (Oops! I’m encountering a spot of trouble) and terminates the session. You can define an error transition within any state except for ones that have a return transition.
Some components have an error defined as an action. These built-in error transitions handle component-specific errors:
|
next transition:state_name:
component: "component name"
properties:
component_property: "value"
component_proprety: "value"
transitions:
next: "go_to_state"
error: "go_to_error_handler"
actions:
action_string1: "go_to_state1"
action_string2: "go_to_state2"While you can define more than one transition, the
return transition is an exception: you can't combine a return transition with the error, next or actions transitions.
next Transition
You use the next transition to specify the default next
state. When a state combines error, actions, and
next transitions, the next transition only gets triggered
when the component can't return a string that satisfies either of the error
or actions transitions.
next transition gets triggered whenever
errors or actions can't, define a next action within the
defaultTransition node.
context:
  variables:
    name: "string"
defaultTransitions:
  next: "nextRules"
states:
  getName:
    component: "System.Text"
    properties:
      prompt: "What's your name please?"
      variable: "name"
    transitions:
      next: "printName"
  printName:
    component: "System.Output"
    properties:
      text: "Hello ${name.value}."
    transitions:
      return: "done"
  nextRules:
    component: "System.Output"
    properties:
      text: "Hello ${name.value}. I told you! Next transitions rule the game!"
    transitions:
      return: "done"
Configure the Dialog Flow for Unexpected Actions
| Scenario | Solution |
|---|---|
| Instead of tapping buttons, the user responds inappropriately by entering text. | To enable your bot to handle this gracefully, route to a state
where the System.Intent component can resolve the text input, like
textReceived: Intent in the following snippet from the
CrcPizzaBot:
|
| Users scroll back up to an earlier message and tap its options, even though they’re expected to tap the buttons in the current response. |
By default, Digital Assistant handles out-of-order messages, but you can override or customize this behavior,
as described in How Out-of-Order Actions Are Detected.
For example, adding a default
system.outofOrderMessage transition tells the Dialog Engine to
transition to a single state that handles all of the out-of-order messages, such
as the HandleUnexpectedAction state in the OBotML snippet above.
You can use different approaches to create this state:
|
Call a Skill from Another Skill from a YAML Dialog Flow
There might be times when you want to provide users an explicit option to temporarily leave the skill they are engaged with to do something in a second skill within the same digital assistant. For example, if they are in a shopping skill and they have made some selections, you could display a button that enables them to jump to a banking skill (to make sure that they have enough money for the purchase) and then return to the shopping skill to complete their order.
To address this in a YAML dialog flow, you can configure an action in a skill to initiate interaction with a different skill in the same digital assistant and then return to the original flow.
Here's how it works:
-
You use the
System.CommonResponsecomponent to present the user a button to do something in another skill.The button is based on a postback action, in which you configure the payload to provide an utterance that is directed toward the target skill. Ideally, that utterance should contain the invocation name of the target skill (i.e. be an explicit invocation) in order to maximize the likelihood that routing to that skill will occur. By doing this, you essentially hard-code an utterance to trigger the desired intent.
Here's the format of that code:
  component: "System.CommonResponse"
  properties:
    metadata:
    ...
      responseItems:
        - type: "cards"
          ...
          actions:
              ...
            - label: "Press me to switch to different skill"
              type: "postback"
              payload:
                action: "system.textReceived"
                variables:
                  system.text: "utterance with invocation name that you want passed to the digital assistant"
                ...
By using a
system.textReceivedaction and specifying the text in thesystem.textvariable, you ensure that the postback is treated as a user message that can be properly routed by the digital assistant.Note
When you usesystem.textReceivedthis way,system.textis the only variable that you can define in the postback payload. Any other variables in the payload are ignored. - You set the
textReceivedtransition to the state containing theSystem.Intentcomponent.transitions: actions: .... textReceived: "Name of the state for the System.Intent component"This is necessary to ensure that the digital assistant provides an appropriate fallback response if the digital assistant does not contain the target skill.
For this to work, the skill's
System.Intentcomponent must have itsdaInterceptproperty set to"always"(which is the default).
If the target skill is in the digital assistant, the digital assistant recognizes the explicit invocation, takes control of the request (which would normally be handled by the component), and routes the request to the target skill's System.Intent component. Once the flow in the target skill is finished, the user is returned to the calling skill.
If the target skill is not in the digital assistant (or the calling skill is exposed without a digital assistant), the calling skill's System.Intent component is invoked and the intent should resolve to unresolvedIntent.
Tip:
To handle the case where the target skill's invocation name is changed when it is added to a digital assistant, you can use a custom parameter to pass in the skill's invocation name in the system.text variable.
For example, you could create a parameter called da.CrcPizzaCashBankInvocationName in the pizza skill and give it a default value of CashBank. You could then reference the parameter like so:
system.text: "ask ${system.config.daCrcPizzaFinSkillInvocationName}, what is my balance"If the invocation name of the skill is changed, you simply change the value of the custom parameter to match the new invocation name.
See Custom Parameters.
When you use an explicit invocation in the
system.text variable, the user may see the message with that button
twice:
- When they are presented the button to navigate to the other skill.
- When they complete the flow in the other skill.
system.text variable instead of explicit invocation. An implicit
invocation is an utterance that matches well with a given skill without using the skill's
invocation name (or a variant of the invocation name with different spacing or
capitalization).
Example: Call a Skill from Another Skill
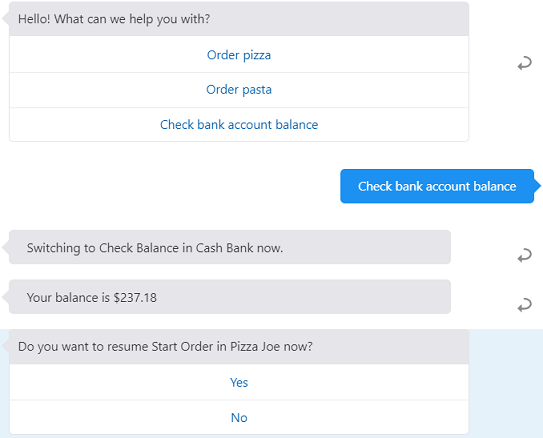
For example, here is an intent for ordering pizza (OrderPizza) that gives the user the option to check their bank account balance before completing their order. The account balance is provided by a different skill (CashBank). If the user selects the Check Balance option, the text "ask CashBank, what is my balance" is posted back to the digital assistant and the user is routed to the appropriate intent within the CashBank skill.
OrderPizza:
  component: "System.CommonResponse"
  properties:
    metadata:
    ...
      responseItems:
        - type: "cards"
          headerText: "Our pizzas:"
          cardLayout: "vertical"
          name: "PizzaCards"
          actions:
            - label: "More Pizzas"
              ...
            - label: "Check bank account balance"
              type: "postback"
              payload:
                action: "system.textReceived"
                variables:
                  system.text: "ask CashBank, do I have enough money?"
                ...
    processUserMessage: true
  transitions:
    actions:
      order: "AskPizzaSize"
      more: "OrderPizza"
      textReceived: "Intent" # where the value of textReceived is the name CashBank's System.Intent state
  ...
Assuming your pizza skill is in the same digital assistant as the Cash Bank skill, here's what it should look like if you open the digital assistant in the tester, access the pizza skill, and then click the Check bank account balance.

Description of the illustration skill-to-skill.png
In the Routing tab of the tester, you can see that the explicit invocation has been recognized and is given preference:
Further down, you can see that the Check Balance intent of the Cash Bank skill is matched:
User-Scoped Variables in YAML Dialog Flows
When the conversation ends, the variable values that were set from the user input are destroyed. With these values gone, your skill users must resort to retracing their steps every time they return to your skill. You can spare your users this effort by defining user-scope variables in the dialog flow. Your skill can use these variables, which store the user input from previous sessions, to quickly step users through the conversation.
context node, are prefixed with user. The
checklastorder state in the following excerpt from the PizzaBotWithMemory
dialog flow, includes the user.lastsize variable that retains the pizza size
from the previous user session. The user. variable persists the user ID. That
ID is channel-specific, so while you can return to a conversation, or skip through an order
using your prior entries on skills that run on the same channel, you can’t do this across
different channels.
main: true
name: "PizzaBot"
parameters:
  age: 18
context:
  variables:
    size: "PizzaSize"
    type: "PizzaType"
    crust: "PizzaCrust"
    iResult: "nlpresult"
    sameAsLast: "YesNo"
states:
  intent:
    component: "System.Intent"
    properties:
      variable: "iResult"
    transitions:
      actions:
        OrderPizza: "checklastorder"
        CancelPizza: "cancelorder"
        unresolvedIntent: "unresolved"
  checklastorder:
    component: "System.ConditionExists"
    properties:
      variable: "user.lastsize"
    transitions:
      actions:
        exists: "lastorderprompt"
        notexists: "resolvesize"
  lastorderprompt:
    component: "System.List"
    properties:
      options: "Yes,No"
      prompt: "Same pizza as last time?"
      variable: "sameAsLast"
    transitions:
      next: "rememberchoice"
  rememberchoice:
    component: "System.ConditionEquals"
    properties:
      variable: "sameAsLast"
      value: "No"
    transitions:
      actions:
        equal: "resolvesize"
        notequal: "load"
...


  load:
    component: "System.CopyVariables"
    properties:
      from: "user.lastsize,user.lasttype,user.lastcrust"
      to: "size,type,crust"
    transitions:
      ...
Built-In YAML Components for Setting User Values
Define the value property of the following components with expressions like “${user.age.value}” to set stored user values.
| Component | Uses |
|---|---|
| System.SetVariable | Sets the stored user value. |
| System.ResetVariables | Resets a stored user value. |
| System.CopyVariables | Copies in the stored user value. |
| System.Output | Outputs the stored user value as text. |
| System.ConditionExists | Checks if the user-scoped variable is already in context. |
| System.ConditionEquals | Checks for the user-scoped variable. |
| System.Switch | Uses the stored value to switch from one state to another. |
Auto-Numbering for Text-Only Channels in YAML Dialog Flows
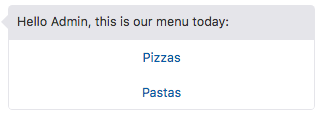
The auto-numbering framework enables your skill bot to run on text-only channels because it prefixes buttons and list options with numbers. When users can’t use tap gestures, they can still trigger the button’s postback actions by entering a number. For example, when the CrcPizzaBot runs in a channel that supports buttons, it displays Pizzas and Pastas.
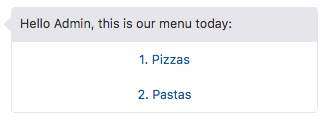
But when it runs on a text-only channel, it renders the Pizza and Pasta options as text and prefixes them with sequential numbers (1. Pizza 2. Pasta). 
Auto-numbering isn’t limited to text-only channels; enabling it where buttons are supported add another way for users to input their choices. For examples, users can either tap Pizza or enter 1. 
Set Auto-Numbering for YAML Dialog Flows
For YAML dialog flows, you can set the auto-numbering feature on a global scale
(meaning that it affects all components named in your dialog flow definition) or at the
component level for the components that trigger postback actions, namely the
System.List, System.CommonResponse,
System.ResolveEntities, System.QnA,
System.Webview, System.OAuthAccountLinkComponent, and
System.OAuth2AccountLinkComponent components.
-
In the context node, add
autoNumberPostbackActions: "boolean". This, liketextOnlyandautoTranslate, is a common variable that can be used across all of your bots.context: variables: pizzaSize: "PizzaSize" pizzaType: "PizzaType" pizzaCrust: "PizzaCrust" pizzaCheese: "CheeseType" autoNumberPostbackActions: "boolean" iResult: "nlpresult" -
Set the
autoNumberPostbackActionsproperty totrue:type: component: "System.List" properties: prompt: "What Type of Pizza do you want?" options: "${pizzaType.type.enumValues}" variable: "pizzType" autoNumberPostbackActions: "true" footerText: "Enter a number or tap your selection." transitions: ...If you need to override auto-numbering for a particular component (either a system component or a custom component), set theautoNumberPostbackActionsproperty tofalse. To override auto-numbering for a specific postback action in the System.CommonResponse, add askipAutoNumberproperty and name the action.Note
Because auto-numbering gets applied through server-side processing, it only works on postback actions, not for the client-side URL actions. Consequently, components that render two button actions, one URL action, and one postback action result in a suboptimal user experience because of the inconsistent numbering of the various UI elements. For the OAuth components that render both a login URL action and a cancel postback action, only the cancel action is prefixed with a number. To maintain consistency in cases like this, set theautoNumberPostbackActionsproperty tofalse. -
You can conditionally enable auto-numbering by setting the
autoNumberPostbackActionsvariable with the current channel. For example:
Once you’ve set thesetAutoNumbering: component: "System.SetVariable" properties: variable: "autoNumberPostbackActions" value: "${(system.channelType=='facebook')?then('true','false')}"autoNumberPostbackActionsvariable, you can reference it to modify theprompttext:
Likewise, you can conditionalize the footer text:prompt: "Hello ${profile.firstName}, this is our menu today<#if autoNumberPostbackActions.value>. Make your choice by entering the menu option number</#if>:"footerText: <#if autoNumberPostbackActions.value>"Make your choice by entering the menu option number."</#if>
Render Content for Text-Only Channels in YAML Dialog Flows
textOnly variable in the dialog flow-branching components like System.ConditionEquals or System.Switch. Before you can branch your flow based on text-only messages, you need to declare textOnly as a context variable and then set its value. Here are the basic steps:
-
Add the
textOnly: "boolean"variable to thecontextnode.context: variables: autoNumberingPostbackActions: "boolean" textOnly: "boolean" -
Reference
textOnlyin the variable setting components, like System.SetVariable and System.Switch. -
Use the
system.messageproperty to expose the complete user message. The following snipppet shows how to set a boolean within thesystem.channelTypeexpression that indicates whether a text-only channel (Twilio, in this case) is in use or not.setTextOnly: component: "System.SetVariable" properties: variable: "textOnly" value: "${(system.channelType=='twilio')?then('true','false')}"You can conditionally enable auto numbering by referencing the user message channel. For example:setAutoNumbering: component: "System.SetVariable" properties variable: autoNumeringPostbackActions value: "${(system.channelType=='twilio')?then('true','false')}"


