Manage Master Encryption Keys in Oracle Key Vault
Autonomous Database supports customer-managed Transparent Data Encryption (TDE) keys that reside in Oracle Key Vault (OKV).

Prerequisites to Use Customer-Managed Encryption Keys in Oracle Key Vault
Describes the prerequisite steps to use customer-managed master encryption keys that reside in Oracle Key Vault (OKV) on Autonomous Database.

Requirements:
Limitations:
  • Cross-tenancy access, where the Autonomous Database instance and OKV are in different tenancies, is not supported.
  • OKV is not supported in cross-region standbys.
  • OKV is not supported in refreshable clones.

Follow these steps:

  1. Create an OKV endpoint, wallet and TDE master key.
    1. Sign into the OKV instance.
      • Copy the Public IP address, or Private IP address on the OKV instance details page and paste into a browser.
      • On the OKV instance login page, enter the username and password.
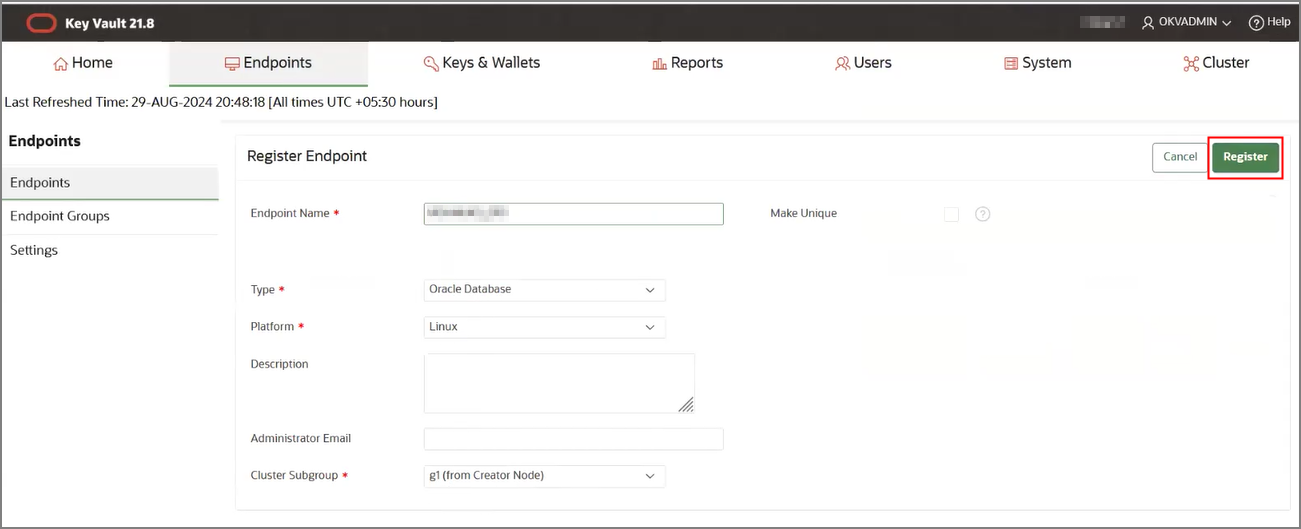
    2. Create and register an OKV endpoint.
      • Click Endpoints, on the OKV home page.
      • Click Add, on the Endpoints details page and enter a name for the endpoint.
      • Allow all other settings to default and click Register.

        For example:
        Description of sec_okv_epregister.png follows

        See Adding, Deleting, or Reenroling Endpoints for more information.

    3. Create a wallet.

      The OKV wallet holds the TDE master encryption key.

      • From the OKV home page, navigate to the Keys & Wallets page.
      • For Wallets on the Keys & Wallets page, click Create.
      • Enter the name of the wallet in the Name field and click Save.

        For example:


        Description of sec_okv_wallet.png follows

        See Creating a Virtual Wallet for more information.

    4. Create a TDE Master Encryption Key in the wallet.
      • Select Keys & Secrets, and click Create.
      • For Application Keys, select TDE Master Encryption Key.
      • For Extractable, select True.
      • Make sure the Date of Deactivation is empty.

        For example:


        Description of sec_okv_extractable.png follows

      • For Wallet Membership, click Select Wallet.
      • From the displayed list of wallets, select the wallet created in the previous step and click Close.
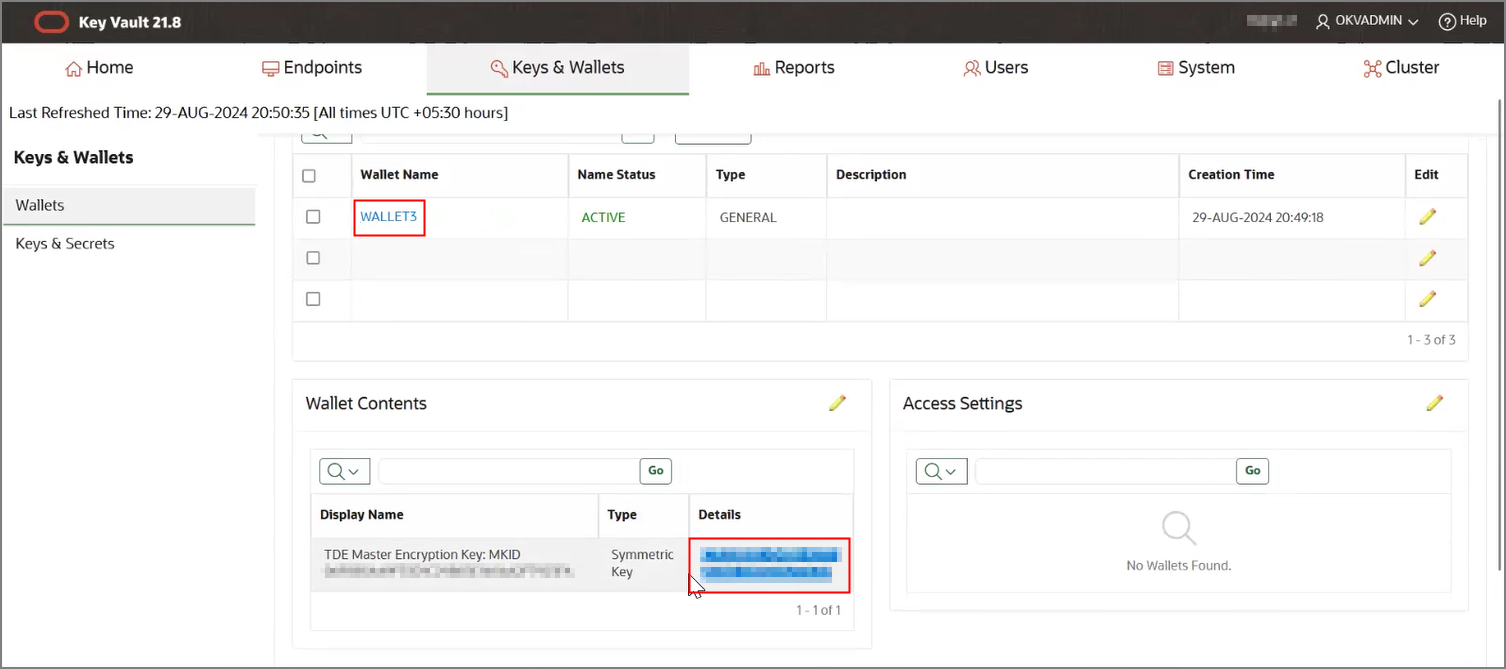
      • Click Create. The TDE Master Encryption Key is created and displayed under Wallet Contents.

        For example:


        Description of sec_okv_key.png follows

    5. Modify the endpoint to make the previously created wallet the default wallet.
      • Navigate to the endpoint's details page.
      • On the Default Wallet pane, select Choose Wallet.
      • On the Choose Wallet page, select the previously created wallet and click Select.
      • Click Save.
    6. Enable Restful services.
      Note

      Restful services must be enabled on the OKV instance to successfully run the curl command, in a subsequent step, to download the wallet.
      • From the OKV home page, select the System tab.
      • On the left navigation pane, click Setting .
      • Under System Configuration, select Restful services.
      • Click All, then Save.
  2. Provision an Autonomous Database instance, with the following required settings:
    1. For Choose network access, select Private endpoint access only.
    2. For Virtual cloud network, select the VCN where this database instance is running.
    3. For Subnet, select the private subnet where this database instance is running.
    4. For Network security groups (NSGs), select the security group.
    5. For Encryption key settings, default to Encryption using an Oracle-managed key. These settings are changed to customer managed keys in OKV, after these prerequisite steps are completed. The customer managed keys are disabled during instance provisioning. See Use Customer-Managed Encryption Keys on Autonomous Database with Oracle Key Vault for details.
  3. Connect to the Autonomous Database instance and create a directory for the OKV wallet.
    1. Connect to the Private Endpoint Autonomous Database instance as the ADMIN user.
      For example, connect to the OKVDEMO1 database instance:
      SQL> connect ADMIN/<password>@OKVDEMO1_low
    2. Create a directory object in the Autonomous Database instance.
      For example:
      SQL> create directory okv_dir as 'okvdir';
    3. Check to make sure the directory is created.
      For example, the following statements create the OKV_DIR directory object and the statement results display the directory name (OKV_DIR) and directory path (/u03/dbfs/<path data>/data/okvdir).
      SQL> connect ADMIN/<admin password>#@OKVDEMO1_low
      Connected
      SQL>
      SQL> create directory okv_dir as 'okvdir';
      Directory created.
      SQL> select * from dba_directories where directory_name = 'OKV_DIR';
      OWNER
      –--------------------------------------------------------------------
      DIRECTORY_NAME
      –--------------------------------------------------------------------
      DIRECTORY_PATH
      –--------------------------------------------------------------------
      ORIGIN_CON_ID
      –------------
      SYS
      OKV_DIR
      /u03/dbfs/<path data>/data/okvdir
      SQL>
  4. Download the OKV wallet to the directory object created in the Autonomous Database instance.
    1. Download the wallet for the endpoint from the OKV instance.
      Run the following command from the client:
      curl -k -X POST
       --location https://<OKV server>:5695/okv/cloud/utility/endpoint/download/sso
       --data "token=<Enrollment Token>"
       --output cwallet.sso
      Where:
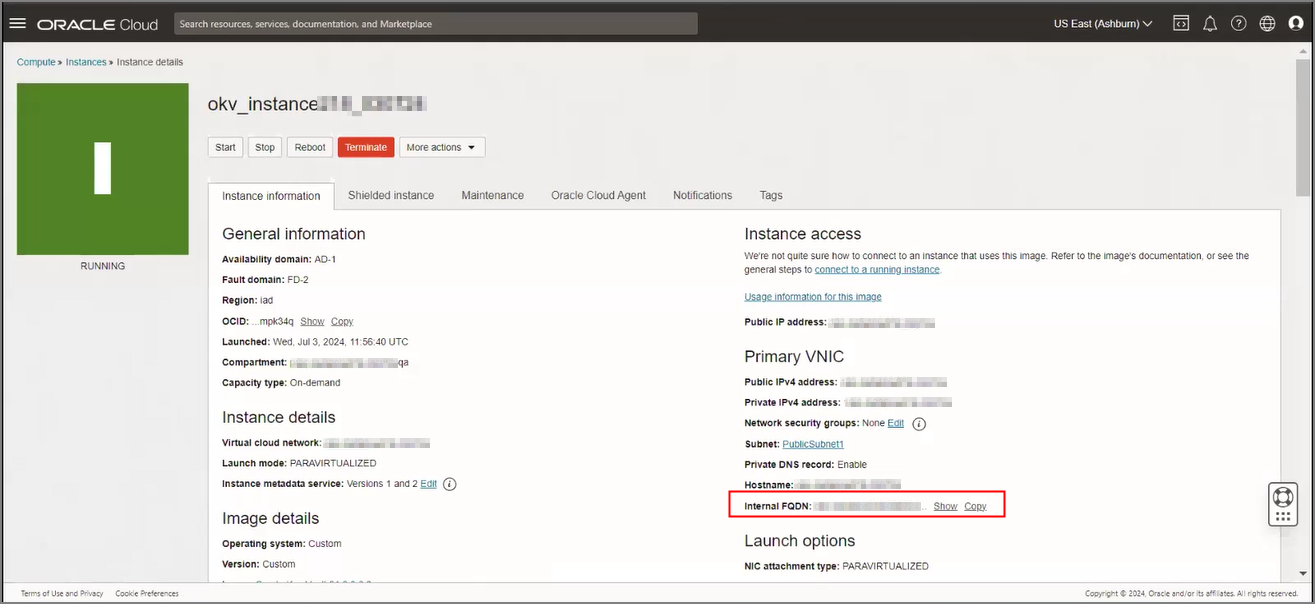
      • OKV server is the Internal Fully Qualified Domain Name (FQDN) found on the OKV instance details page
      • Enrollment Token is the OKV instance enrollment token found on the Endpoints page for the endpoint.

      After the wallet is downloaded, the endpoint on the OKV instance shows a status of enrolled.

    2. Upload the wallet to Object Storage.

      Upload the wallet file from your local machine to your Object Storage bucket using Upload Object. See Uploading an Object to a Bucket, for more information.

    3. In Object Storage, generate a Pre-Authenticated Request (PAR) URL for the uploaded wallet file. See Creating a Pre-Authenticated Request in Object Storage for more information.
    4. From the VM, connect to the database instance as ADMIN user.
    5. In the database instance, run the DBMS_CLOUD.GET_OBJECT procedure to download the wallet from Object Storage to the database instance wallet directory.
      For example:
      BEGIN
          DBMS_CLOUD.GET_OBJECT(
              object_uri => '<PAR URL>',
              directory_name => '<wallet_dir>');
      END;
      /
      • Where:
        • object_uri is the PAR URL generated for the wallet file in Object Storage.
        • directory_name is the name of the wallet directory created in the database instance.

        See GET_OBJECT Procedure and Function for more information.

    6. Delete the wallet from Object Storage.

Use Customer-Managed Encryption Keys on Autonomous Database with Oracle Key Vault

Shows the steps to encrypt your Autonomous Database using customer-managed master encryption keys that reside in Oracle Key Vault (OKV).

Follow these steps:

  1. Perform the required customer-managed encryption key prerequisite steps as necessary. See Prerequisites to Use Customer-Managed Encryption Keys in Oracle Key Vault for details.
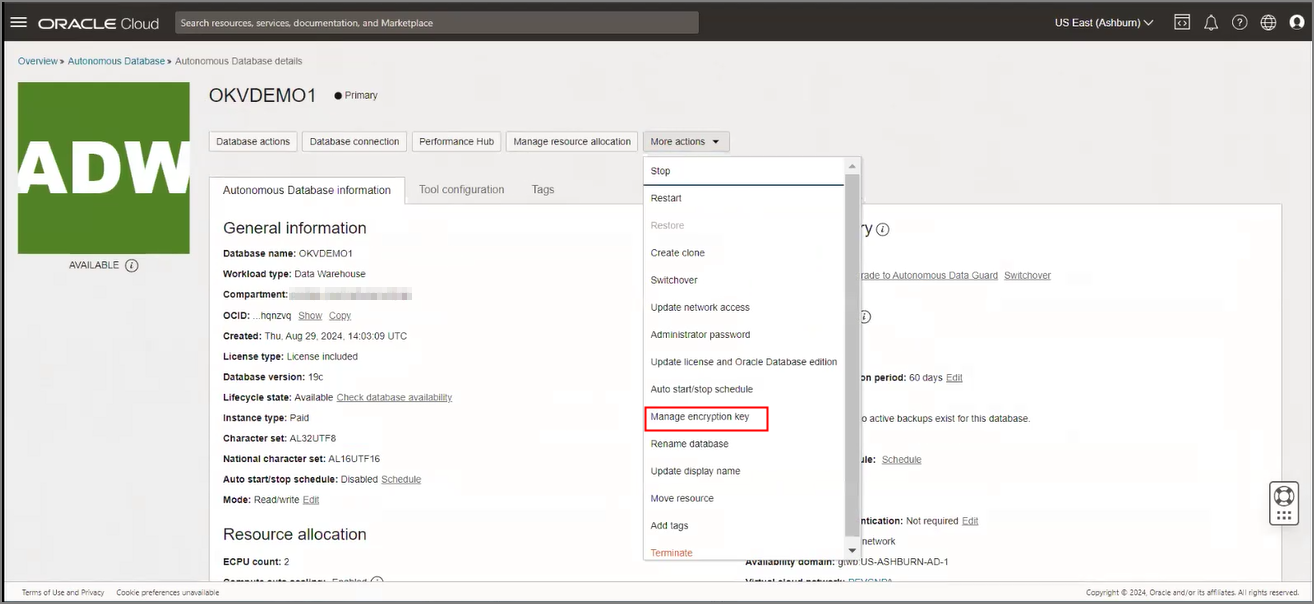
  2. On the Details page for the Autonomous Database instance, click More actions, and select Manage encryption key.


    Description of sec_okv_manage.png follows

    Note

    If you are already using customer-managed keys in OKV and you want to rotate the TDE keys, follow these steps and select a different key (select a key that is different from the currently selected master encryption key). However, you cannot use an OKV key that has been used previously on the same Autonomous Database instance.

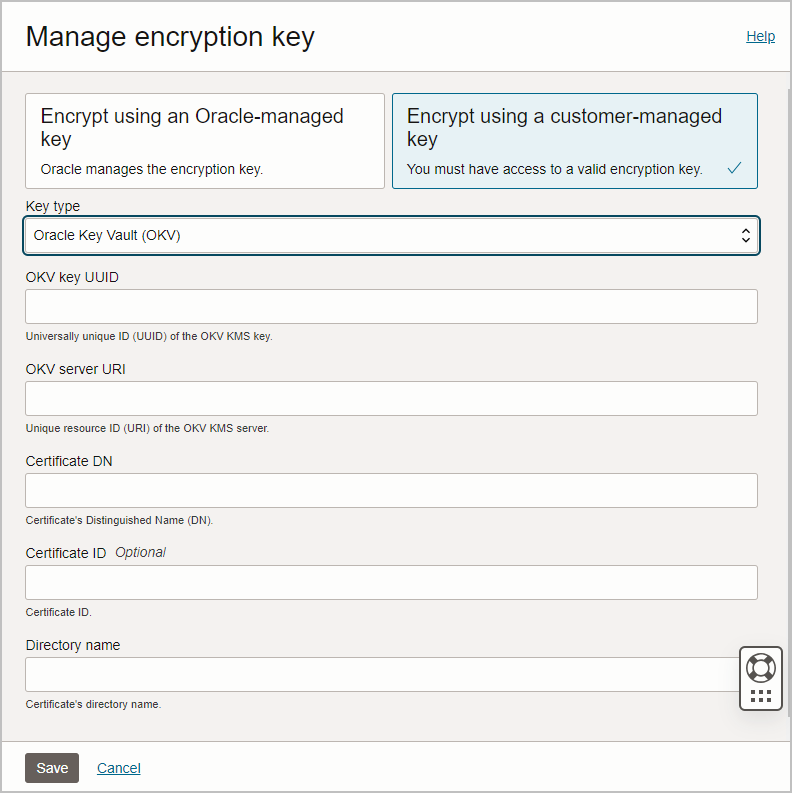
  3. On the Manage encryption key page, select Encrypt using a customer-managed key.
  4. On the Key type drop-down, select Oracle Key Vault (OKV).

    The Manage encryption key dialog displays the Oracle Key Vault (OKV) options.
    Description of sec_okv.png follows

  5. Enter the following information:
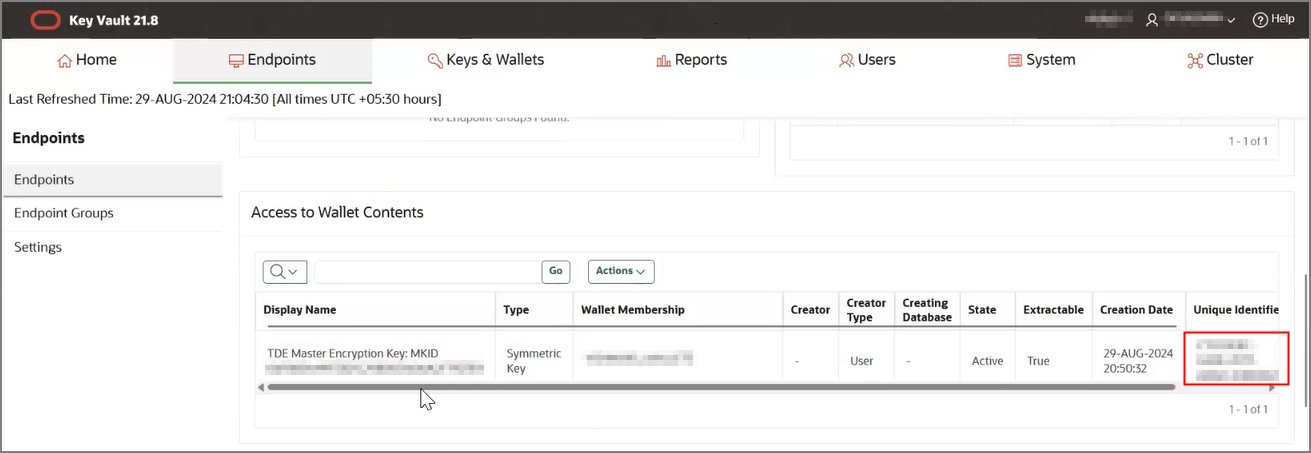
    • OKV UUID - Enter the TDE master key's Unique Identifier for the key located in the OKV instance.

      To find this value:

      1. Sign into the OKV instance, and select Endpoints.
      2. Select the endpoint that contains the wallet and key.
      3. Scroll to Access to Wallet Contents, and copy the Unique Identifier.


        Description of sec_okv_uuid.png follows

      4. Paste the Unique Identifier into the OKV UUID field.
    • OKV Server URI - Enter the Internal Fully Qualified Domain Name (FQDN) of the OKV instance.

      For example, if using an OCI VM to host OKV, this value can be found on the OKV instance details page under Primary VNIC:


      Description of sec_okv_fqdn.png follows

    • Certificate DN - Enter your certificate Distinguished Name (DN).
    • Certificate ID (Optional) - Enter your certificate ID or leave blank.
      Note

      This field is optional if using OKV versions 21.9 and above. If using OKV versions below 21.9, the certificate ID is required.
    • Directory name - Enter the directory name where the wallet is saved on the Autonomous Database instance.
  6. Click Save.

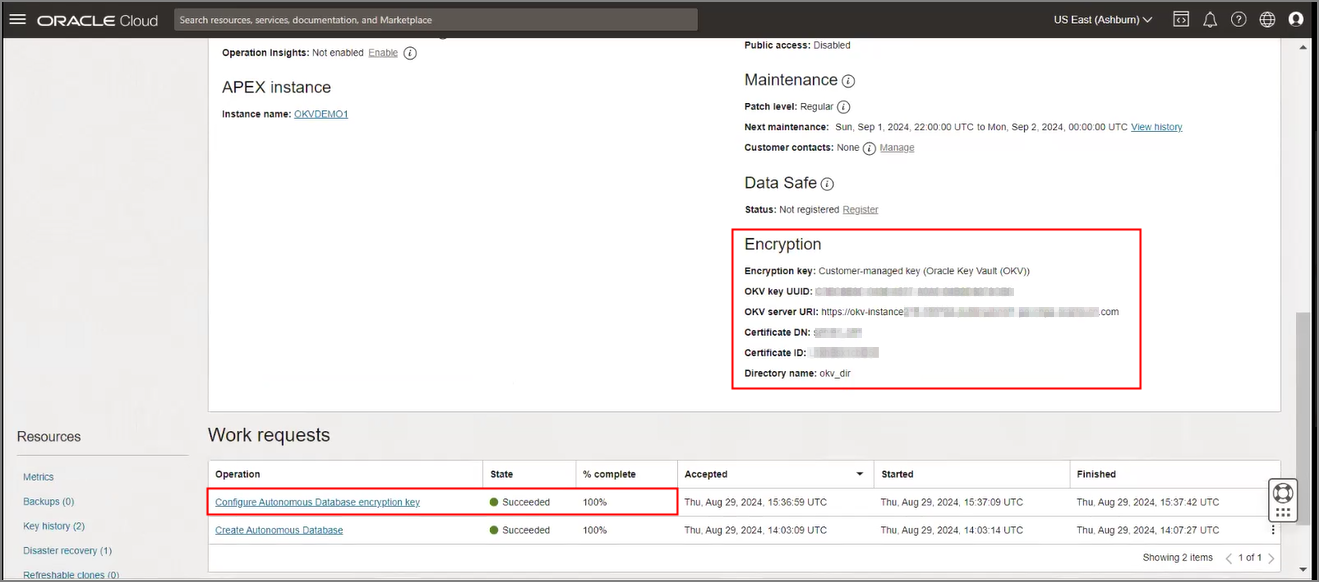
When the save completes successfully, encryption settings for the Autonomous Database instance are updated to show Customer-managed key (Oracle Key Vault (OKV)) and the work request state shows succeeded.


Description of sec_okv_done.png follows