Use Amazon Resource Names (ARNs) to Access AWS Resources
You can use Amazon Resource Names (ARNs) to access AWS resources with Autonomous AI Database.
- About Using Amazon Resource Names (ARNs) to Access AWS Resources
When you use ARN role based authentication with Autonomous AI Database, you can securely access AWS resources without creating and saving credentials based on long-term AWS IAM access keys. - Perform AWS Management Prerequisites to Use Amazon Resource Names (ARNs)
Using the AWS Management Console or using the APIs, create an AWS user, role, policies, and trust relationship. You perform these steps before you use withDBMS_CLOUD.CREATE_CREDENTIALto create a credential with an ARN parameter on Autonomous AI Database. - Perform Autonomous AI Database Prerequisites to Use Amazon ARNs
Prior to using an AWS resource withDBMS_CLOUD.CREATE_CREDENTIALwith an ARN parameter, the ADMIN user must enable ARN on the Autonomous AI Database instance. - Create Credentials with ARN Parameters to Access AWS Resources
After ARN usage is enabled for the Autonomous AI Database instance and the ARN is configured by the AWS administrator, on Autonomous AI Database you can create a credential object with ARN parameters. - Update Credentials with ARN Parameters for AWS Resources
The ARN credentials you use on Autonomous AI Database work with the AWS token service that enables you to use temporary role based credentials to access to AWS resources from Autonomous AI Database.
Parent topic: Configure Policies and Roles to Access Resources
About Using Amazon Resource Names (ARNs) to Access AWS Resources
When you use ARN role based authentication with Autonomous AI Database, you can securely access AWS resources without creating and saving credentials based on long-term AWS IAM access keys.
For example, you may want to load data from an AWS S3 bucket into your Autonomous AI Database, perform some operation on the data, and then write the modified data back to the S3 bucket. You can do this without using an ARN if you have AWS user credentials to access the S3 bucket. However, using role-based ARNs to access AWS resources from Autonomous AI Database has the following benefits:
- You can create role-based access, with different policies for different users or schemas that need access to AWS resources from an Autonomous AI Database instance. This allows you to set a policy to limit access to AWS resources by role. For example, setting a policy limiting to read-only access, by role, to an S3 bucket.
-
ARN based credentials provide better security as you do not need to provide long-term AWS user credentials in code to access AWS resources. Autonomous AI Database manages the temporary credentials generated from the AWS Assume Role Operation.
Steps to Configure ARN Usage with Autonomous AI Database
Before creating a credential using an ARN in Autonomous AI Database, in AWS, your account administrator must define a policy that allows you to access AWS resources, such as an S3 bucket. By default, ARN credential services are not enabled on Autonomous AI Database. The ADMIN user enables ARN credentials for the necessary user which allows them to create and use ARN credentials on the Autonomous AI Database instance.
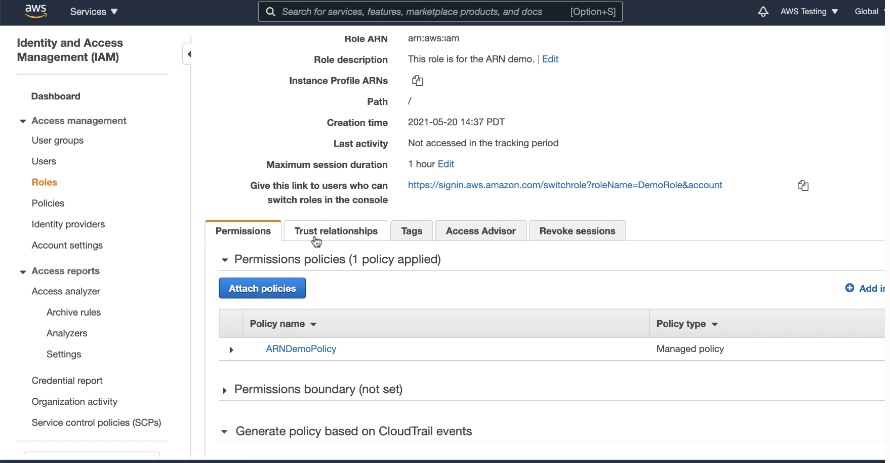
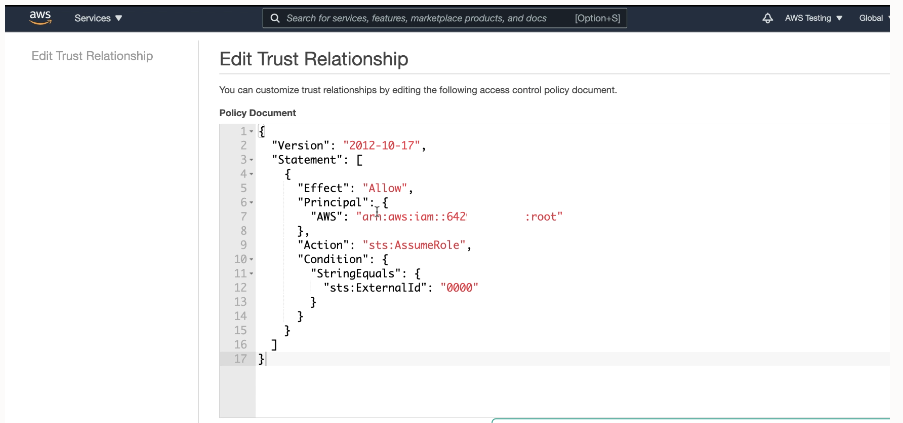
In AWS, the role ARN is the identifier for the provided access and can be viewed on the AWS console. For added security, when the AWS administrator configures the role, policies, and trust relationship for the AWS account, they must also configure an External ID in the role's trust relationship.
The External ID provides additional protection for assuming roles. The AWS administrator configures configure the External ID as one of the following, based on the Autonomous AI Database instance:
-
The compartment OCID
-
The database OCID
-
The tenancy OCID
On AWS, the role can only be assumed by trusted users that are identified by the External ID included in the request URL, where the supplied External ID in the request matches the External ID configured in the role's trust relationship.
Setting the External ID is required for security.
The following figure outlines the configuration steps:
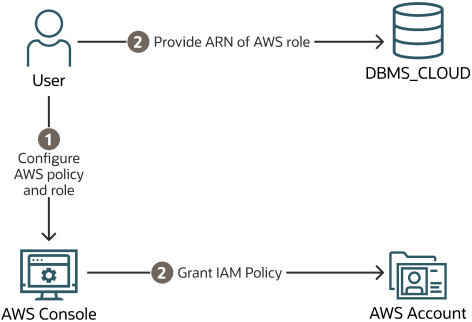
Description of the illustration adb_arn_config_steps.eps
Steps to Use ARNs with DBMS_CLOUD
Each AWS resource has its own identity, and the resource authenticates with the Autonomous AI Database instance using a DBMS_CLOUD credential that
you create with parameters that identify the ARN. Autonomous AI Database creates and secures
the principal credentials you use to access AWS resources.
To create a credential with ARN parameters to access AWS resources:
-
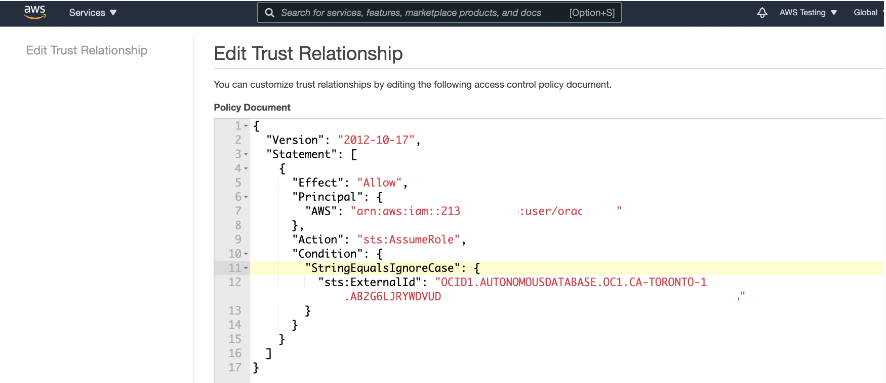
Perform prerequisite steps in the AWS Account: In your AWS account, from the AWS Management Console or using the CLI, create the roles and policies for the ARN that you use with Autonomous AI Database and update the trust relationship for the role. The Oracle user ARN is configured when the trust relationship for the role is updated.
See Perform AWS Management Prerequisites to Use Amazon Resource Names (ARNs) for more information.
-
Perform prerequisite steps on Autonomous AI Database: On Autonomous AI Database you must enable the ADMIN user or another user to use credentials with ARN parameters to access AWS resources.
See Perform Autonomous AI Database Prerequisites to Use Amazon ARNs for more information.
-
Create credentials with
DBMS_CLOUD.CREATE_CREDENTIALand supply the parameters that identify an AWS role. Using the credential object, Autonomous AI Database can access AWS resources as specified in the policies defined for the role in the AWS account.See Create Credentials with ARN Parameters to Access AWS Resources for details on these steps.
-
Use the credential object you created in the previous step with a
DBMS_CLOUDprocedure or function that takes a credential parameter, such asDBMS_CLOUD.COPY_DATAorDBMS_CLOUD.LIST_OBJECTS.
Parent topic: Use Amazon Resource Names (ARNs) to Access AWS Resources
Perform AWS Management Prerequisites to Use Amazon Resource Names (ARNs)
Using
the AWS Management Console or using the APIs, create an AWS user, role, policies, and trust
relationship. You perform these steps before you use with DBMS_CLOUD.CREATE_CREDENTIAL to create a credential with an
ARN parameter on Autonomous AI Database.
To use an ARN to access AWS resources your AWS administrator defines the policies and a principal that allows you to access AWS resources. For example, while using Autonomous AI Database you might want to access data from an S3 bucket, perform some operation on the data, and then write the modified data back to the S3 bucket.
Depending on your existing AWS configuration and the External ID you use, you do not need to create a new role and policy for each Autonomous AI Database instance. If you already have an AWS role containing the necessary policy to access a resource, for example to access S3 cloud storage, you can modify the trust relationship to include the details in Step 3. Likewise, if you already have a role with the necessary trust relationship, you can use that role to access all of your databases in an OCI compartment or tenancy if you use an external ID that specifies the compartment OCID or tenancy OCID.
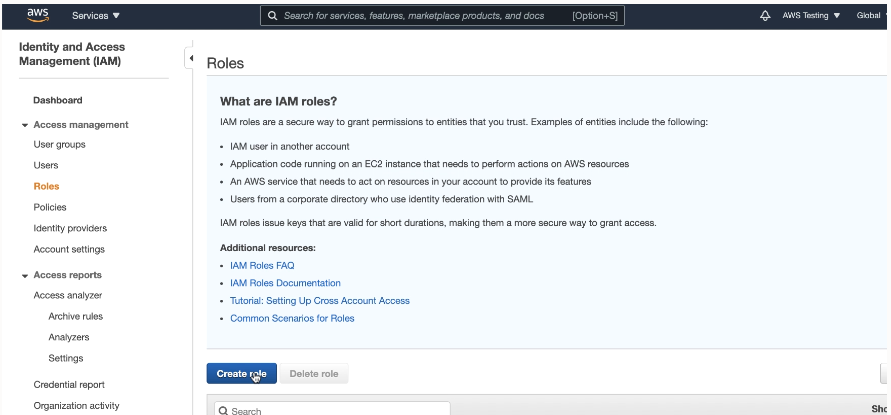
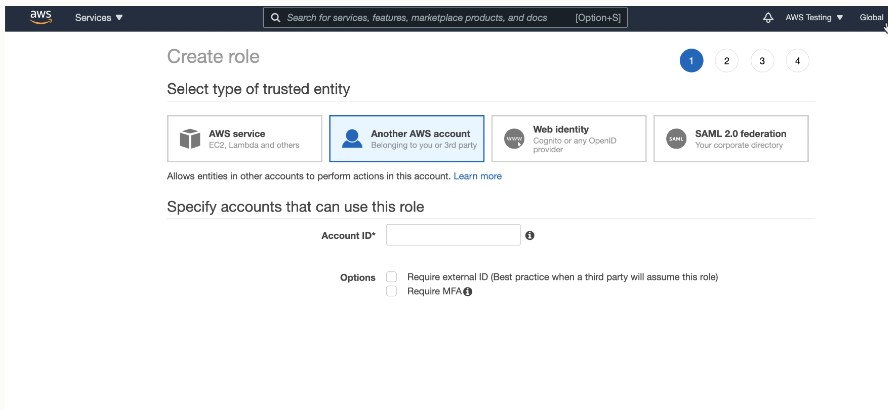
From the AWS Management Console or using the APIs, an AWS administrator performs the following steps:
After the ARN role configuration is finished, you can enable ARN on the instance. See Perform Autonomous AI Database Prerequisites to Use Amazon ARNs for more information.
Parent topic: Use Amazon Resource Names (ARNs) to Access AWS Resources
Perform Autonomous AI Database Prerequisites to Use Amazon ARNs
Prior to
using an AWS resource with DBMS_CLOUD.CREATE_CREDENTIAL with an ARN parameter, the ADMIN user must enable ARN on the Autonomous AI Database instance.
By default, ARN credential services are not enabled on Autonomous AI Database. The ADMIN user runs the procedure DBMS_CLOUD_ADMIN.ENABLE_PRINCIPAL_AUTH to enable the
ADMIN user or other users to create
credentials with ARN parameters.
After you enable ARN on the
Autonomous AI Database instance by running DBMS_CLOUD_ADMIN.ENABLE_PRINCIPAL_AUTH,
the credential named AWS$ARN is available to use
with any DBMS_CLOUD API that takes a
credential as the input. Except for the credential named AWS$ARN, you can
also create additional credentials with ARN parameters to access AWS resources. See
Create Credentials with ARN Parameters to Access AWS Resources for more information.
Parent topic: Use Amazon Resource Names (ARNs) to Access AWS Resources
Create Credentials with ARN Parameters to Access AWS Resources
After ARN usage is enabled for the Autonomous AI Database instance and the ARN is configured by the AWS administrator, on Autonomous AI Database you can create a credential object with ARN parameters.
Autonomous AI Database creates and secures the
principal credentials you use to access the Amazon resources when you supply the
credential object with DBMS_CLOUD procedures and functions.
To use Amazon resources with Autonomous AI Database, do the following:
Parent topic: Use Amazon Resource Names (ARNs) to Access AWS Resources
Update Credentials with ARN Parameters for AWS Resources
The ARN credentials you use on Autonomous AI Database work with the AWS token service that enables you to use temporary role based credentials to access to AWS resources from Autonomous AI Database.
When an AWS Administrator revokes the policies, roles, or trust relationship, you need to either update the credentials or create new credentials to access the AWS resources.
Perform the following steps to update credentials:
See UPDATE_CREDENTIAL Procedure and CREATE_CREDENTIAL Procedure for more information.
Parent topic: Use Amazon Resource Names (ARNs) to Access AWS Resources
