Managing Integrations
Discover and manage the services that are integrated with your Fusion Applications environments.
When you provision an environment, additional services are provisioned and integrated with your Fusion Applications. These services extend the functionality of your applications. The set of additional services that are provisioned varies depending on the subscriptions (or SKUs) you purchased and the type of environment (production or non-production). The Integrations feature of environment management lets you discover and manage these additional services from a single interface.
After your environment is provisioned, you can add integration with Fusion Data Intelligence, if you have purchased the subscription.
Accessing Integrated Services
The policy that allows you to manage Fusion Applications environments includes permissions to view the auto-provisioned integrated services and to manage the service instances. If you are customizing a policy for environment management, ensure that you include the statements necessary to work with integrated service instances.
When the integrated services are provisioned during Fusion Applications environment creation, the user who is provisioning the environment is also set up as the Service Administrator of the integrated applications. The policies that allow you to manage the service instances do not give you access to sign in and use the applications. To add users to the integrated applications, see Managing Users for Integrated Applications.
Services Automatically Provisioned with Fusion Applications
The services are provisioned and integrated depend on the subscriptions you purchased and the type of environment (production, test, or development). Integrated services are provisioned in the same region and compartment as the Fusion Applications environment. The following table lists the auto-provisioned integrated services and the subscriptions they're included with:
| Service | Provisioned with | Environments |
|---|---|---|
| Oracle Digital Assistant | ERP, Sales & Service, and HCM | Production and non-production |
| Oracle Visual Builder Studio (VB Studio) | ERP, Sales & Service, and HCM | One instance is provisioned for the test environment. |
| Visual Builder Cloud Service (VBCS) | Sales & Service for Enterprise, Premium, and Partners Cloud Service | Production and non-production |
| Oracle Integration Cloud (OIC) | Permitting and Licensing | Production and non-production |
Viewing Integrated Services
The Integrations panel of the environment details page displays services that were provisioned with your Fusion Applications environment. From the Integrations panel you can:
- View the list of services that are integrated with your environment.
- Navigate directly to the details of the integrated service instance, where you can perform management tasks for the integrated service instance. For example, you can navigate to the Digital Assistant service instance details to monitor, configure, and manage the instance.
- Link directly to the application where you can log in to use the application service console.
To view integrations
- Follow the step-by-step guide on the user interface of the Console: On the Overview page, under Guided learning find the Integrations tile and select View details. You are provided step-by-step assistance to perform the task. To exit the task at any point, select Close. You can submit your feedback about the guided task after you close or complete it.
- Use the following procedure on the Console:
- Navigate to the environment: On the Applications Home under My applications, select Fusion Applications , and then select the environment name. The environment details page is displayed.
- On the environment details page, under Resources, select Integrations. The services and applications integrated with the environment are displayed.
- To view or edit the service instance: Select the name of the integration. You must have permissions to work with the service to access the service instance details page. See Accessing Integrated Services for more information. For information about managing the service instance, see the service-specific documentation:
- To visit the application-specific Console: Select the Application URL to access the application. You will be automatically logged in with the credentials you used to sign in to the Cloud Console, or prompted to sign in. You must be added as a user to the application to sign in. If you provisioned the Fusion Applications environment, you are automatically added as the Service Administrator. Other users must be added. See the service-specific documentation for adding users.
Self-Service Integration with Oracle Fusion Data Intelligence
After your Fusion Applications environment is provisioned, you can add integration with Fusion Data Intelligence.
Prerequisites
Before you add the integration to Oracle Fusion Data Intelligence:
- Ensure that your Fusion Applications environment is on version 23B or later. The version is displayed in the header information on the environment details page.
-
Review requirements for Fusion Data Intelligence .
To add the integration with Fusion Data Intelligence
- Navigate to the environment: On the Applications Home under My applications, select Fusion Applications , and then select the environment name. The environment details page is displayed.
- On the environment details page, under Resources, select Integrations.
- Click Add Fusion Data Intelligence, and then select Continue to confirm.
- Complete the fields on the Create Instance - Fusion Data Intelligence form. For help completing these fields, see Create an Integrated Oracle Fusion Data Intelligence Instance.
After the instance creation is complete, a domain administrator must assign users to the FAW system groups created during the instance provisioning process. For more information about the Fusion Data Intelligence groups, see About Groups.
Detaching an Integration
A few services are provisioned automatically with your environment. These services are required for your Fusion Applications to function properly. You can view these integrations and link directly to the service-specific Consoles, but you can't detach them. You can only detach the integrations that are self-service provisioned.
When you detach an integration, the service instance is not deleted, and it continues to run. You can still access the service Console through its URL. However, the functionality is no longer available to your Fusion Applications. After you detach an integration from an environment, you can't integrate the service instance with any other Fusion Applications environments using the Integrations feature. You can still manually integrate the service instance with an environment.
To detach an integration
You can't detach services that were automatically provisioned with your environment.
- Navigate to the environment: On the Applications Home under My applications, select Fusion Applications , and then select the environment name. The environment details page is displayed.
- On the environment details page, under Resources, select Integrations. The services and applications integrated with the environment are displayed.
- Select the of the integration you want to detach.
- Select Detach.
Managing Users for Integrated Applications
Manage users and groups of the integrated service applications in the associated identity domain. A link to the associated identity domain is displayed at the top of the Integrations panel in the environment details page:

For details about identity domains, see Working with Identity Domains.
Application users are granted access through predefined roles, such as Service Administrator, Service Developer, and Service User. Following is a sample procedure for creating a group, creating a user in the group, and assigning the group to an application role. You can also use the same procedure to assign a user directly to a role. See the application-specific documentation for more information about the available roles and any other specific details for managing users in each integrated application.
You use the same interface to assign groups, users, or applications to a role. See Step 4.
- Select the Associated identity domain identifier link to navigate to the identity domain.
- Create a group:
- Select Groups.
- Follow the instructions in Creating a Group to create a group for this role. For example, OIC-Service-Administrators.
- Navigate back to the identity domain details by selecting the domain breadcrumb link at the top of the page.
- Create a user and assign them to the group:
- Select Users.
- Follow the instructions in Creating a User to create the user. In the Create user page, select the group you created in the previous step to assign the user to the group.
- Navigate back to the identity domain details by selecting the domain breadcrumb link at the top of the page.
-
Assign the group to a role (recommended). You can also use this procedure to add a user or application to a role.
- On the Identity domain details page, select Oracle Cloud Services. Select the Cloud Service application that you want to grant access to. Some of the Cloud Service names include generated prefixes or suffixes. Use the description to verify your selection.
- On the Application details page, select Application roles.
- Find the role you want to add the group, user, or application to and then select the down arrow at the end of the row to expand the display.
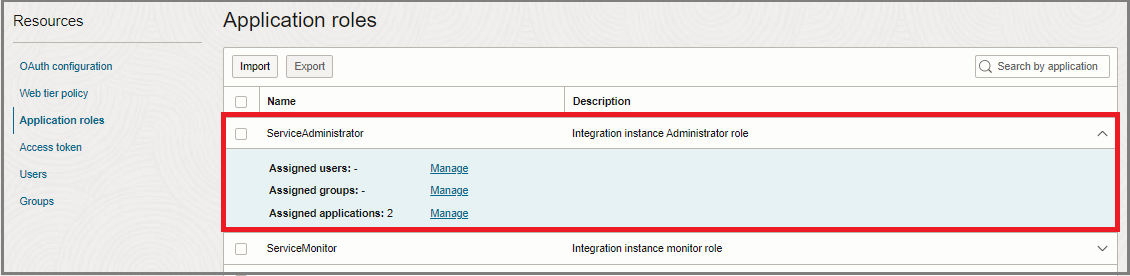
- Next to Assigned groups, select Manage.
- Select Show available groups.
- Select the check box next to the group and then select Assign. The group is now listed in the Assigned groups table.
- Select Close.